

Intermediate
Build a dApp on MultiversX
Welcome to the tutorial on how to build a decentralized application (dApp) on MultiversX. MultiversX is a blockchain platform that enables developers to quickly and easily create decentralized applications that are secure, fast, and scalable. In this tutorial, we will walk you through the steps to build a dApp on MultiversX, from setting up the development environment to deploying the dApp on the blockchain.
Whether you are a seasoned blockchain developer or just starting out, this tutorial will help you understand the basics of building a dApp on MultiversX and provide you with the tools to create your own applications on this platform. So let’s get started!
Application Layer (The Frontend)
For the web app we’ll have two pages:
-
The Sign in page – here we can authenticate with ledger, web wallet or Maiar Wallet
-
The Dashboard page – here we can either ping or pong, if we already deposited, then we will see a countdown timer until the time interval clears out.
Blockchain Layer (The Backend)
We will create a smart contract that can handle the deposit (ping), claim (pong), and status actions (did_user_ping, get_time_to_pong). Let’s say that, for now, this smart contract plays the role of an API in a dApp. Also, this is where our business logic resides.
The MultiversX devnet is a public test network maintained by our community where any developer can test their smart contracts and dApps in a real world environment.
Set up the environment
Project Structure
Setup the environment
First, let’s create a new folder for our project, I’ll name it ping-pong.
mkdir -p ping-pong/wallet
cd ping-pong/wallet
In the end, we’ll have three subfolders: wallet, contract, and dapp. For convenience, we’ll save our owner’s wallet Keystore in the wallet folder.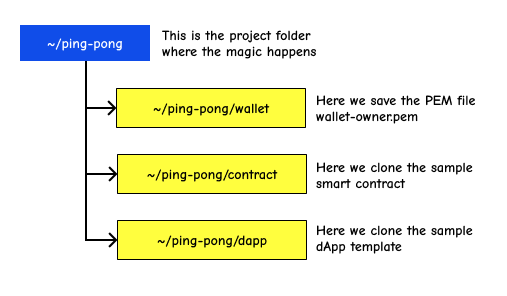
Software Prerequisites
Software prerequisites
In our example, we’ll use Ubuntu 20.04. MacOS works as well (skip to the last paragraph in this section). We’ll need to install python 3.8, python-pip, and libncurses5. For the frontend application, we’ll use an app template based on React JS, so we will need nodejs and npm.
First, we make sure the operating system prerequisites are installed:
sudo apt-get update
sudo apt install libncurses5 build-essential python3-pip nodejs npm python3.8-venv
We’ll also need erdpy, the Elrond command line tool, which is helpful for signing transactions, deploying smart contracts, and managing wallets, accounts, and validators. We’ll use it to deploy our smart contract. Erdpy can be installed using the Elrond documentation page Installing mxpy • MultiversX Docs
We’ll download the erdpy installer and run it
wget -O erdpy-up.py https://raw.githubusercontent.com/ElrondNetwork/elrond-sdk-erdpy/master/erdpy-up.py
python3 erdpy-up.py
Restart the user session to activate erdpy
source ~/.profile
In order to install erdpy on MacOs, you need to make sure you have installed python 3.8 and pip on your system. Then, install the latest erdpy version, using pip.
pip3 install --user --upgrade --no-cache-dir erdpy
If you encounter any error relating to pynacl package, make sure you have libsodium installed.
brew install libsodium
Create an owner wallet
We now have all the prerequisites installed, let’s create an owner’s wallet PEM file.
The smart contract can only be deployed on the blockchain by an owner, so we will create an owner wallet here. The owner can also update the contract, later on, if needed.
Let’s head over to the Elrond wallet, click “Create new wallet”, and write down the security phrase (24 words) that can help us retrieve the wallet, and the password for the JSON Keystore (that we will save in the ~/ping-pong/wallet folder). We should be able to see our new Elrond wallet owner address which is, in this case, erd1…….
We can also generate a private key PEM file, like this, we won’t need to enter our wallet password each time we want to confirm a transaction.
1cd ~/ping-pong/wallet

2erdpy --verbose wallet derive ./wallet-owner.pem --mnemonic

3
We will enter our 24 secret words when prompted and a new PEM file will be created. This command requires that you enter all 24 words each separated by a space.
In order to initiate transactions on the blockchain, we need some funds, every transaction costs a very small fee, on the blockchain, this is called gas. On the devnet wallet, we have a faucet that allows you to get free test funds for our applications. We can request 10 xEGLD every 24 hours, so let’s request 10 xEGLD now. We now check if the transaction was successful, and yes, we see that we now have 10 xEGLD in our devnet wallet.
The Blockchain Layer – The Smart Contract
Our owner wallet is completely set now, we can move on to our backend, the blockchain layer.
Clone the template
Clone the Ping-Pong Sample Smart Contract
Let’s start with our smart contract. We’ll first clone the sample contract repository from here ![]() GitHub – multiversx/mx-ping-pong-sc
GitHub – multiversx/mx-ping-pong-sc
cd ~/ping-pong
git clone https://github.com/ElrondNetwork/ping-pong-smart-contract contract
cd contract/ping-pong
Build the Smart Contract
We now have the source code for the smart contract, but we need to compile it into a binary that the Elrond Virtual Machine can run. The VM can run Web Assembly code, so we need to compile our Rust source code into Web Assembly (WASM).
Run the following command in order to build the rust smart contract into a wasm file.
erdpy contract build
On the last line of the output we’ll have:
INFO:projects.core:WASM file generated: output/ping-pong.wasm
After running this command line, we see that a wasm file was generated. This file contains the runtime code for our smart contract.
Customize and Deploy
Deploy the smart contract on Elrond Devnet Next step is to deploy the contract to the blockchain.
Customize the variables
Optionally we can customize the default params in erdpy.json:
{
    "configurations": {
        "default": {
            "proxy": "https://devnet-api.elrond.com",
            "chainID": "D"
        }
    },
    "contract":{
        "deploy":{
            "verbose": true,
            "bytecode": "output/ping-pong.wasm",
            "recall-nonce": true,
            "pem": "../../wallet/wallet-owner.pem",
            "gas-limit": 60000000,
            "arguments": [1000000000000000000, 600],
            "send": true,
            "outfile": "deploy-testnet.interaction.json"
        }
     }
}
Make sure your owner wallet PEM file is in the right folder, the smart contract is built and let’s get to the deployment. For now, let’s continue with the default values. We will run:
erdpy contract deploy
We’ll take a look at the log output. We have 2 elements that need our attention: the contract address and the transaction hash. Let’s check them in the Devnet Explorer.
Devnet Explorer will be your best friend in developing dApps on the Elrond Blockchain, as you’ll first deploy and test your dApps on Devnet.
INFO:accounts:Account.sync_nonce() INFO:accounts:Account.sync_nonce() done: 32 INFO:cli.contracts:Contract address: erd1qqqqqqqqqqqqqpgq0hmfvuygs34cgqsvgg6fpq9c5mffh4y04cysagr6cn INFO:utils:View this contract address in the Elrond Devnet Explorer:  MultiversX (previously Elrond) Explorer INFO:transactions:Transaction.send: nonce=32 INFO:transactions:Hash: ee84f3e833d439e159c9619fd76e26d2afcdad62c197d87e4940072f18558153 INFO:utils:View this transaction in the Elrond Devnet Explorer: MultiversX (previously Elrond) Explorer
The smart contract is now deployed on the blockchain. We can interact with it using blockchain transactions in order to invoke smart contract functions ping or pong.
The smart contract source code resides in ping-pong-smart-contract/ping-pong/src/ping_pong.rs
There are two main functions: ping and pong, these are invoked using blockchain transactions.
We also have two other functions defined in the smart contract: get_time_to_pong and did_user_ping, these view functions are invoked using Elrond API (https://devnet-api.elrond.com/vm-values/query).
The Application Layer – The Web App
All right, let’s move on to the application layer.
Clone the Sample App
We will clone a very simple dApp template that implements the calls to our newly deployed smart contract.
git clone https://github.com/ElrondNetwork/dapp-template dapp
cd dapp
Configure the app
Customize the Smart Contract Address
nano src/config.tsx
We’ll take a look at the first instruction:
export const contractAddress =
  'erd1qqqqqqqqqqqqq...';
and we’ll change it to our contract address that was shown after erdpy contract deployment:
export const contractAddress =
'erd1qqqqqqqqqqqqqpgq0hmfvuygs34cgqsvg...ffh4y04cysagr6cn';
Save and close config.tsx and we’re ready for the first build.
Build the dApp
We’ll first install the dependencies:
npm install
and then we’ll start a development server to test our new dApp
npm run start
Run it on the local machine (or host it on your server) If you start the development server on the local machine, then open http://localhost:3000 in your browser. If you start it on your own server, then you can access http://:3000. The built version only contains static files, so any hosting provider will do.
After you start the development server, when you see the Sign in screen, this means the application is up and running.
Test Your Application
We will sign in with a test wallet. You can reuse the same owner’s wallet if you want to, or create a new one, following the same steps you followed when creating the owner’s wallet.
Ping Feature
After signing in, we’ll see the dashboard where we can see the Ping button.
Click the Ping button and you’ll be redirected to the authentication page on the web wallet, maiar wallet, or your authentication device. A new transaction will be created and you’ll be asked to confirm it. This transaction transfers the balance from your wallet to the smart contract address. Those funds will be locked for a specified period of time. Pay attention to the data field, where we call the smart contract function ping. After you confirm the transaction, a success message will appear and the funds are locked.
Wait the time interval You can see the amount of time you’ll have to wait until you can pong.
Pong Feature
After the time interval has passed, you can claim the funds by clicking the Pong button. Another blockchain transaction will wait to be processed, this time the amount will be zero, as we only have to invoke the pong function (specified in the data field). The transaction will trigger a success message and the funds will be returned to the wallet.