Intermediate
Connecting to Baobab
Welcome to our tutorial on connecting to Baobab, a testnet for the Klaytn blockchain network. In Klaytn, Baobab is a test environment that allows developers and researchers to test their applications and smart contracts on a testnet before deploying them on the mainnet. Connecting to Baobab is a crucial step in the development process, as it allows developers to test their applications in a realistic environment and ensure they are functioning correctly before deploying them on the mainnet. In this tutorial, we will explore the process of connecting to Baobab, including the necessary software and configuration steps, and best practices for testing and debugging your applications on the testnet. Whether you are a developer, researcher, or simply a blockchain enthusiast, this tutorial will provide valuable insights and hands-on experience in connecting to Baobab, Klaytn’s testnet.
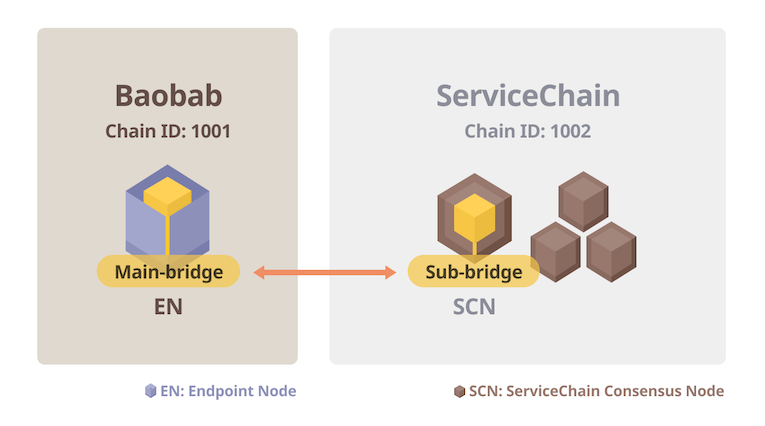
This section covers how to connect your 4-node ServiceChain network to the Baobab network. You will set up a Baobab EN and connect the EN with one of your SCNs. Then you will enable the anchoring feature to put ServiceChain block information onto the Baobab network.

Step 0: Install Baobab EN
The installation is the uncompression of the downloaded package. Extract the archive on the EN server.
EN-01$ tar xvf ken-baobab-vX.X.X-XXXXX-amd64.tar.gz
Step 1: Preparing genesis.json
From the EN server, download the genesis.json for Baobab network.
EN-01$ curl -X GET https://packages.klaytn.net/baobab/genesis.json -o ~/genesis.json
Step 2: EN Node Initialization
Now, we will initialize the EN node using the genesis file. Execute the following command. It will create the data folder storing the chain data and logs on your home directory. You can change the data folder using the --datadir directive.
EN-01$ ken --datadir ~/data init ~/genesis.json
Step 3: Configure the EN Node
Go to the ken installation folder and rename mv kend_baobab.conf kend.conf, then edit conf/kend.conf as follows.
...
NETWORK="baobab"
...
SC_MAIN_BRIDGE=1
...
DATA_DIR=~/data
...
Step 4: Start the EN Node
EN-01$ kend start
Starting kscnd: OK
You can check the block sync status by watching klay.blockNumber. If this number is not 0, the node is working fine. Downloading all blocks on the Baobab network may take a long time depending on network conditions and hardware performance
EN-01$ ken attach --datadir ~/data
> klay.blockNumber
21073
You can check the block sync status by watching klay.blockNumber. If this number is not 0, the node is working fine. Downloading all blocks on the Baobab network may take a long time depending on network conditions and hardware performance
EN-01$ ken attach --datadir ~/data
> klay.blockNumber
21073
If you want to stop a node, you can use the command kend stop.
Step 5: Check the KNI of EN Node
Take note of EN-01’s KNI which is the information used to connect from an SCN-L2-01 node. This value will be used in the next step when generating main-bridges.json.
EN-01$ ken attach --datadir ~/data
> mainbridge.nodeInfo.kni
"kni://0f7aa6499553...25bae@[::]:50505?discport=0"
Step 6: Create main-bridges.json
Log on to an SCN-L2-01 (note: not the EN-01 node) and create main-bridges.json on ~/data. Replace [::] located after @ letter with EN-01 node’s IP address.
SCN-L2-01$ echo '["kni://0f7aa6499553...25bae@192.168.1.1:50505?discport=0"]' > ~/data/main-bridges.json
Step 7: Configure SCN then Restart kscn
From the SCN-L2-01 node’s shell, edit kscn-XXXXX-amd64/conf/kscnd.conf. If SC_SUB_BRIDGE is set to 1, data anchoring starts automatically when the SCN-L2-01 node starts. In this example, SC_PARENT_CHAIN_ID is set to 1001 because the chainID of the parent chain, Baobab, is 1001. SC_ANCHORING_PERIOD is the parameter that decides the period to send an anchoring tx to the main chain. By setting the value to 10, you configure the node to perform anchoring every 10 blocks. The default value is 1.
...
SC_SUB_BRIDGE=1
...
SC_PARENT_CHAIN_ID=1001
...
SC_ANCHORING_PERIOD=10
...
Restart kscn by executing the following command:
SCN-L2-01$ kscnd stop
Shutting down kscnd: Killed
SCN-L2-01$ kscnd start
Starting kscnd: OK
Check if the SCN-L2-01 is connected to the EN-01 by checking subbridge.peers.length
SCN-L2-01$ kscn attach --datadir ~/data
> subbridge.peers.length
1
Anchoring
After finishing the EN-01 and SCN-L2-01 connection, you can log ServiceChain block information on the parent chain via Anchoring. In this section, you will top up a parent operator account, enable Anchoring, and check the anchored block number.
Step 1: Get KLAY to test anchoring
Anchoring requires SCN-L2-01 to make an anchoring transaction to Baobab. So subbridge.parentOperator account should have enough KLAY to pay the transaction fee. Get some KLAY from Baobab Wallet Faucet and transfer some KLAY to the parentOperator. For data anchoring in real service, parentOperator needs to have enough KLAY for transaction fees.
SCN-L2-01$ kscn attach --datadir ~/data
> subbridge.parentOperator
"0x3ce216beeafc62d20547376396e89528e1d778ca"
Step 2: Start Anchoring
To start anchoring, execute the following command:
SCN-L2-01$ kscn attach --datadir ~/data
> subbridge.anchoring(true)
true
After anchoring starts, you can check the latest block anchored to Baobab by using subbridge.latestAnchoredBlockNumber. Please note that this only works after the EN already followed up on the latest block of Baobab. By default, SCN-L2-01 tries anchoring on every block from the block on which anchoring is turned on. The anchoring period can be set by changing SC_ANCHORING_PERIOD. If the value is set to 10, the node tries anchoring when the block number is a multiple of 10.
SCN-L2-01$ kscn attach --datadir ~/data
> subbridge.latestAnchoredBlockNumber
100
With this, you complete this workshop successfully!!
