
Intermediate
Custom RPC in Unity SDK and How to build the scenes to login
This tutorial provides an introduction to custom RPC methods that can be used in the Unity SDK, including an example of connecting to Cronos and any EVM compatible blockchain, and executing a smart contract method without altering the smart contract state. The tutorial also includes an example of building scenes to login and load a player’s NFT assets. The ImportNFTTextureCronos.cs file is updated with code to ensure that the NFT loads conditionally after successfully connecting to a wallet. The tutorial concludes with instructions on building the scenes using the WebGL method and selecting the Cronos DefiWallet Template in the Player -> Resolution and Presentation settings. Upon successful completion, users can log in to their DefiConnect wallet and the scene will load any textures from NFT assets they own on successful login.
Custom RPC
A standard interface for custom RPC methods.
This section contains an introduction to custom methods that can be used in the Unity SDK. For additional operations and methods please refer to the ChainSafe Documentation.
Example of Custom RPC
Connect to Cronos and any EVM compatible blockchain by providing an RPC. All methods have an optional field to add an RPC URL.
string chain = "cronos";
string network = "mainnet"; // mainnet or testnet
string account = "WALLET_ADDRESS";
string rpc = "https://evm-dev.cronos.org"; // test: https://evm-dev-t3.cronos.org/

string balance = await EVM.BalanceOf(chain, network, account, rpc);
print(balance);
Call Custom Contracts
Call will execute a smart contract method without altering the smart contract state.
// SPDX-License-Identifier: MIT
pragma solidity ^0.8.0;

contract AddTotal {
    uint256 public myTotal = 0;

    function addTotal(uint8 _myArg) public {
        myTotal = myTotal + _myArg;
    }
}lid
string chain = "cronos";
string network = "mainnet"; // mainnet or testnet
string method = "myTotal"; // smart contract method to call
string abi = "[ { \"inputs\": [ { \"internalType\": \"uint8\", \"name\": \"_myArg\", \"type\": \"uint8\" } ], \"name\": \"addTotal\", \"outputs\": [], \"stateMutability\": \"nonpayable\", \"type\": \"function\" }, { \"inputs\": [], \"name\": \"myTotal\", \"outputs\": [ { \"internalType\": \"uint256\", \"name\": \"\", \"type\": \"uint256\" } ], \"stateMutability\": \"view\", \"type\": \"function\" } ]";
string contract = "CONTRACT_ADDRESS";
string args = "[]";

string response = await EVM.Call(chain, network, contract, abi, method, args);
print(response);
Login Example
This section will illustrate how to build the scenes to login and load a player’s NFT assets.
NOTE In order to use the Cronos Network, you will have to add the Network ID and Name in the network.js file in the Assets/WebGLTemplates/Web3GL-2020x/ folder.
Import NFT
To ensure that the NFT loads conditionally after successfully connecting to a wallet, you can update the ImportNFTTextureCronos.cs file with the content below.
using System.Collections;
using System.Collections.Generic;
using System.Threading.Tasks;
using UnityEngine;
using UnityEngine.Networking;

public class ImportNFTTextureCronos : MonoBehaviour
{
    public class Response {
        public string image;
    }

    async void Start()
    {
        string chain = "cronos";
        string network = "mainnet"; // mainnet or testnet
        string account = "WALLET_ADDRESS"; // PlayerPrefs.GetString("Account");
        string contract = "CONTRACT_ADDRESS";
        string tokenId = "TOKEN_ID";

        string ownerOf = await ERC721.OwnerOf(chain, network, contract, tokenId);

        if (ownerOf == account)
        {
            // fetch uri from chain
            string uri = await ERC721.URI(chain, network, contract, tokenId);
            print("uri: " + uri);

            // fetch json from uri
            UnityWebRequest webRequest = UnityWebRequest.Get(uri);
            await webRequest.SendWebRequest();
            Response data = JsonUtility.FromJson<Response>(System.Text.Encoding.UTF8.GetString(webRequest.downloadHandler.data));

            // parse json to get image uri
            string imageUri = data.image;
            print("imageUri: " + imageUri);

            // fetch image and display in game
            UnityWebRequest textureRequest = UnityWebRequestTexture.GetTexture(imageUri);
            await textureRequest.SendWebRequest();
            this.gameObject.GetComponent<Renderer>().material.mainTexture = ((DownloadHandlerTexture)textureRequest.downloadHandler).texture;
        }
    }
}
If you are using IPFS please replace IPFS with an HTTPS call as seen below
Replace IPFS
if (uri.StartsWith("ipfs://"))
{
    uri = uri.Replace("ipfs://", "https://ipfs.io/ipfs/");
}
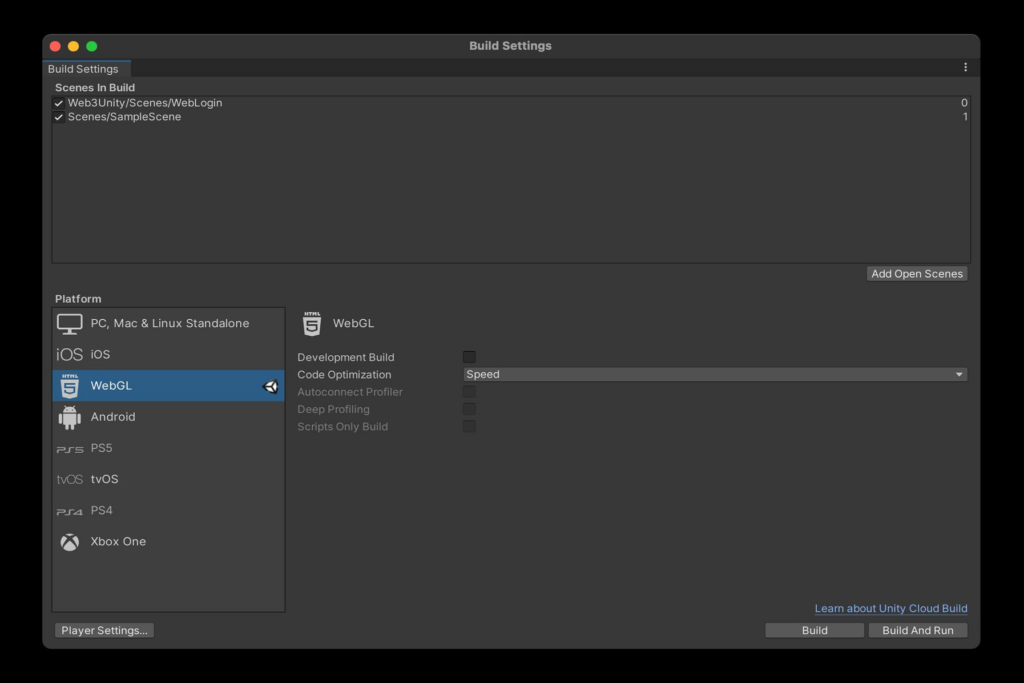
Build the Scenes
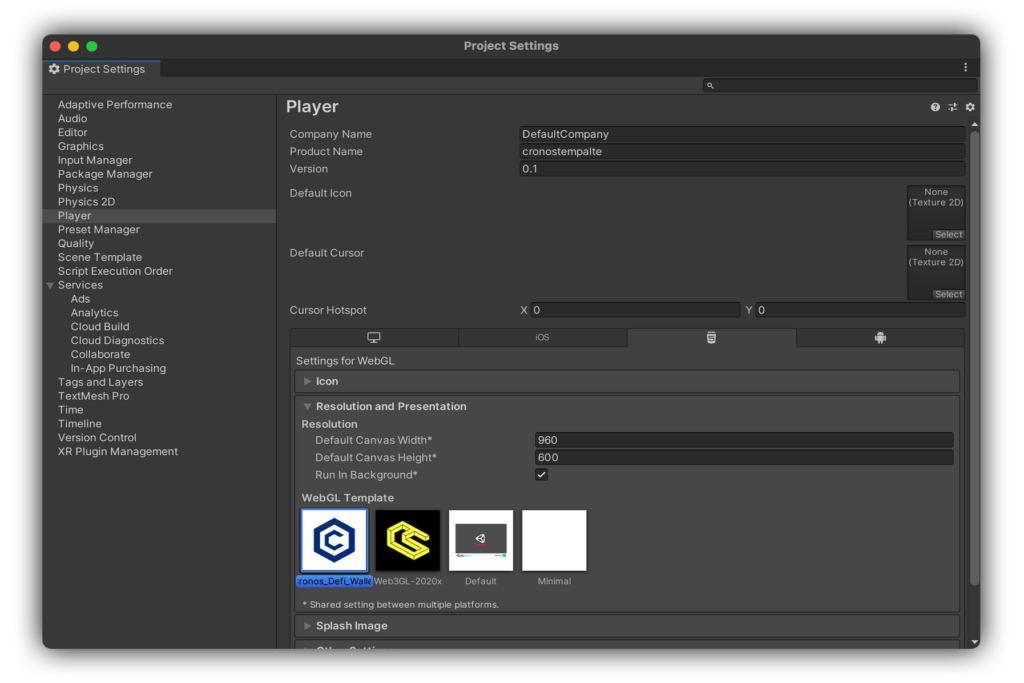
To build the Game Login example, you need to go to File/Build Settings and select your WebGL, IOS or Androi Build Settings. In this example, we will build using the WebGL method. To build with the DefiWallet option, you will have to select the Cronos DefiWallet Template in the Player -> Resolution and Presentation settings
NOTE Make sure to select the Cronos Defi Wallet Template in the Player -> Resolution and Presentation settings.
On successful completion, you will be able to log in to your DefiConnect wallet. The scene will load any textures from NFT assets you own on successful login.