Intermediate
How to create and deploy HRC721 token/NFT
This tutorial will take you through creating your own HRC721 or NFT. HRC721 is nothing but ERC721 deployed on Harmony.
This tutorial will guide you through the process of creating and deploying your own non-fungible token (NFT) on the Harmony testnet using the HRC721 standard and the OpenZeppelin Contracts library. The tutorial will cover setting up the contract metadata and images using IPFS, uploading the files to Pinata, a convenient IPFS API and toolkit, and using Remix to deploy the NFT contract. The tutorial also includes instructions for creating and uploading two JSON files, one for storing the metadata for all the tokens and one for storing metadata for an individual token. The tutorial is accompanied by a video tutorial, and it is recommended that readers have some knowledge of Solidity and web3.js, as well as a free Pinata account.
Overview
In this tutorial we will create a non-fungible token (NFT) and deploy to harmony testnet.
HRC721 is a standard for representing ownership of non-fungible tokens, that is, where each token is unique such as in real estate or collectibles.
We will use Presets contracts in OpenZeppelin Contracts to create an HRC721 and deploy using Remix.
Video Tutorial
Setting up the Contract Metadata and Images using IPFS
EIP-721 includes an optional metadata extension with a name, symbol and for each tokenID a tokenURI with can point to a JSON file with name, description and image for the given token ID.
For our example we will upload three files
HarmonyLogo.svg which stores the Image used for the token.
NFTTokenBaseURL.json which stores the metadata for all the tokens and is used when deploying the NFT contract.
NFTToken0.json which stores an instance of the metadata for Token0.
Uploading to IPFS
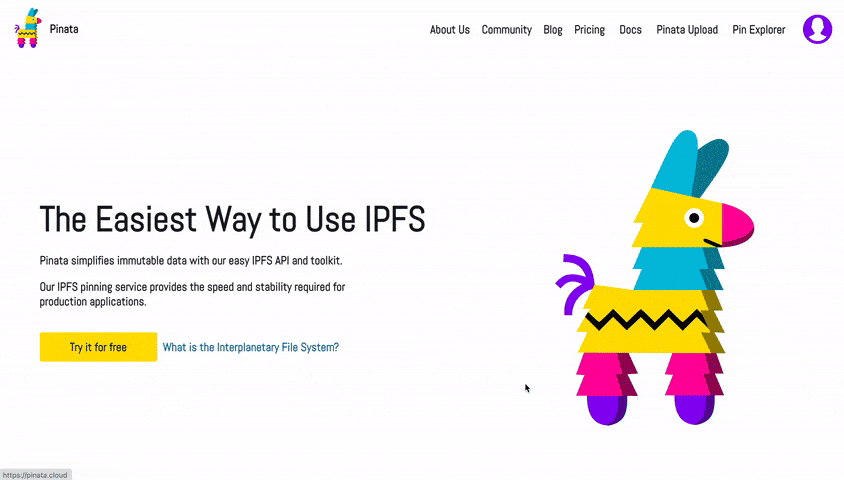
We will use Pinata, a convenient IPFS API and toolkit, to store our NFT asset and metadata to ensure our NFT is truly decentralized. If you don’t have a Pinata account, sign up for a free account here and complete the steps to verify your email.
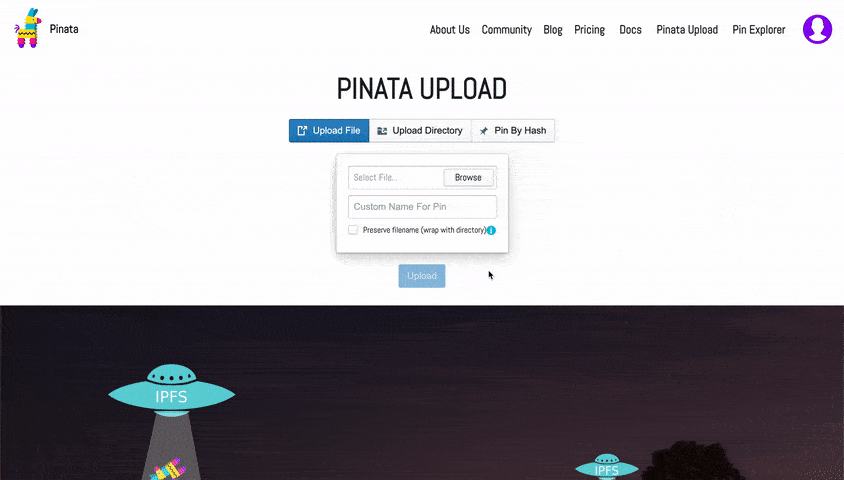
Once you’ve created an account:
-
Navigate to the “Pinata Upload” button on the top right
-
Upload an image to pinata – this will be the image asset for your NFT. Feel free to name the asset whatever you wish
-
After you upload, at the top of the page, there should be a green popup that allows you to view the hash of your upload —> Copy that hashcode. You can view your upload at: https://gateway.pinata.cloud/ipfs/<hash-code>
For the more visual learners, the steps above are summarized here:Now, we’re going to want to upload one more document to Pinata. But before we do that, we need to create it!
Feel free to change the data in the json files below. You can remove or add to the attributes section. Most importantly, make sure the image field points to the location of your IPFS image— otherwise, your NFT will include a photo of a (very cute!) Harmony Logo.
Once you’re done editing the json file, save it and upload it to Pinata, following the same steps we did for uploading the image.
Here is the information for the two json files
Note that the image field uses the value from the Harmony Logo we uploaded above.
On your local machine
Make a new file called NFTTokenBaseURL.json and add the following json code:
[
    {
      "id": 0,
      "description": "My NFT",
      "external_url": "https://forum.openzeppelin.com/t/create-an-nft-and-deploy-to-a-public-testnet-using-truffle/2961",
      "image": "https://gateway.pinata.cloud/ipfs/QmTTg77eKPFeKF1h75KdRrC9pTRKiMb34J9uXGzfj5xq6r",
      "name": "My NFT 0"
    },
    {
      "id": 1,
      "description": "My NFT",
      "external_url": "https://forum.openzeppelin.com/t/create-an-nft-and-deploy-to-a-public-testnet-using-truffle/2961",
      "image": "https://gateway.pinata.cloud/ipfs/QmTTg77eKPFeKF1h75KdRrC9pTRKiMb34J9uXGzfj5xq6r",
      "name": "My NFT 1"
    },
    {
      "id": 2,
      "description": "My NFT",
      "external_url": "https://forum.openzeppelin.com/t/create-an-nft-and-deploy-to-a-public-testnet-using-truffle/2961",
      "image": "https://twemoji.maxcdn.com/svg/1f40e.svg",
      "name": "My NFT 2"
    }
  ]
Make a new file called NFTToken0.json and add the following json code:
“id”: 0,
“description”: “My NFT”,
“external_url”: “https://forum.openzeppelin.com/t/create-an-nft-and-deploy-to-a-public-testnet-using-truffle/2961”,
“image”: “https://gateway.pinata.cloud/ipfs/QmTTg77eKPFeKF1h75KdRrC9pTRKiMb34J9uXGzfj5xq6r”,
“name”: “My NFT 0”
}
{
    "id": 0,
    "description": "My NFT",
    "external_url": "https://forum.openzeppelin.com/t/create-an-nft-and-deploy-to-a-public-testnet-using-truffle/2961",
    "image": "https://gateway.pinata.cloud/ipfs/QmTTg77eKPFeKF1h75KdRrC9pTRKiMb34J9uXGzfj5xq6r",
    "name": "My NFT 0"
  }
For our example we loaded the following two files
HarmonyLogo.svg at https://gateway.pinata.cloud/ipfs/QmTTg77eKPFeKF1h75KdRrC9pTRKiMb34J9uXGzfj5xq6r
NFTTokenBaseURL.json at https://gateway.pinata.cloud/ipfs/QmVkDbc6NPni1uzQq3gsiocUc3YGZjF7QGcM37hMcBqNmv
NFTToken0.json at https://gateway.pinata.cloud/ipfs/QmdAprJQmTtZ3vQLuorpuwJwyXs4YyC8Uh11hjsevCM5DC
Setting up the Remix Development Environment
Open Remix – Ethereum IDE in your favorite browser.
If you haven’t used Remix before, you need to setup plugins so that you can use the Solidity Compiler and Deploy and Run Transactions.
Select the Plugin Manager button on the bottom left under the Environments heading. If the Solidity Compiler is not already active, search for it and then press the activate button.
Add the Solidity Compiler Plugin
Importing the contract
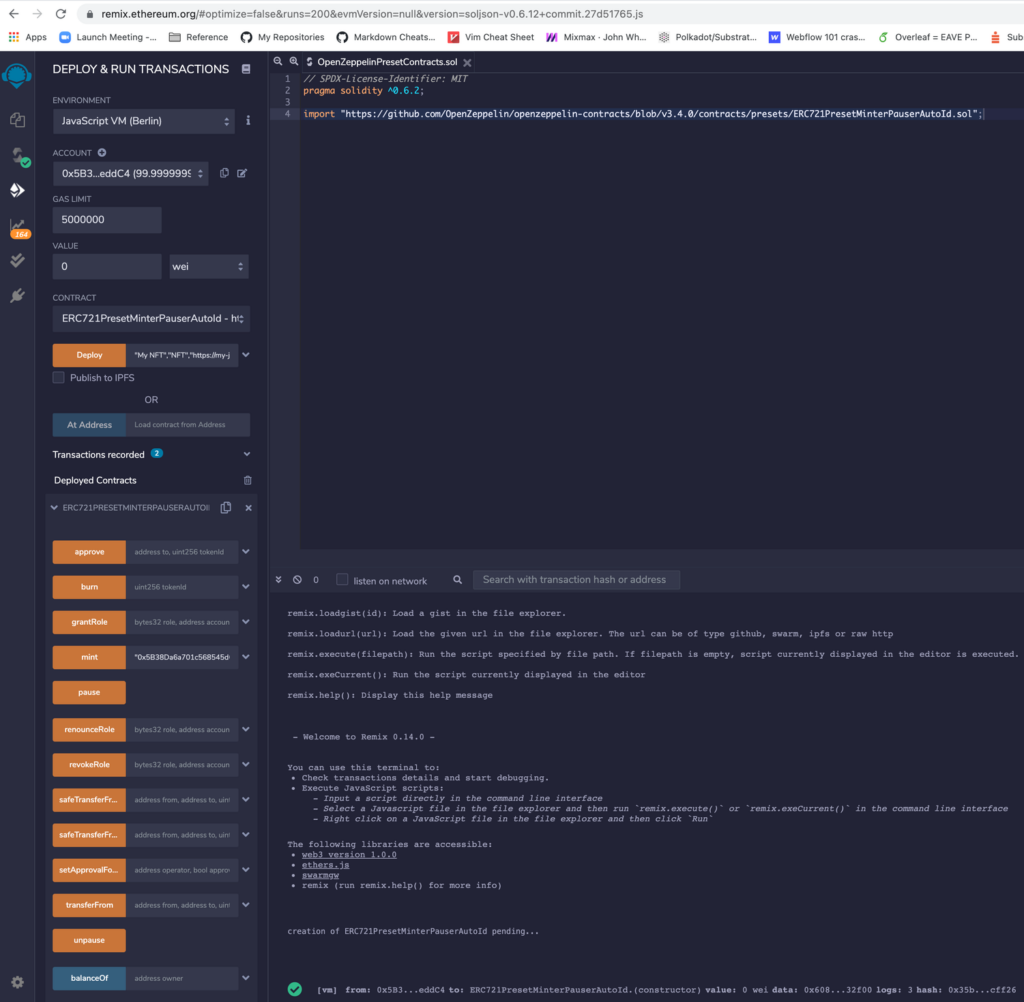
We are going to use Preset ERC721PresetMinterPauserAutoId which is an ERC721 that is preset so it can be minted, paused and burned.
We need to import ERC721PresetMinterPauserAutoId into Remix.
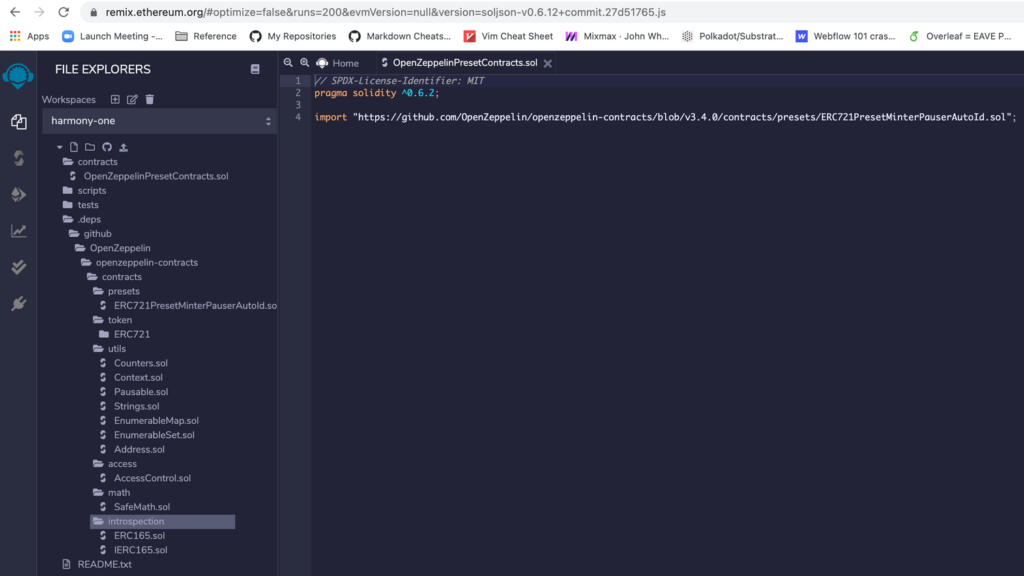
In the File Explorer press the ➕ to Create New File Call the new file OpenZeppelinPresetContracts.sol
In the new file add the import statement for ERC721PresetMinterPauserAutoId below.
We specify a minimum version of the Solidity compiler to use and import ERC721PresetMinterPauserAutoId from GitHub.
Note: When importing via GitHub, you should specify the release tag, otherwise you will get the latest code in the master branch. For OpenZeppelin Contracts you should only use code published in an official release. We will import OpenZeppelin Contracts v3.4.0. (for further instructions on how imports work in remix see Importing from GitHub 35 in the Remix documentation).
// SPDX-License-Identifier: MIT
pragma solidity ^0.8.4;

import "https://github.com/OpenZeppelin/openzeppelin-contracts/blob/v3.4.0/contracts/presets/ERC721PresetMinterPauserAutoId.sol";
Note when importing the contract it automatically inserts the contracts under dependencies.

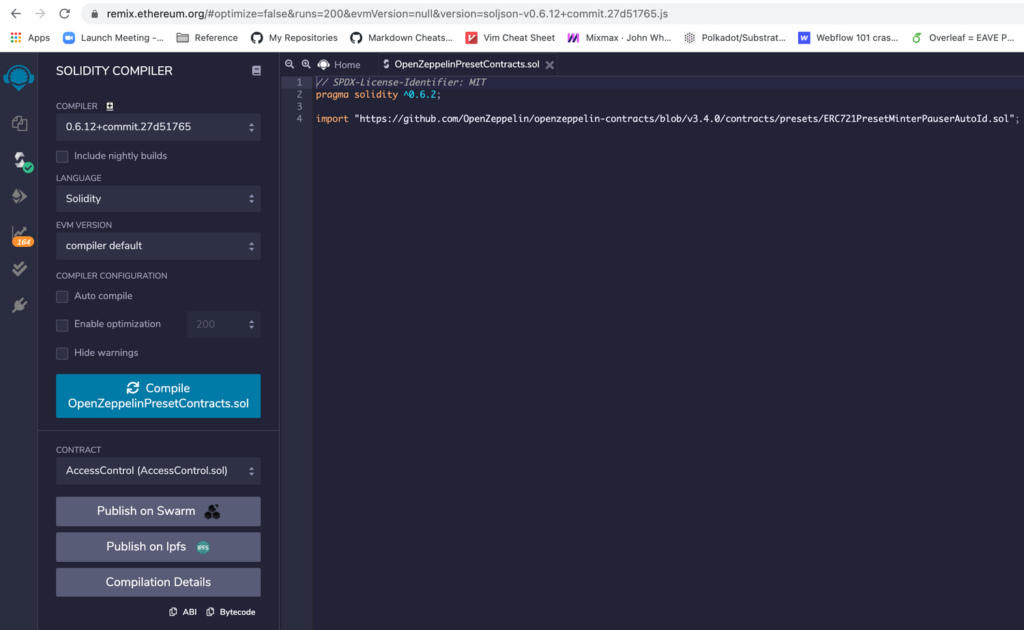
Compile the contract
Select the Solidity Compiler plugin on the left hand side of the screen. Press the Compile button to compile the contract.
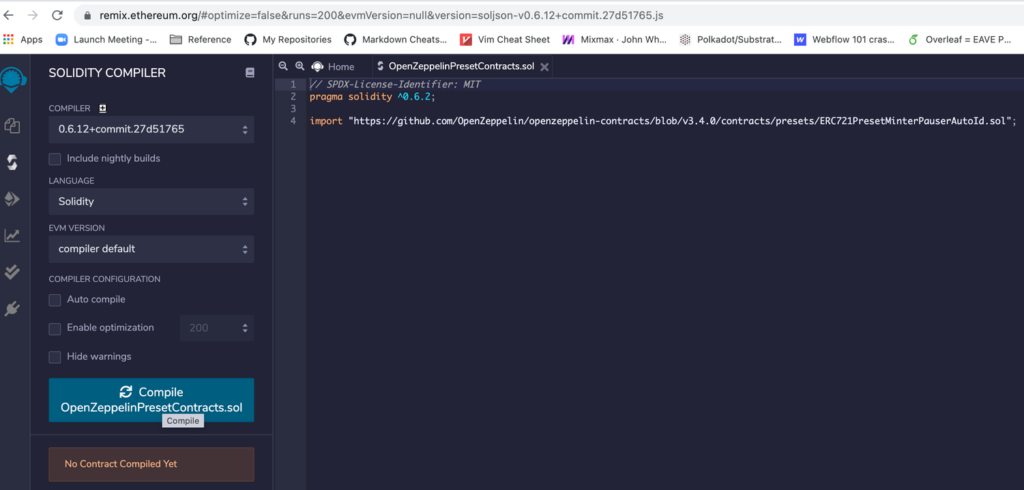
The contract and the contracts it inherits from will be loaded into Remix. The contract will then be compiled
Deploy the contract Locally
We can deploy our new token to a development blockchain. Providing a name, a symbol and a base URI as parameters to the constructor to create a new ERC721PresetMinterPauserAutoId.
Select the Deploy & Run Transactions plugin on the left hand side of the screen. Environment should default to JavaScript VM (Berlin) or JavasScript VM (London)our development blockchain. Change the gas limit to 5000000 Change the Contract to ERC721PresetMinterPauserAutoId
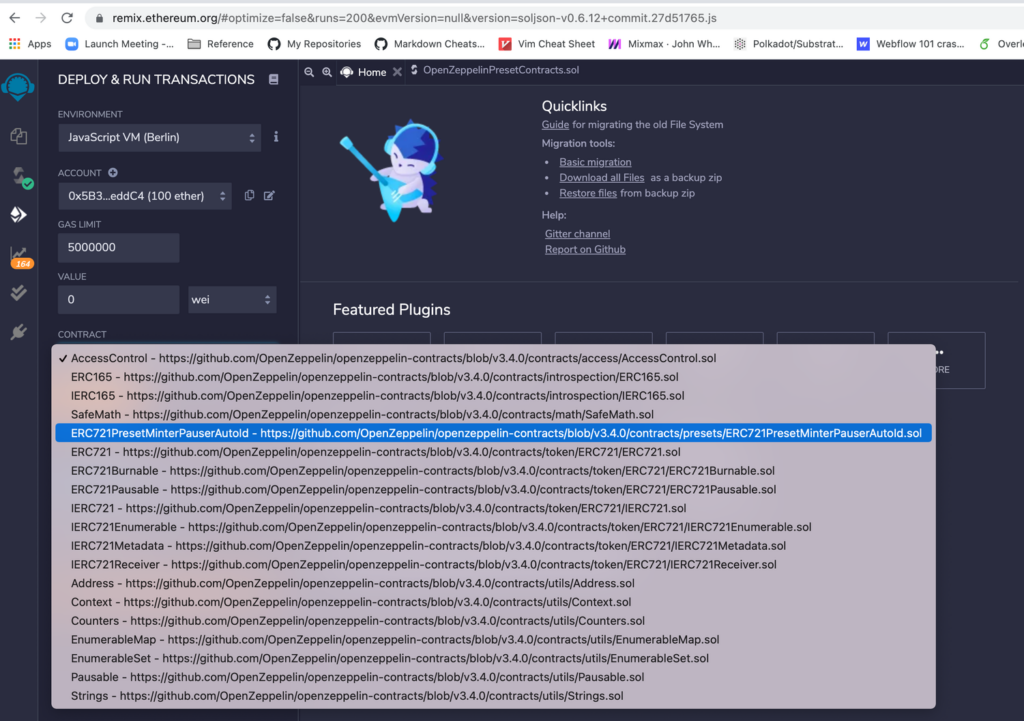
Select the Contract from the drop down
Specify the name, symbol and base URI to use for our new token. by selecting the drop down next to the deploy button. I am using “My NFT” and “NFT” and “https://gateway.pinata.cloud/ipfs/QmTmHW5NDh5wUTstTLcPRkKgGU75tvapMhHtPxjcRtMkLN“
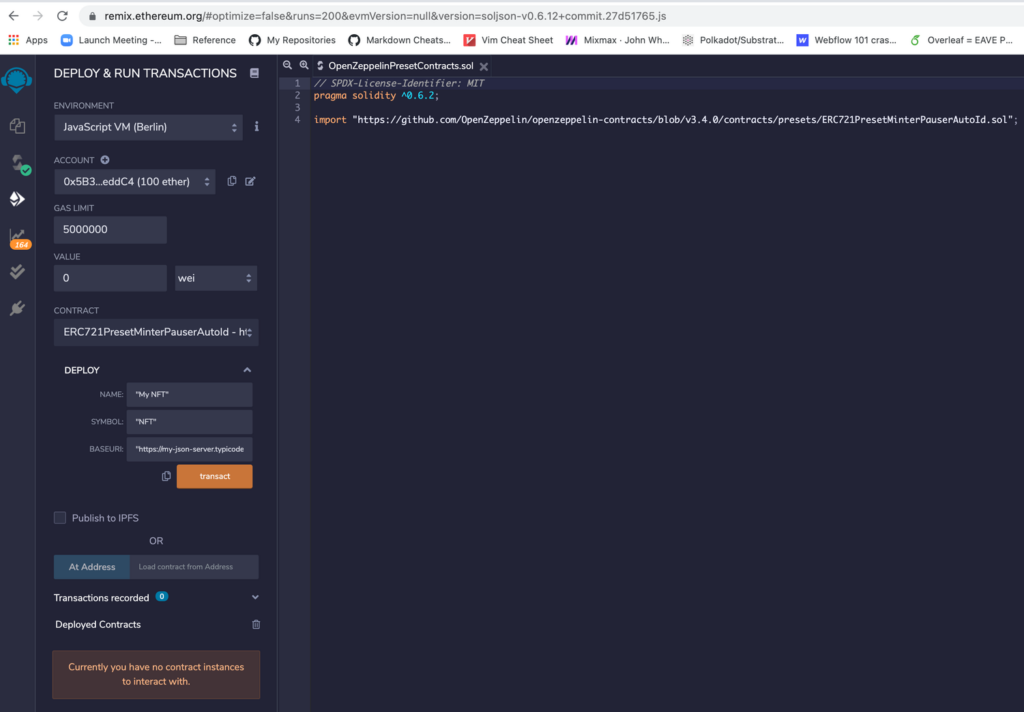
Press Deploy.
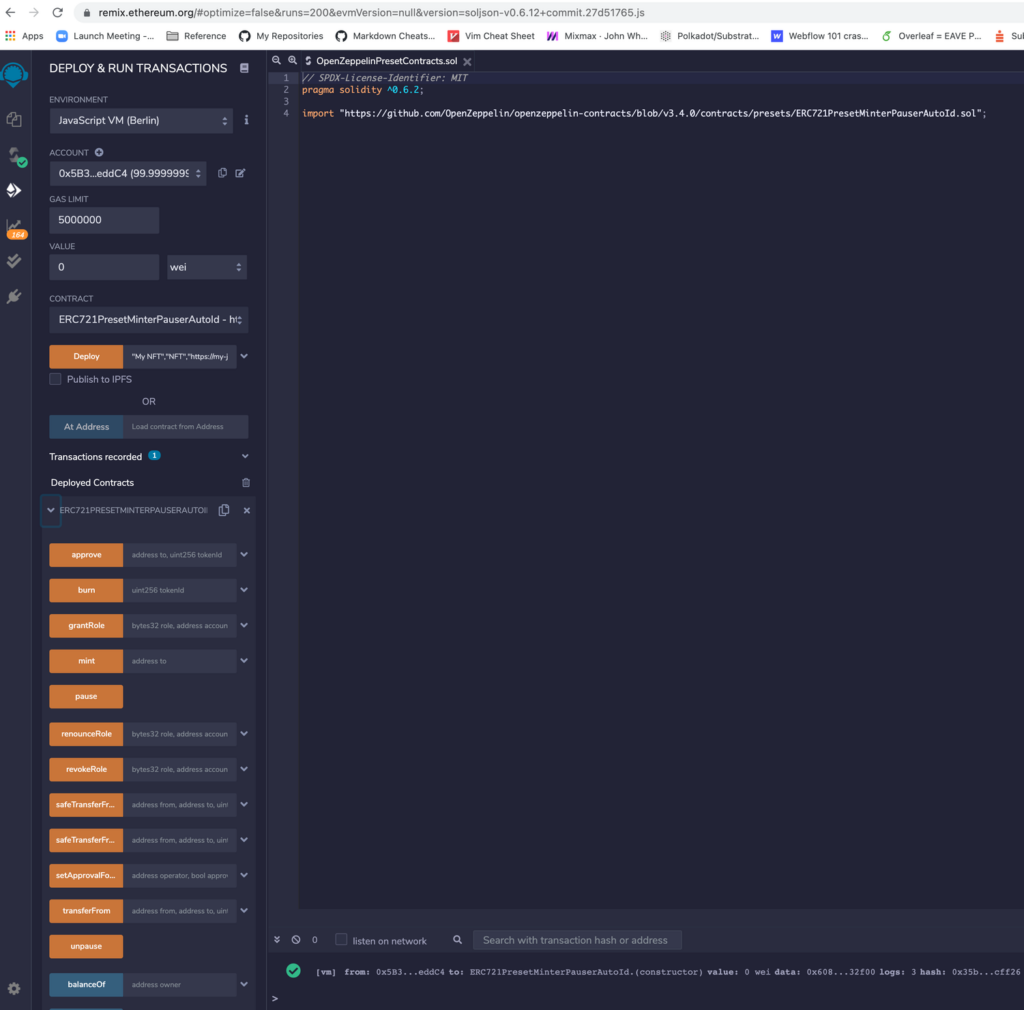
Remix will deploy our token . You can see the deployed contract under the Deployed contracts section. By pressing the drop down on the right you can see the methods which you can use to interact with the token.
Interact with our Token
We can interact with our deployed token using Remix. In the Deploy & Run Transactions plugin, under Deployed Contracts expand our deployed token (ERC721PRESETMINTERPAUSERAUTOID) to show the methods we can interact with. (for help see Deployed Contracts in Remix documentation)
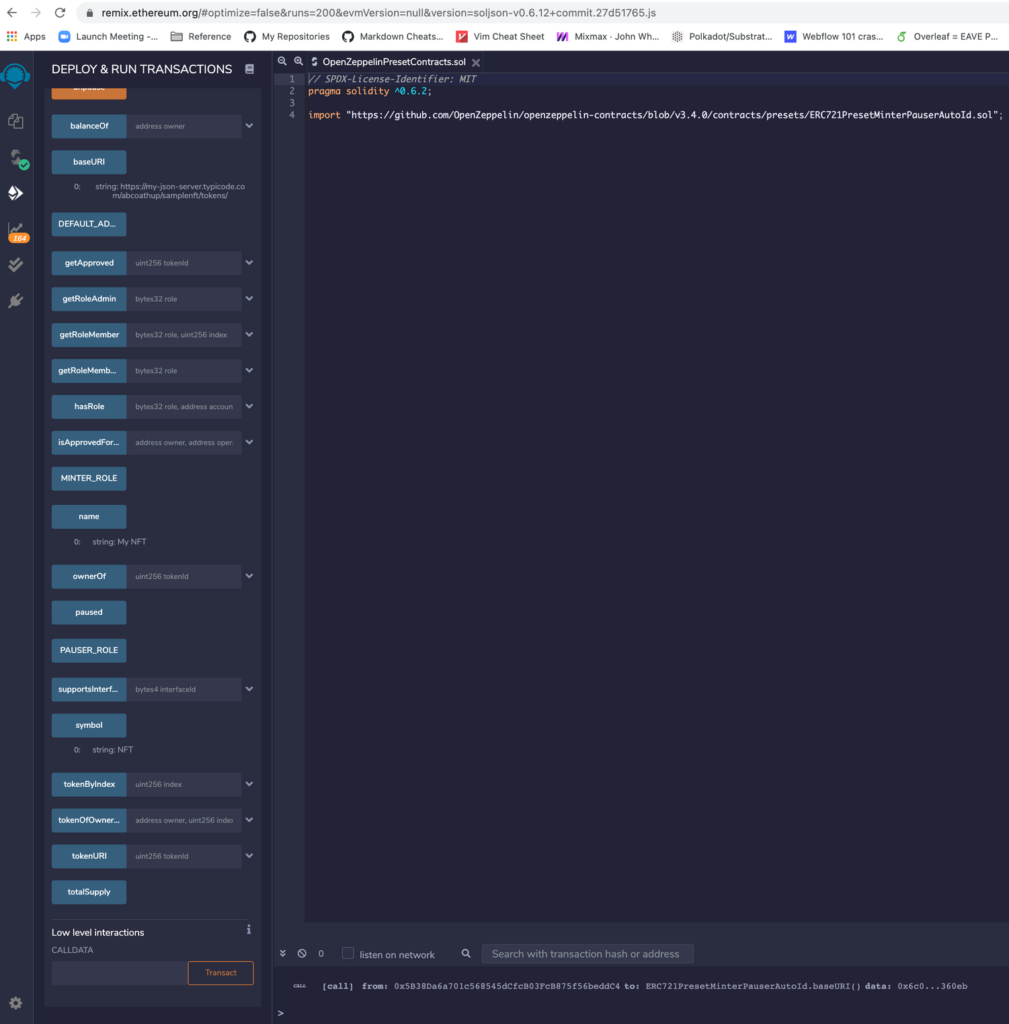
Token metadata
We can call the contract functions to read token metadata such as name, symbol and baseURI
Press the name, symbol and baseURI function buttons and this will call the functions in our deployed token. Showing values:
-
baseURI:0: string: https://my-json-server.typicode.com/abcoathup/samplenft/tokens/ -
name:0: string: My Token -
symbol:0: string: My NFT

Mint
We can send a transaction to mint tokens to a given account, from an account with the minter role. In our case we are minting from the account which deployed the token, which is given the minter role.
We will mint 1 NFT with token ID 0 to our account: 0x5B38Da6a701c568545dCfcB03FcB875f56beddC4
We can set the parameters as follows "0x5B38Da6a701c568545dCfcB03FcB875f56beddC4"

Press mint The transaction will be shown in the console
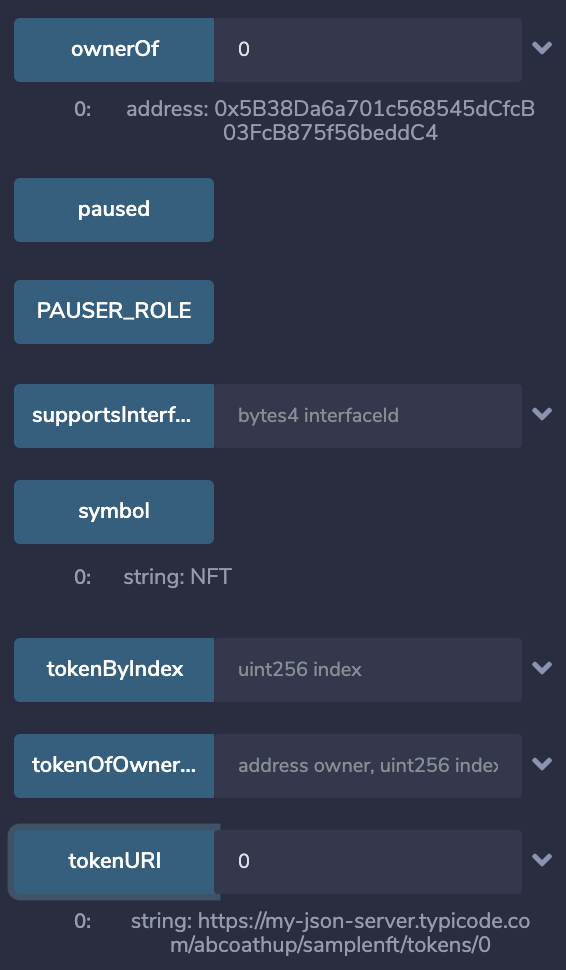
We can check the owner of the token and the token URI for the metadata Showing values:
-
ownerOf:0: address: 0x5B38Da6a701c568545dCfcB03FcB875f56beddC4 -
tokenURI:0: string: https://my-json-server.typicode.com/abcoathup/samplenft/tokens/0
Deploy to a Harmony testnet
Setup and fund your Harmony Metamask Wallet
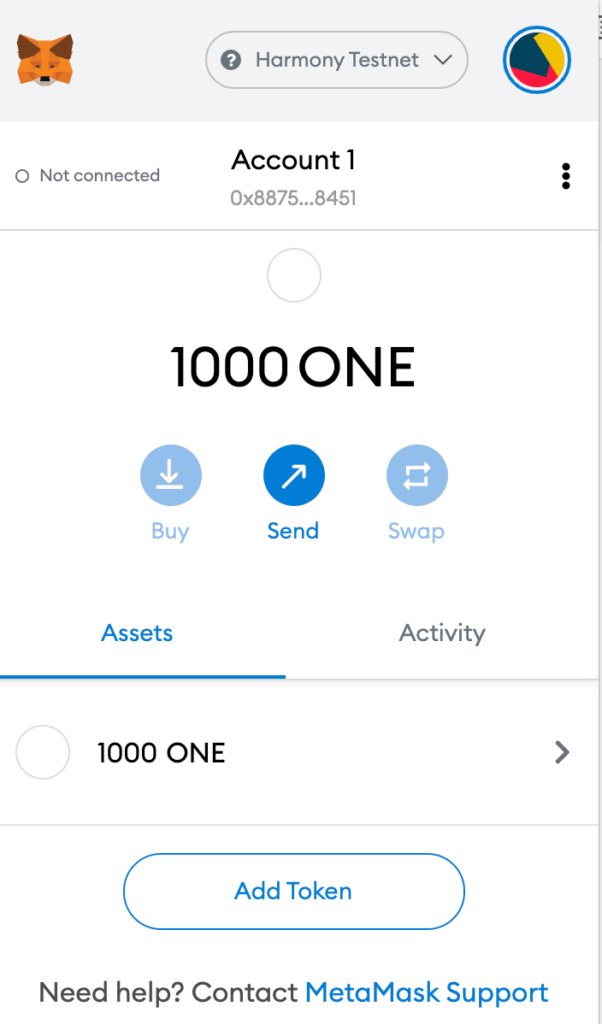
In order to deploy to Harmony Testnet you will need to setup Metamask and get some one tokens from the faucet.
Harmony Metamask configuration instructions are here.
Harmony Faucet Information is here.
After successful setup and funding your Metamask should look like this
Deploy to Harmony Testnet
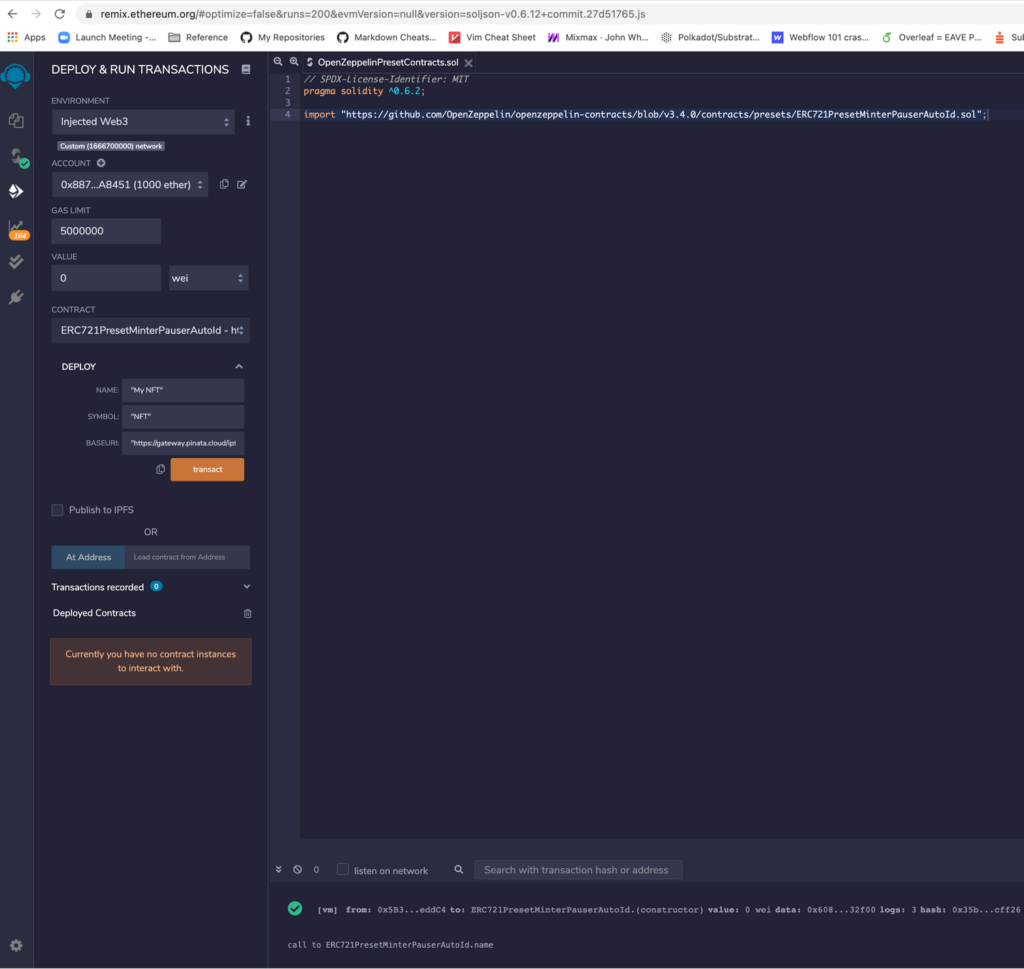
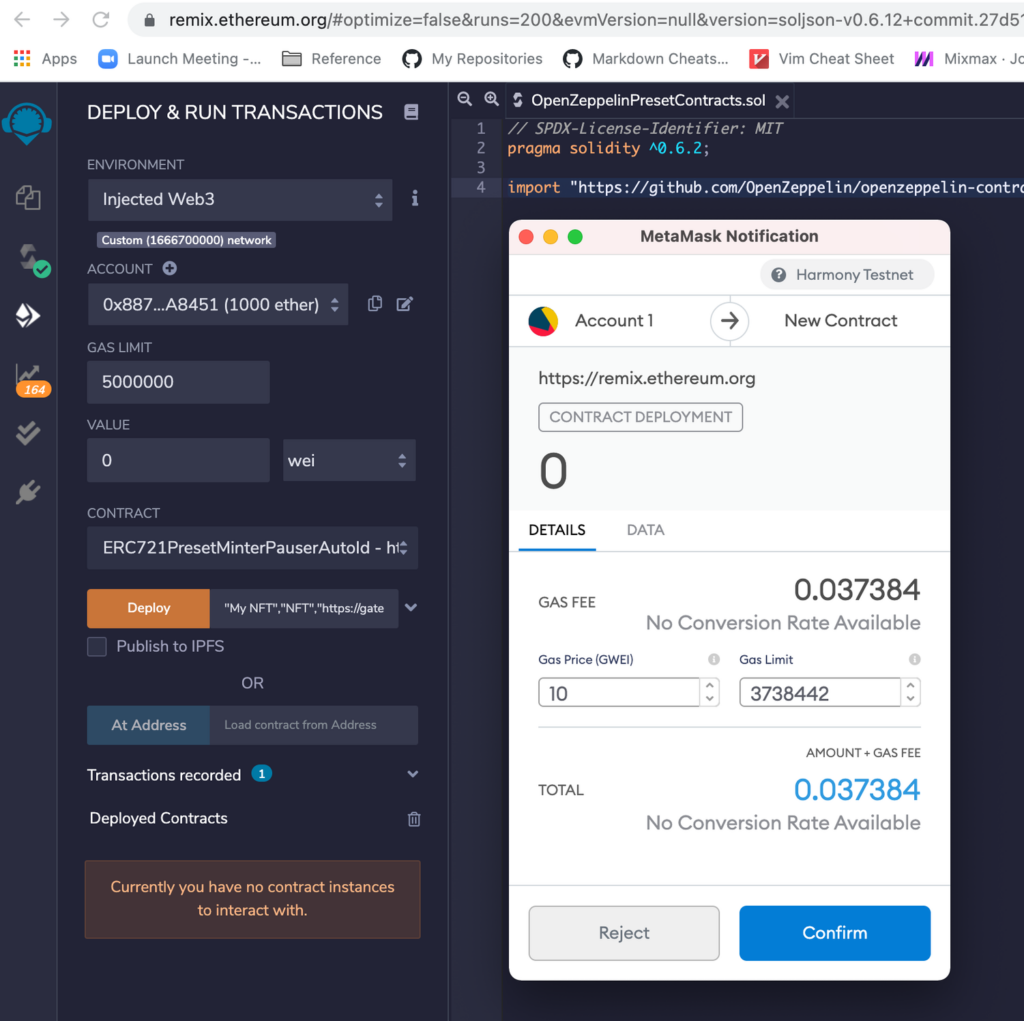
Set the network in MetaMask to Harmony Testnet. Change the environment in Deploy and Run Transactions to Injected Web3 so that Remix uses web3 from MetaMask

Check the gas limit is set to 5000000 Check the Contract is set to ERC721PresetMinterPauserAutoId Specify the name, symbol and base URI to use for our new token. I am using “My NFT” and “NFT” and “https://gateway.pinata.cloud/ipfs/QmVkDbc6NPni1uzQq3gsiocUc3YGZjF7QGcM37hMcBqNmv“
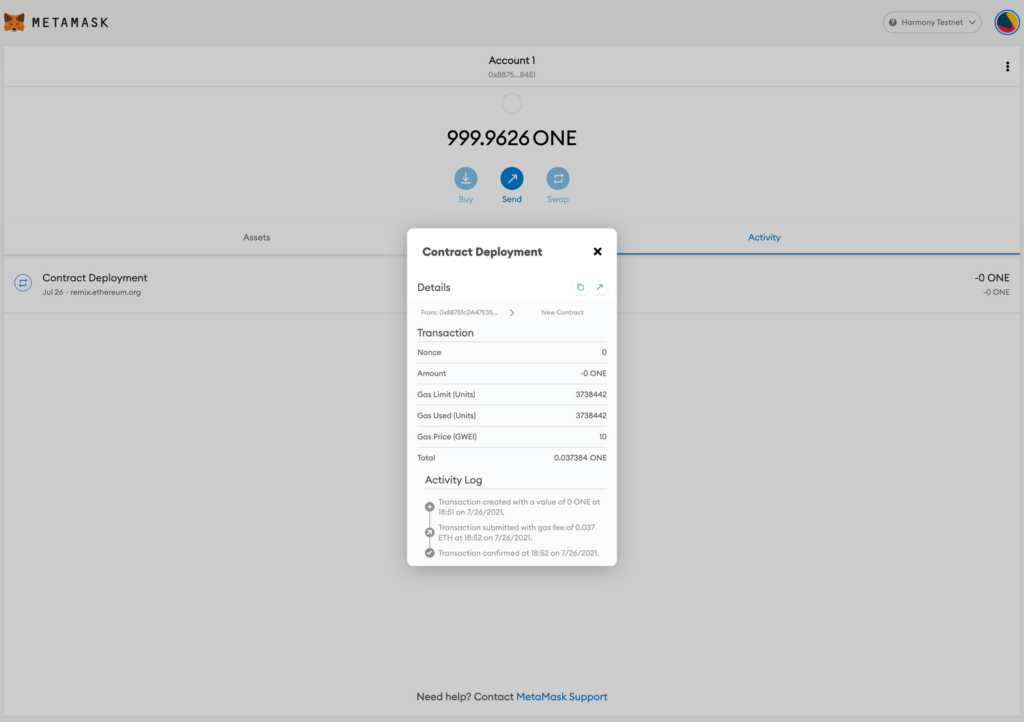
Press Deploy. Confirm the transaction in MetaMask The console will show creation of ERC721PresetMinterPauserAutoId pending... and then shortly after the contract will be deployed.


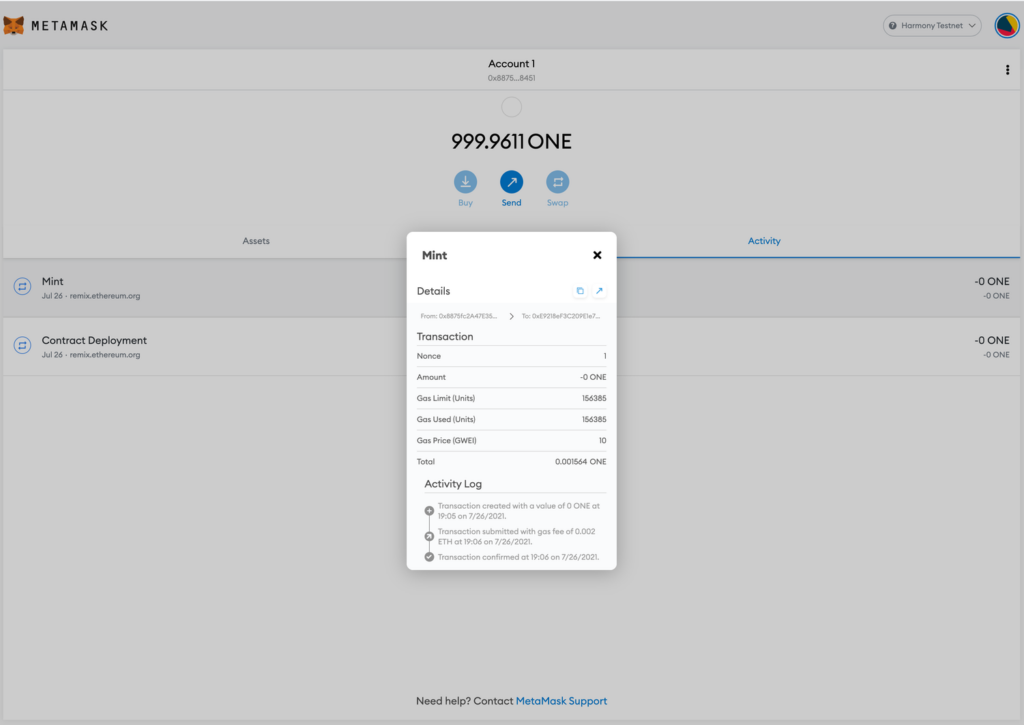
Mint
We can send a transaction to mint tokens to a given account, from an account with the minter role.
In our case we are minting from the account which deployed the token, which is given the minter role.
We will mint 1 NFT with token ID 0. Specify the address that you want to be the token holder (0x8875fc2A47E35ACD1784bB5f58f563dFE86A8451 is one of my test accounts)
Press mint with the recipient address Confirm the transaction in MetaMask
The console will show transact to ERC721PresetMinterPauserAutoId.mint pending ... and then shortly afterwards the NFT will be minted
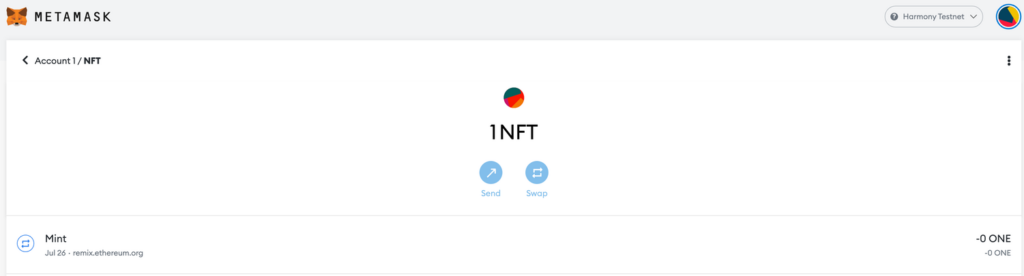
Viewing the NFT Token in Metamask
By using the explorer and looking at your transaction history for your metamask account you can find the address of the NFT contract deployed. Our account is here and our NFT contract is here.
You can then add that token address to metamask,
Our NFT contract address is 0xe9218ef3c209e1e7db8bef2e33f822006b44bcd7
We add the NFT Token Contract
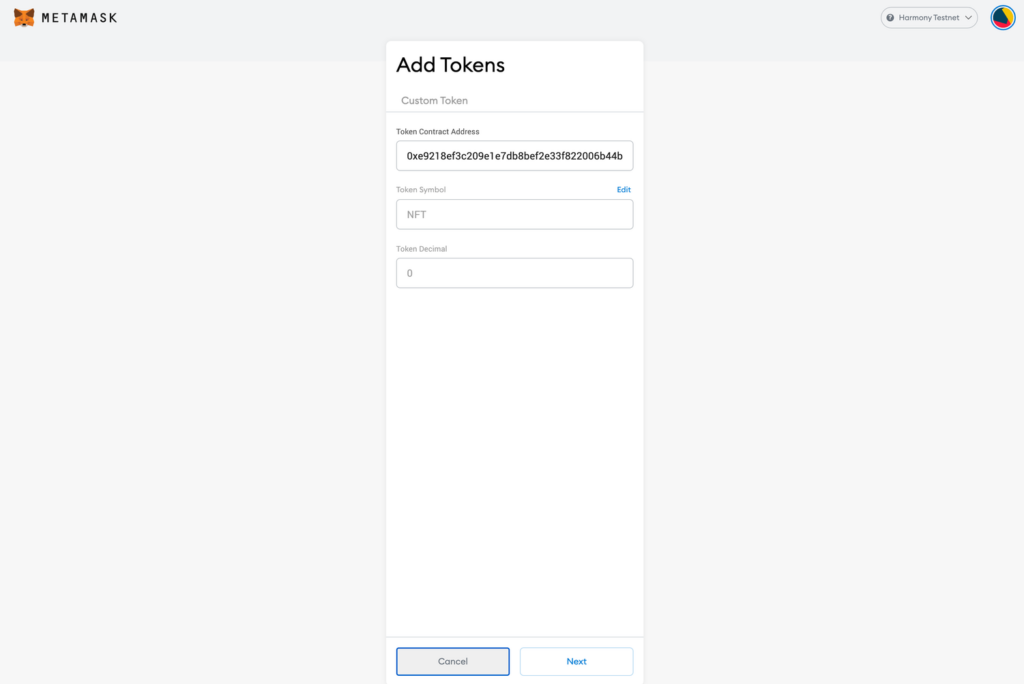
and after adding it to metamask we see