
Advance
How to Create, Test and Deploy Smart Contracts
Welcome to this tutorial on how to create, test and deploy smart contracts on Tezos. Tezos is a decentralized, self-amending blockchain platform that allows for the creation and execution of smart contracts. In this tutorial, you will learn how to create, test and deploy smart contracts on the Tezos blockchain using the Michelson programming language and the Tezos development tools. We will walk you through the steps needed to set up your Tezos development environment, write and compile your smart contract code, and deploy it to the Tezos testnet. We will also discuss how to test and debug your smart contract using the Tezos development tools and the Tezos testnet. Let’s get started!
Various components of Tezos smart contracts?
As the Tezos blockchain platform has unique features, the smart contracts it deploys also have many components that you must learn about, to seamlessly create and deploy Tezos smart contracts.
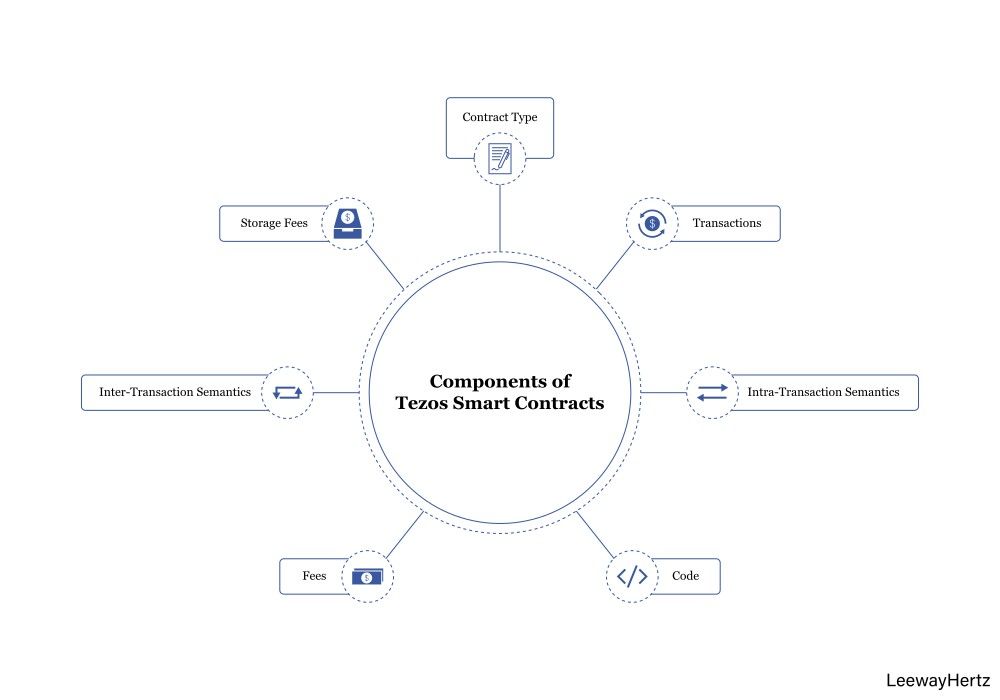
The important components of Tezos smart contracts are:
- Contract Type
- Transactions
- Storage Fees
- Code
- Fees
- Intra-Transaction Semantics
- Inter-Transaction Semantics
Here, we will show you how to create, test, and deploy a Tezos smart contract with the help of an example. We are developing a generic liquidity pool contract to enable users to deposit and withdraw Tezos tokens without any restrictions. In our example, user John will deposit 10 tez to the contract, and then user Katy will withdraw 5 tez
How to create a Tezos Smart Contract?
We are going to write the contract in the LIGO language and then later compile it for Michelson.
Step 1: Install LIGO CLI
To compile and test the contract, we need to install the LIGO CLI. After installing it, we can start writing the contract by opening the following in our editor:
v1-public-pool.ligo
For our contract, we can create a folder and file with the following commands:
$ mkdir tezos-defi && cd tezos-defi
$ touch v1-public-pool.ligo
Even though the current version of Tezos supports a unique entry point for each contract, we can use arguments indicating the operations we want to perform to work around this limitation. Here, we will illustrate two operations – Deposit and Withdraw. In our contract, we will represent them with a variant type, like the following:
type entry_action is
| Deposit
| Withdraw
Also, the storage will be a simple record with a liquidity field of the Tez type, which will represent the funds in our pool.
type finance_storage is record
 liquidity: tez;
end
Here, we are using tez for declarations and mtz for literals, as LIGO had an issue with mixing them up.
After this, we’ll work on defining the entry point.
Step 2: Define the Entry Point
The method chosen to listen to external communication is referred to as the entry point for a contract in Tezos. It receives two arguments:
-
The parameters for the method.
-
The contract storage.
Also, it has a fixed signature for the following:
-
response
-
operation list
-
storage
In the contract entry point, the parameter’s type will be entry_action, which we already defined as follows:
type entry_action is
| Deposit
| Withdraw
For this parameter, the value must be one of the values defined by either the Deposit or the Withdraw operation, while the method’s body will be empty. The output will be delegated according to the operation’s value, and the storage will be propagated in both cases.
function main (const action: entry_action; var finance_storage: finance_storage): (list (operation) * finance_storage) is
block {
skip
} with case action of
| Deposit(param) -> depositImp(finance_storage)
| Withdraw (param) -> withdrawImp(finance_storage)
end;
After defining the entry point, we will set up the deposit operation.
Step 3: Set Up the Deposit Operation
The deposit operation takes the amount sent to the transaction origin. If the amount is zero, it will fail.
As we’re going to modify the storage, we’ll define it as var.
function depositImp(var finance_storage: finance_storage)
: (list(operation) * finance_storage) is
block {
if amount = 0mtz
then skip //fail(“No tez transferred!”);
else block {
finance_storage.liquidity := finance_storage.liquidity + amount;
}
} with(noOperations, finance_storage)
We will return noOperations as the first component in the return value and will define this in the contract's global scope. This defines a list initialized with nil.
const noOperations: list(operation) = nil;
We will return noOperations as the first component in the return value and will define this in the contract’s global scope. This defines a list initialized with nil.
const noOperations: list(operation) = nil;
After setting up the deposit operation, we’ll set up the withdrawal operation.
Step 4: Set Up the Withdraw Operation
The “Withdraw” operation enables users to withdraw a fixed tez amount from the liquidity pool. To make the transfer to the sender, whether the contract has enough tez or not is checked by validation. We’ll use the global “sender” from LIGO, which refers to the transaction’s origination account.
If the validation succeeds:
-
contract storage will revert
-
liquidity pool will remain unchanged
function withdrawImp(var finance_storage: finance_storage): (list(operation) * finance_storage)
block {
const withdrawAmount: tez = 1000000mtz;
var operations: list(operation) := nil;
if withdrawAmount > finance_storage.liquidity
then skip //fail("No funds to withdraw!")
else block {
const receiver: contract(unit) = get_contract(sender);
const payoutOperation: operation = transaction(unit, withdrawAmount, receiver);
operations:= list
payoutOperation
end;
finance_storage.liquidity := finance_storage.liquidity - withdrawAmount;
}
} with(operations, finance_storage)
After the operations are set up, the smart contract is created and it is now time to test it.
How to deploy the contract?
The deployment of a Tezos smart contract is called “origination.”
It represents the creation of an account that has a script attached to the smart contract. The address of contracts created via originations starts with KT1… (originated accounts) instead of implicit accounts with addresses beginning with tz1… (also tz2 or tz3).
To deploy the contract, we run the following command:
# ./alphaclient.sh shell
$ alpha-client originate contract v1-public-pool for contractOwner
transferring 0 from contractOwner running v1-public-pool.tz --init 0
--burn-cap 2.314
tezos-client provides us with the following command to list the address of the contracts deployed:
# ./alphaclient.sh shell
$ alpha-client list known contracts
> contract: KT1HkL7uH53X12CZeH8Jv9H2AYHrA9M9xDUt
 Contract memorized as v1-public-pool.
Interacting with the contract
To make the contract functional, we must feed the contract with tez. So, we will deposit 10,000 tez using the contractOwner account.
The first step is to obtain the parameter to send to the contract’s entry point. We can get the Michelson code with the following command:
# /tezos-defi working directory
$ ligo compile-parameter v1-public-pool.ligo -s pascaligo main
“Deposit(unit)”
> (Left Unit)
We can now call the contract
# ./alphaclient.sh shell
$ alpha-client transfer 10000 from contractOwner to v1-public-pool
--arg “(Left Unit)” --burn-cap 0.004
We can also verify the result in multiple ways. For example, we can query the contract storage:
# ./alphaclient.sh shell
$ alpha-client get script storage for v1-public-pool
> 10000000000
We can also check that the contractOwner wallet has decreased by 10,000 tez.
# ./alphaclient.sh shell
$ alpha-client get balance for contractOwner
> 8044.90585 ꜩ
We can also use a block explorer.
Now, we can try the withdrawal operation. This time the katy account will withdraw some tez from our liquidity pool. As we have transferred 5 tez to katy, it will be enough to pay transaction fees. To obtain the Michelson instruction, we run the following command:
X-INT ~/develop/tezos-defi-dev-experience/tezos-ligo [master|...4]
15:54 $ ligo compile-parameter v1-public-pool.ligo -s pascaligo main "Withdraw(unit)"
(Right Unit)
Now, we call the withdrawal contract method.
# ./alphaclient.sh shell
$ alpha-client get balance for katy
$ alpha-client transfer 0 from katy to v1-public-pool --arg “(Right Unit)”
$ alpha-client get balance for katy
Conclusion
Tezos is a generic and self-amending crypto-ledger, so it is becoming one of the most popular blockchain platforms. Its unique features are attracting more and more people towards it. By following the right steps, one can conveniently deploy smart contracts on the Tezos blockchain platform.
By this, you complete this workshop successfully!!