Intermediate
How to deploy a smart contract on Klaytn
Welcome to this tutorial on how to deploy a smart contract on Klaytn. Klaytn is a blockchain platform developed by GroundX, the blockchain arm of South Korean internet giant Kakao. It is designed to provide fast and secure blockchain services for mass adoption. In this tutorial, you will learn how to deploy a smart contract on Klaytn using the Klaytn Console and the Klaytn Wallet. We will walk you through the steps needed to set up your Klaytn development environment and deploy your first smart contract on the Klaytn testnet. Let’s get started!
1. Preparation: Install the necessary tools
We need some basic tools to get started. Let’s download from the below links:
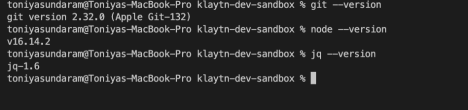
Install git and check the version using
git --version
Install docker and make sure the docker is running
Install Node v10.21.0 or higher and check the version using
node --version
Install Jq and check the version using
jq --version
Now our laptop is ready for development.
2. Download the Klaytn sandbox
Klaytn sandbox is a boilerplate code that helps developers to get started with building Dapps on Klaytn. Sandbox uses the Truffle framework to compile, deploy and test smart contracts.
Let’s clone the sandbox repository, and install the necessary libraries.
git clone https://github.com/Krustuniverse-Klaytn-Group/klaytn-dev-sandbox.git
cd klaytn-dev-sandbox
npm install
npm install -g truffle@v5.1.61
Open the klaytn-dev-sandbox folder in any editor. We used VsCode in this example. You should see the below folder structure in your editor:
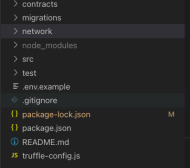
>contracts folder has a few examples of smart contracts
>migrations folder has the deployment scripts to deploy any smart contract
>network folder has the scripts to start a local Klaytn network
>src folder has the code to develop a UI for the Dapp
3. Booting up a local Klaytn network
We first need an environment where we can deploy our contracts. During development, it’s a better idea to use a local blockchain that is similar to Ganache. It runs on your machine, requires no Internet, and provides you with 10 test accounts to execute our transaction.
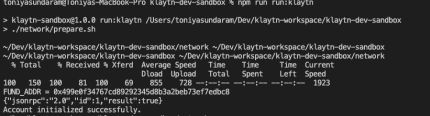
You can easily deploy a local Klaytn network using the below command. It deploys one Klaytn consensus node by default.
npm run run:klaytn
To see the execution logs, run :
npm run run:klaytn:log
To stop the network, run :
npm run run:klaytn:stop
To resume the network, run :
npm run run:klaytn:resume
To completely terminate the network, run
npm run run:klaytn:terminate
To remove log files, run
npm run run:klaytn:cleanlog
4. Writing the contract
In the contracts directory of our project, we can see a few example contracts to start with. Below are the standard contracts to create fungible and non-fungible tokens. We can use this example of contracts to deploy in our network and transfer tokens.
-
KIP7 similar to
ERC-20 token contract
-
KIP17 similar to
ERC-721 token contract
-
KIP37 similar to
ERC-1155 contract
In addition to the existing smart contracts, we can also write our own smart contracts under the contracts folder. Here is a very simple greeter contract:
KlaytnGreeter is a simple contract that returns a greeting message. A greeting message is set when the contract is deployed.
pragma solidity ^0.8.0;
contract KlaytnGreeter
/* Define variable greeting of the type string */
string greeting;
/* This runs once when the contract is created */
constructor (string memory _greeting) public
greeting = _greeting;

/* Main function */
function greet() public view returns (string memory)
return greeting;
Save the above code in a KlaytnGreeter.sol file under the contracts folder. The next step is to compile and deploy the smart contract in the local network.
5. Deploying the contract on your local network
The Migrations directory has all the deployment scripts. By default, there are deployment scripts for the token contracts.
-
First, let’s try adding a deployment script for the newly created smart contract. The below code will compile and deploy the
KlaytnGreeter contract in the local network and also saves the API and deployed address in the src folder for future reference.
const fs = require('fs')
var greeter = artifacts.require('KlaytnGreeter')
module.exports = function (deployer)
deployer.deploy(greeter, 'Welcome to Klaytn!').then(() =>
if (greeter._json)
fs.mkdir('./src/deployed',  recursive: true , (err) =>
if (err) throw err
)
// Save the deployed abi to greeterABI file in the src folder.
fs.writeFile('./src/deployed/greeterABI', JSON.stringify(greeter._json.abi, 2), (err) =>
if (err) throw err
)

// Save the deployed address to greeterAddress file in the src folder.
fs.writeFile('./src/deployed/greeterAddress', greeter.address, (err) =>
if (err) throw err
console.log(
`The deployed contract address * $greeter.address * is recorded on deployedAddress file`
)
)
)
We can copy the above code and save it as 5_greeter_migration.js. Now run the below command to deploy the contract.
truffle migrate --f 5 --network klaytn
You will see the below logs once it’s deployed successfully.
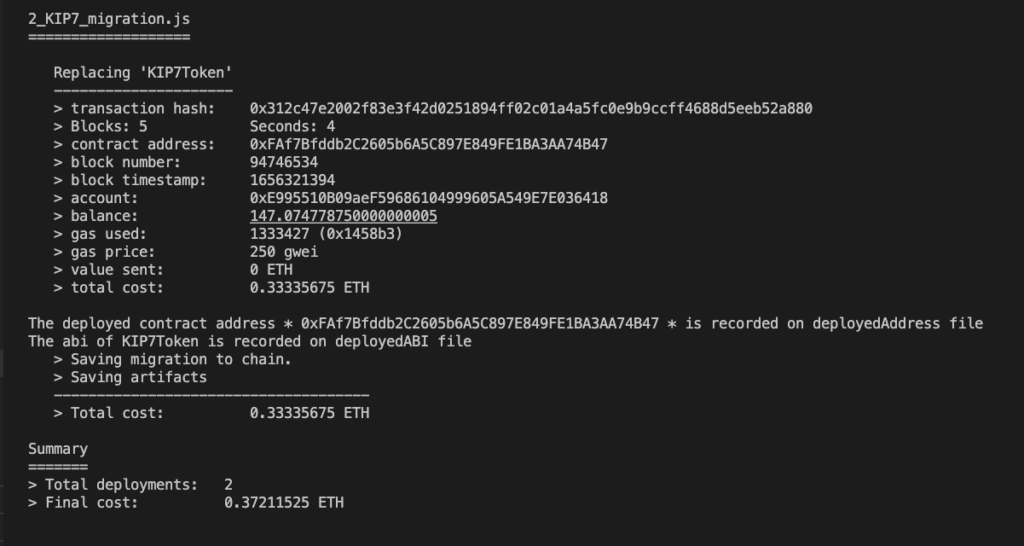
2. Now let’s try deploying any one of the existing sample contracts in the network. Run the below command to compile and deploy the fungible token contract.
npm run deploy:klaytn:kip7
If the deployment is successful we can see the deployed API and address files generated under the src/deployed folder.
6. Deploying the contract on the test network
While deploying to the test network is similar to the local network, it requires some configuration changes. Baobab is Klaytn’s test network, similar to Ropsten in Ethereum.
The easiest way to access a testnet is via KAS (Klaytn API Service) which is a public node service similar to Infura. KAS provides access to public Klaytn nodes for testnets as well as the main network via free and paid plans.
-
You can sign up for
Klaytn API Service and get the assigned Access key and Secret key which are used to connect to the Baobab testnet.
-
The next step is to configure truffle-config.js to update the testnet configuration.
kasBaobab:
provider: () =>
const option =
headers: [
 name: 'Authorization', value: 'Basic ' + Buffer.from(accessKeyId + ':' + secretAccessKey).toString('base64') ,  name: 'x-chain-id', value: '1001'
],
keepAlive: false,

return new HDWalletProvider(privateKey, new Caver.providers.HttpProvider("https://node-api.klaytnapi.com/v1/klaytn", option)) ,
network_id: '1001', //Klaytn baobab testnet's network id
gas: '8500000',
gasPrice:'25000000000'
truffle-config.js file in the sandbox has the above configuration already.
3. Add the Access key and Secret key obtained from Step1 to the .env file
ACCESS_KEY_ID=KASKY9YK7JE3NEXQZN6PWT86
SECRET_ACCESS_KEY=nO14rGPiz1QDpDdjWGcYoVTueC3ksJTcZ_eg3887
KAS_TESTNET_API_URL=https://node-api.klaytnapi.com/v1/klaytn
4. Now we have all the configuration updates to deploy in the Baobab test network. Execute the below command to deploy.
truffle migrate --f 1 --to 2 --network kasBaobab
We can see the below output of the deployed API and address files generated under the src/deployed folder.