Advanced
How to deploy and verify a smart contract using Cronos?
Smart Contracts
Smart contracts hold an essential role in the blockchain ecosystem of dApps. It is critical to ensure they work as intended and remain as secure as possible. Complete and well-design smart contracts save us from unnecessary financial losses and help the project stay secure. Smart contract verification is sometimes overlooked when teams are rushing to ship, but it is vital to verify smart contracts on their correctness, validity and security.
The following documentation demonstrates the deployment and verification of a smart contract by Solidity to Cronos. @openzeppelin/contracts is used for the demo Solidity script. Both Truffle and Hardhat for deployment are included in this documentation and you shall use one of your choices. We also walk through the steps of verifying a smart contract with the Hardhat Cronoscan plugin on Cronos.
Pre-requisites
Below are the prerequisites for contract deployment and verification.
Supported OS
We officially support macOS, Windows and Linux only. Other platforms may work but there is no guarantee. We will extend our support to other platforms after we have stabilized our current architecture.
Prepare nodejs and npm environment
You can refer to Downloading and installing Node.js and npm Nodejs v10 is suggested
Sufficient funds on deployer address
You can access to faucet to obtain testnet TCRO and explorer to view the address details.
Git clone smart-contract-example
$ git clone git@github.com:crypto-org-chain/cronos-smart-contract-example.git
Once you have them all ready, now we are ready to go through the next step of contract deployment and verification!
Contract Deployment
Truffle: Deploy ERC20 Contract
Step 1. Enter smart-contract-example/truffle folder
$ cd cronos-smart-contract-example/truffle
Step 2. Run npm install inside the folder
$ npm install
Step 3. Make a copy of .env.example to .env
$ cp .env.example .env
Step 4. Modify .env and fill ONE of the field
MNEMONIC=goose easy ivory ...
PRIVATE_KEY=XXXXXXX
Step 5. Review Migration Script at migrations/2_deploy_cronos_token.js
const CronosToken = artifacts.require("CronosToken");

module.exports = function (deployer) {
    deployer.deploy(CronosToken, "Cronos Token", "CRT", "1000000000000000000000000");
};
Step 6. Endpoints setting
By default, the script will be using your local host "127.0.0.1" – If you are not running a localhost, you may leverage the public endpoint https://evm-t3.cronos.org/ by making changes to networks in truffle-config.js, for example
networks: {
  development: {
    provider: new HDWalletProvider(getHDWallet(), "http://127.0.0.1:8545"), // TODO
    network_id: "*",       // Any network (default: none)
  },
  testnet: {
    provider: new HDWalletProvider(getHDWallet(), "https://evm-t3.cronos.org/:8545"), // TODO
    network_id: "*",
    skipDryRun: true
  },
},
Step 7. Deploy Contract
npm run deploy-contract-cronos
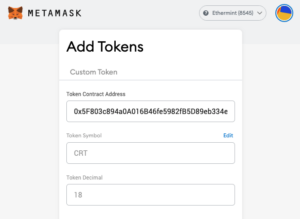
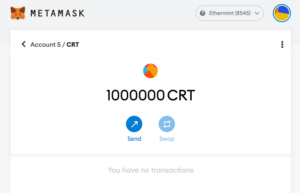
Step 8. Obtain Contract address from console and input to Metamask
Correct balance will be shown on Metamask page
CronosToken deployed to: 0x5F803c894a0A16B46fe5982fB5D89eb334eAF68
Contract Verification
Hardhat: Verify Your Contracts with Hardhat-Cronoscan plugin
After you deploy your ERC20 Contract successfully, the next is to verify the source code for your Solidity contracts. The Hardhat-Cronoscan plugin aims to make it easy for smart contract developers to verify the smart contracts on Cronoscan from the Hardhat development environment.
This plugin adds the Cronos network to the verify task provided by Hardhat-Etherscan. With this plugin, the verify task is able to verify Cronos contracts through Cronoscan’s service.
Step 1. Install the package
We need the Hardhat plugin for integration with Cronoscan’s contract verification service. This plugin needs to be used in conjunction with the Hardhat-Etherscan plugin (v3.1.0 or above).
# Install hardhat-etherscan plugin
npm install --save-dev @nomiclabs/hardhat-etherscan@^3.1.0

# Install hardhat-cronoscan plugin
npm install --save-dev @cronos-labs/hardhat-cronoscan
And make sure you also have the following dependencies:
npm install ethers dotenv @openzeppelin/contracts
npm install --save-dev solidity-coverage
npm install --save-dev hardhat-gas-reporter
Step 2. Import the plugins
Under Hardhat, add the following statement to your hardhat.config.ts:
...
import "@nomiclabs/hardhat";
import "@nomiclabs/hardhat-etherscan";
import "@cronos-labs/hardhat-cronoscan";
...
Step 3. Define your Cronoscan API key
In your project’s hardhat.config.js, append to your existing configurations. Replace {YOUR_CRONOSCAN_API_KEY}with your Cronoscan API key.
If you don’t have a Cronoscan API KEY, you will need to create a Cronoscan account first. After you log in to the Cronoscan account, you will be able to generate it at API-KEY page. Cronoscan Testnet shares the same API key as Cronoscan Mainnet, but it is recommended to generate a new one on the Cronoscan portal and replace {YOUR_CRONOSCAN_TESTNET_API_KEY} with it. One Cronoscan allows creating three API KEYs.
Update the settings as below under hardhat.config.ts
const config: HardhatUserConfig = {
solidity: "version",
 networks: {
   hardhat: {},
   cronosTestnet: {
     url: "https://evm-t3.cronos.org/",
     chainId: 338,
     accounts: ['myPrivateKey'],
     gasPrice: 5000000000000,
   },
   cronos: {
     url: "https://evm.cronos.org/",
     chainId: 25,
     accounts: ['myPrivateKey'],
     gasPrice: 5000000000000,
   },
 },
  etherscan: {
    apiKey: {
      cronosTestnet: "{YOUR_CRONOSCAN_TESTNET_API_KEY}",
      cronos: "{YOUR_CRONOSCAN_API_KEY}",
    },
  },
};
Step 4. Check the supported network list:
Check the list of supported networks:
npx hardhat verify --list-networks
Step 5. Verify the Smart Contract
Obtain your deployed contract address when you deployed the contract (Step 8 in the previous section).
In your hardhat project, run the verify task as shown below. Replace DEPLOYED_CONTRACT_ADDRESS with your deployed contract address, and the constructor arguments that were used to deploy it (if any)
Verify on Cronos (Mainnet):
npx hardhat verify --network cronos DEPLOYED_CONTRACT_ADDRESS "Constructor argument 1" "Constructor argument 2"
Verify on Cronos Testnet
npx hardhat verify --network cronosTestnet DEPLOYED_CONTRACT_ADDRESS "Constructor argument 1""Constructor argument 2"
Example:
npx hardhat verify --network cronosTestnet "0x00e9fd0eaea8325dc31a64e23d91607fdd60d2d1" "My token name" "My token symbol"
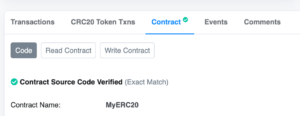
You should now be able to see your contact is verified on Cronoscan or Testnet Cronoscan and start to read and write your smart contracts.