

Intermediate
How to mint an NFT on Ethereum
“Minting an NFT” is the act of publishing a unique instance of your ERC-721 token on the blockchain. Using our smart contract from Part 1 of this NFT tutorial series, let’s flex our Web3 skills and mint an NFT. At the end of this tutorial, you’ll be able to mint as many NFTs as your heart (and wallet) desires!
Let’s get started!
STEP 1: INSTALL WEB3
If you followed the first tutorial on creating your NFT smart contract, you already have experience using Ethers.js. Web3 is similar to Ethers, as it is a library used to make creating requests to the Ethereum blockchain easier. In this tutorial we’ll be using Alchemy Web3, which is an enhanced Web3 library that offers automatic retries and robust WebSocket support.
In your project home directory run:
1npm install @alch/alchemy-web32
STEP 2: CREATE A MINT-NFT.JS FILE
Inside your scripts directory, create a mint-nft.js file and add the following lines of code:
require("dotenv").config()
const API_URL = process.env.API_URL
const { createAlchemyWeb3 } = require("@alch/alchemy-web3")
const web3 = createAlchemyWeb3(API_URL)
STEP 3: GRAB YOUR CONTRACT ABI
Our contract ABI (Application Binary Interface) is the interface to interact with our smart contract. You can learn more about Contract ABIs here. Hardhat automatically generates an ABI for us and saves it in the MyNFT.json file. In order to use this we’ll need to parse out the contents by adding the following lines of code to our mint-nft.js file:
const contract = require("../artifacts/contracts/MyNFT.sol/MyNFT.json")
If you want to see the ABI you can print it to your console:
console.log(JSON.stringify(contract.abi))
To run mint-nft.js and see your ABI printed to the console navigate to your terminal and run:
node scripts/mint-nft.js
STEP 4: CONFIGURE THE METADATA FOR YOUR NFT USING IPFS
If you remember from our tutorial in Part 1, our mintNFT smart contract function takes in a tokenURI parameter that should resolve to a JSON document describing the NFT’s metadata— which is really what brings the NFT to life, allowing it to have configurable properties, such as a name, description, image, and other attributes.
Interplanetary File System (IPFS) is a decentralized protocol and peer-to-peer network for storing and sharing data in a distributed file system.
We will use Pinata, a convenient IPFS API and toolkit, to store our NFT asset and metadata to ensure our NFT is truly decentralized. If you don’t have a Pinata account, sign up for a free account here and complete the steps to verify your email.
Once you’ve created an account:
-
Navigate to the “Files” page and click the blue “Upload” button at the top-left of the page.
-
Upload an image to Pinata — this will be the image asset for your NFT. Feel free to name the asset whatever you wish
-
After you upload, you’ll see the file info in the table on the “Files” page. You’ll also see a CID column. You can copy the CID by clicking the copy button next to it. You can view your upload at:
https://gateway.pinata.cloud/ipfs/<CID>. You can find the image we used on IPFS here, for example.
For the more visual learners, the steps above are summarized here:
Now, we’re going to want to upload one more document to Pinata. But before we do that, we need to create it!
In your root directory, make a new file called nft-metadata.json and add the following json code:
{
  "attributes": [
    {
      "trait_type": "Breed",
      "value": "Maltipoo"
    },
    {
      "trait_type": "Eye color",
      "value": "Mocha"
    }
  ],
  "description": "The world's most adorable and sensitive pup.",
  "image": "ipfs://QmWmvTJmJU3pozR9ZHFmQC2DNDwi2XJtf3QGyYiiagFSWb",
  "name": "Ramses"
}
Feel free to change the data in the json. You can remove or add to the attributes section. Most importantly, make sure image field points to the location of your IPFS image — otherwise, your NFT will include a photo of a (very cute!) dog.
Once you’re done editing the JSON file, save it and upload it to Pinata, following the same steps we did for uploading the image.
STEP 5: CREATE AN INSTANCE OF YOUR CONTRACT
Now, to interact with our contract, we need to create an instance of it in our code. To do so we’ll need our contract address which we can get from the deployment or Etherscan by looking up the address you used to deploy the contract.
In the above example, our contract address is 0x5a738a5c5fe46a1fd5ee7dd7e38f722e2aef7778.
Next we will use the Web3 contract method to create our contract using the ABI and address. In your mint-nft.js file, add the following:
const contractAddress = "0x5a738a5c5fe46a1fd5ee7dd7e38f722e2aef7778"

const nftContract = new web3.eth.Contract(contract.abi, contractAddress)
STEP 6: UPDATE THE .ENV FILE
Now, in order to create and send transactions to the Ethereum chain, we’ll use your public ethereum account address to get the account nonce (will explain below).
Add your public key to your .env file — if you completed part 1 of the tutorial, our .env file should now look like this:
API_URL = "https://eth-goerli.g.alchemy.com/v2/your-api-key"
PRIVATE_KEY = "your-private-account-address"
PUBLIC_KEY = "your-public-account-address"
STEP 7: CREATE YOUR TRANSACTION
First, let’s define a function named mintNFT(tokenData) and create our transaction by doing the following:
-
Grab your PRIVATE_KEY and PUBLIC_KEY from the
.envfile. -
Next, we’ll need to figure out the account nonce. The nonce specification is used to keep track of the number of transactions sent from your address — which we need for security purposes and to prevent replay attacks. To get the number of transactions sent from your address, we use getTransactionCount.
-
Finally we’ll set up our transaction with the following info:
-
'from': PUBLIC_KEY— The origin of our transaction is our public address -
'to': contractAddress— The contract we wish to interact with and send the transaction -
'nonce': nonce— The account nonce with the number of transactions sent from our address -
'gas': estimatedGas— The estimated gas needed to complete the transaction -
'data': nftContract.methods.mintNFT(PUBLIC_KEY, md).encodeABI()— The computation we wish to perform in this transaction — which in this case is minting a NFT
Your mint-nft.js file should look like this now:
require('dotenv').config();
const API_URL = process.env.API_URL;
const PUBLIC_KEY = process.env.PUBLIC_KEY;
const PRIVATE_KEY = process.env.PRIVATE_KEY;
const { createAlchemyWeb3 } = require("@alch/alchemy-web3");
const web3 = createAlchemyWeb3(API_URL);
const contract = require("../artifacts/contracts/MyNFT.sol/MyNFT.json");
const contractAddress = "0x5a738a5c5fe46a1fd5ee7dd7e38f722e2aef7778";
const nftContract = new web3.eth.Contract(contract.abi, contractAddress);
async function mintNFT(tokenURI) {
const nonce = await web3.eth.getTransactionCount(PUBLIC_KEY, 'latest'); //get latest nonce
//the transaction
const tx = {
'from': PUBLIC_KEY,
'to': contractAddress,
'nonce': nonce,
'gas': 500000,
'data': nftContract.methods.mintNFT(PUBLIC_KEY, tokenURI).encodeABI()
};
}
STEP 8: SIGN THE TRANSACTION
Now that we’ve created our transaction, we need to sign it in order to send it off. Here is where we’ll use our private key.
web3.eth.sendSignedTransaction will give us the transaction hash, which we can use to make sure our transaction was mined and didn’t get dropped by the network. You’ll notice in the transaction signing section, we’ve added some error checking so we know if our transaction successfully went through.
require("dotenv").config()
const API_URL = process.env.API_URL
const PUBLIC_KEY = process.env.PUBLIC_KEY
const PRIVATE_KEY = process.env.PRIVATE_KEY

const { createAlchemyWeb3 } = require("@alch/alchemy-web3")
const web3 = createAlchemyWeb3(API_URL)

const contract = require("../artifacts/contracts/MyNFT.sol/MyNFT.json")
const contractAddress = "0x5a738a5c5fe46a1fd5ee7dd7e38f722e2aef7778"
const nftContract = new web3.eth.Contract(contract.abi, contractAddress)

async function mintNFT(tokenURI) {
  const nonce = await web3.eth.getTransactionCount(PUBLIC_KEY, "latest") //get latest nonce

  //the transaction
  const tx = {
    from: PUBLIC_KEY,
    to: contractAddress,
    nonce: nonce,
    gas: 500000,
    data: nftContract.methods.mintNFT(PUBLIC_KEY, tokenURI).encodeABI(),
  }

  const signPromise = web3.eth.accounts.signTransaction(tx, PRIVATE_KEY)
  signPromise
    .then((signedTx) => {
      web3.eth.sendSignedTransaction(
        signedTx.rawTransaction,
        function (err, hash) {
          if (!err) {
            console.log(
              "The hash of your transaction is: ",
              hash,
              "\nCheck Alchemy's Mempool to view the status of your transaction!"
            )
          } else {
            console.log(
              "Something went wrong when submitting your transaction:",
              err
            )
          }
        }
      )
    })
    .catch((err) => {
      console.log(" Promise failed:", err)
    })
}
STEP 9: CALL MINTNFT AND RUN NODE MINT-NFT.JS
Remember the metadata.json you uploaded to Pinata? Get its hashcode from Pinata and pass the following as parameter to the function mintNFT https://gateway.pinata.cloud/ipfs/<metadata-hash-code>
Here’s how to get the hashcode:
How to get your nft metadata hashcode on Pinata
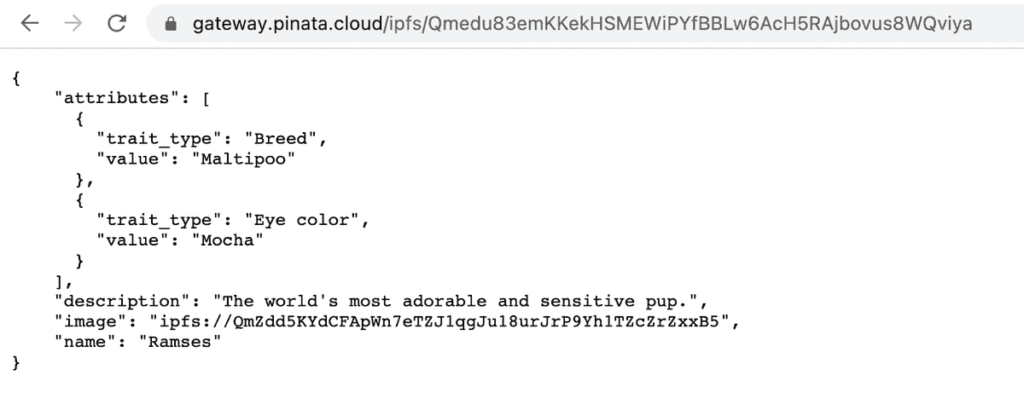
Double check that the hashcode you copied links to your metadata.json by loading
https://gateway.pinata.cloud/ipfs/<metadata-hash-code>into a separate window. The page should look similar to the screenshot below:
Your page should display the json metadata
Altogether, your code should look something like this:
require("dotenv").config()
const API_URL = process.env.API_URL
const PUBLIC_KEY = process.env.PUBLIC_KEY
const PRIVATE_KEY = process.env.PRIVATE_KEY

const { createAlchemyWeb3 } = require("@alch/alchemy-web3")
const web3 = createAlchemyWeb3(API_URL)

const contract = require("../artifacts/contracts/MyNFT.sol/MyNFT.json")
const contractAddress = "0x5a738a5c5fe46a1fd5ee7dd7e38f722e2aef7778"
const nftContract = new web3.eth.Contract(contract.abi, contractAddress)

async function mintNFT(tokenURI) {
  const nonce = await web3.eth.getTransactionCount(PUBLIC_KEY, "latest") //get latest nonce

  //the transaction
  const tx = {
    from: PUBLIC_KEY,
    to: contractAddress,
    nonce: nonce,
    gas: 500000,
    data: nftContract.methods.mintNFT(PUBLIC_KEY, tokenURI).encodeABI(),
  }

  const signPromise = web3.eth.accounts.signTransaction(tx, PRIVATE_KEY)
  signPromise
    .then((signedTx) => {
      web3.eth.sendSignedTransaction(
        signedTx.rawTransaction,
        function (err, hash) {
          if (!err) {
            console.log(
              "The hash of your transaction is: ",
              hash,
              "\nCheck Alchemy's Mempool to view the status of your transaction!"
            )
          } else {
            console.log(
              "Something went wrong when submitting your transaction:",
              err
            )
          }
        }
      )
    })
    .catch((err) => {
      console.log("Promise failed:", err)
    })
}

mintNFT("ipfs://QmYueiuRNmL4MiA2GwtVMm6ZagknXnSpQnB3z2gWbz36hP")
Now, run node scripts/mint-nft.js to deploy your NFT. After a couple of seconds, you should see a response like this in your terminal:
The hash of your transaction is: 0x301791fdf492001fcd9d5e5b12f3aa1bbbea9a88ed24993a8ab2cdae2d06e1e8

Check Alchemy's Mempool to view the status of your transaction!
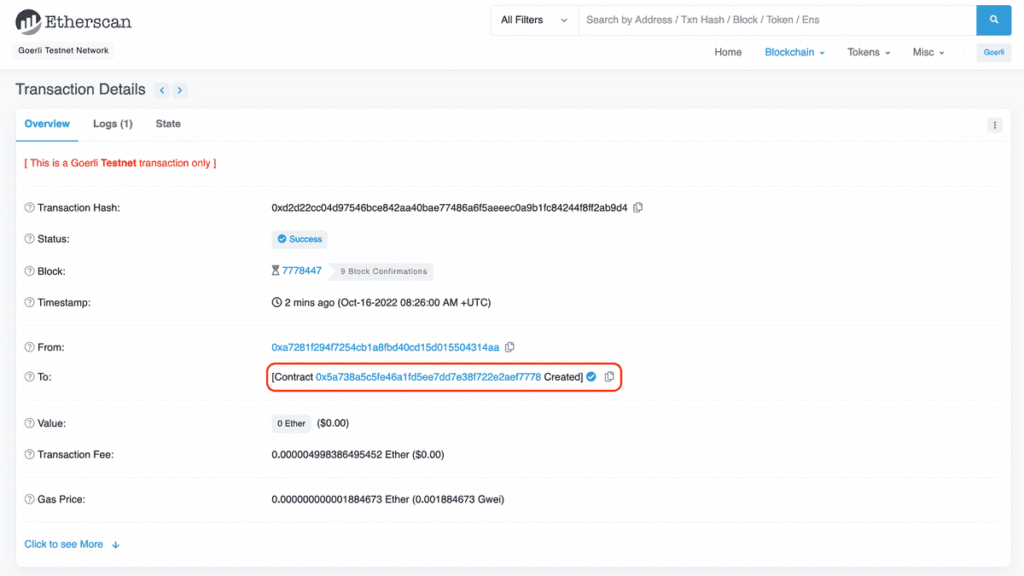
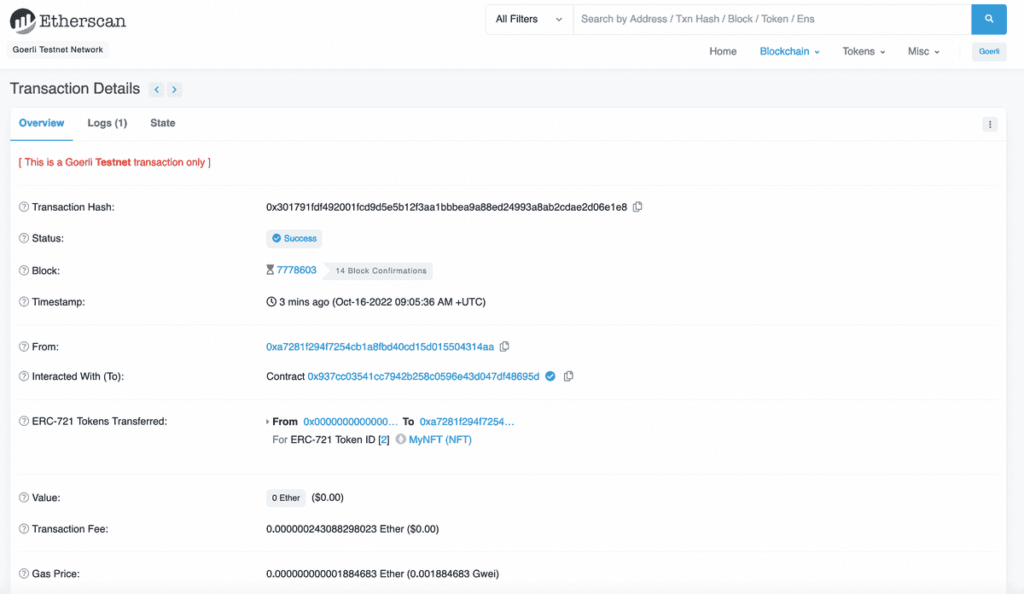
Next, visit your Alchemy mempool to see the status of your transaction (whether it’s pending, mined, or got dropped by the network). If your transaction got dropped, it’s also helpful to check Goerli Etherscan and search for your transaction hash.
View your NFT transaction hash on Etherscan
And that’s it! You’ve now deployed AND minted with a NFT on the Ethereum blockchain
Using the mint-nft.js you can mint as many NFT’s as your heart (and wallet) desires! Just be sure to pass in a new tokenURI describing the NFT’s metadata (otherwise, you’ll just end up making a bunch of identical ones with different IDs).