
Advanced
How to start a full Cronos node on AWS EC2 instance.
Cronos chain is the first blockchain network that interoperates with both Ethereum and Cosmos ecosystems, supporting Decentralized Finance, NFTs and Metaverse.
It aims to massively scale the DeFi and decentralized application (Web3) user community, by providing builders with the ability to instantly port apps and crypto assets from other chains while benefiting from low cost, high throughput, and fast finality.
Key features of the Cronos chain include:
EVM at low cost (typically less than 1 USD per transaction).
High throughput (can support 50 M transactions per day).
Fast finality (each block is final, every 5 seconds).
Low energy consumption.
Ethereum compatible: Supports EVM, ERC20, ERC721, and all other standard solidity smart contracts. Can support crypto assets and DeFi protocols of other EVM compatible chains.
Built with Cosmos SDK: interoperable with popular Cosmos ecosystem chains via IBC (Inter Blockchain Communication protocol).
Now, if you are building a Dapp on Cronos, you will probably need to run a dedicated full node in order to listen to events and run queries on blockchain data with no rate limits.
So, let’s look at how we can set-up a Cronos Mainnet full node quickly to support your development workflow!
Let’s create and set-up a AWS EC2 instance with elastic storage
Create a AWS EC2 virtual machine
First, you need to sign into the AWS console and select a region in the top right corner of the AWS Management Console. You should choose whatever region is closest to you.
Let’s start a EC2 instance by clicking on Services, then Compute, then EC2, then Launch instance.
For this tutorial, we have made the following selections. After each step, click Next.
Step 1 — Amazon Machine Image (AMI): Amazon Linux 2 Kernel 5 64-bit (x86).
Step 2 — Instance Type: Any machine of type t2 or t3, or whatever ttype is available, with 4 cores (x86_64 architecture processor) and 16 GB of RAM.
Step 3 — Instance Details: Keep the default settings.
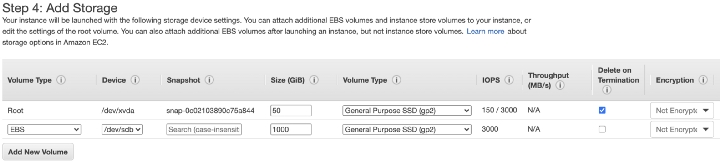
Step 4 — Add Storage: To be on the safe side, we have used 50 GB for the root (/dev/xvda) volume, and 1000 GB for an additional EBS (/dev/sdb) volume as shown below. You will need to monitor the /dev/sdb volume later so that you can increase elastic storage as the blockchain grows.
Step 5 — Add Tags: Here you can create a Name tag in order to locate your instance more easily in the AWS Management Console.
Step 6 — Security Group: Create a new security group with the default settings (SSH port 22 accessible from anywhere 0.0.0.0/0).
Then Review & Launch, and Launch! The last step should offer you the option to create and download a private key pair (.pem file). Do that and save the .pem file on your local machine (let’s call it cronos-01.pem) in a directory that you can easily find later, for example you can create a directory called ~/cronosdev.
Associate a fixed IP address
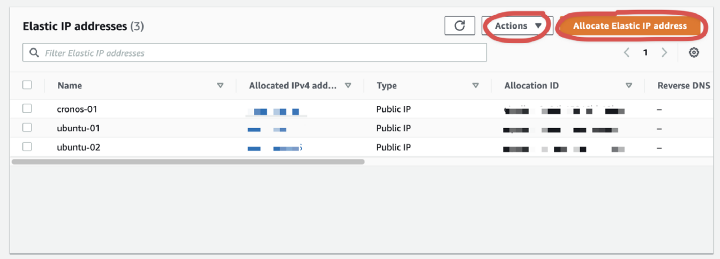
In the EC2 management console, go to Elastic IPs in the side bar menu, allocate a new Elastic IP address and then go to Actions to associate it with the EC2 virtual machine that we have just launched.
Open port 8545
In order to send RPC-JSON queries to your node, you need to open post 8545.
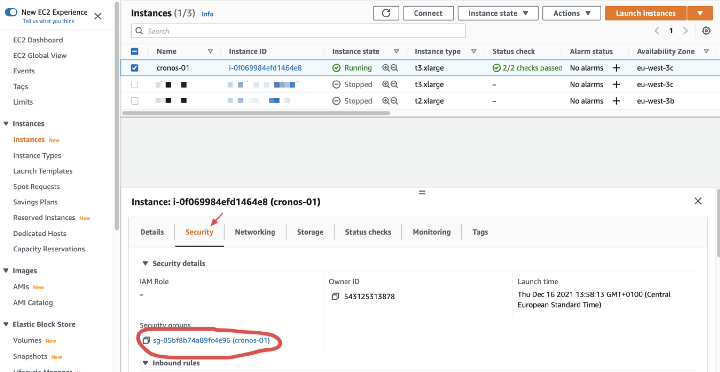
In the EC2 management console, under Instances, retrieve the name of the security group associated with your virtual machine, which should look like something like sg-05bf8b74a89fc4e96.
Then go to Security Groups in the side bar menu, select the security group associated with your virtual machine, and under Actions select Edit inbound rules.
Let’s add a rule for Custom TCP port 8545, and open it to 0.0.0.0/0 (anyone) for now.

Connect to the AWS EC2 instance
Open a Terminal window in the ~/cronosdev directory and execute the following commands:
# Fix the permissions of the key pair file
chmod 400 cronos-01.pem
# Connect to the EC2 virtual machine
ssh -i "cronos-01.pem" ec2-user@elastic_ip_associated_with_vm
# Once connected, update libraries and install missing ones
sudo yum update
sudo yum install jq
Mount extra storage for the blockchain data
While still connected to the EC2 virtual machine, enter the following commands in the Terminal:
# List available storage volumes
# Here you can retrieve the File system name of the 1000 GB volume,
# which should be something like /dev/nvme1n1
lsblk
# List UUIDs of available storage volumes
# Here you can retrieve the UUID of the 1000 GB volume, which
# should be something like 0bcd4d37-a271-4b2c-a475-a2bdb05f5f0d
sudo blkid
# Mount the 1000 GB volume and associate it with /cronos directory
# Replace /dev/nvme1n1 and 0bcd4d37-a271-4b2c-a475-a2bdb05f5f0d by
# the correct values in the following commands
sudo mkfs -t xfs /dev/nvme1n1
sudo mkdir /cronos
sudo mount /dev/nvme1n1 /cronos
# Let's edit the file /etc/fstab
sudo vim /etc/fstab
Once the /etc/fstab file is open in your terminal, add a row like this at the bottom of the file (replace the UUID by the correct value). Everything should be on the same row:
UUID=3a5c2d89-be70-4d9b-8597-e20af21db901 /cronos xfs defaults,nofail 0 2
Then save (if you are using vim, escape then :wq).
Finally, change the permissions of the /cronos directory to make it writable and executable by the Cronos client.
sudo chmod -R 777 /cronos
Install the Cronos Mainnet client (cronosd)
Download the Cronos Mainnet binary and install it.
# While still connected to the VM in your terminal,
# go to the user directory
cd ~/
# Replace the URL below by the latest URL given in the official
# documentation at
# <https://cronos.crypto.org/docs/getting-started/cronos-mainnet.html#step-1-get-the-cronos-mainnet-beta-binary>
curl -LOJ <https://github.com/crypto-org-chain/cronos/releases/download/v0.6.1/cronos_0.6.1_Linux_x86_64.tar.gz>
# Replace the file name below by the correct file name if needed
tar -zxvf cronos_0.6.1_Linux_x86_64.tar.gz
# We check that cronosd has been installed to the
# ~/bin/cronosd directory, this command
# should return the version number
./bin/cronosd version
# We move cronosd to the main bin directory,
# then check that cronosd can be called from anywhere.
# The last command should return the version number.
sudo mv ./bin/cronosd /bin
cronosd version
Initialize cronos d.
# Initialize cronosd
# Replace [moniker] by the name that we want to give to our node.
# Replace cronosmainnet_25-1 by the correct value if it has changed.
# Note that we use the --home option to make sure
# that the cronos data is stored on the mounted 1000 GB drive,
# not on the root volume.
cronosd init [moniker] --chain-id cronosmainnet_25-1 --home /cronos/.cronos
Configure cronosd as an archive node
First, you are going to change the configuration of the node in order to ensure that it stores all blocks and transactions, not just the latest states. You need to un-toggle fast sync and disable pruning.
Let’s edit the file /cronos/.cronos/config/config.toml
vim /cronos/.cronos/config/config.toml
In config.toml, change fast_sync to falseand then save.
fast_sync = false
Let’s edit the file app.toml.
vim /cronos/.cronos/config/app.toml
In app.toml, we change pruning from default to nothing, then save.
pruning = "nothing"
Continue to configure cronos
Let’s download the genesis file and save it in the /cronos/.cronos/config/ directory.
curl <https://raw.githubusercontent.com/crypto-org-chain/cronos-mainnet/master/cronosmainnet_25-1/genesis.json> > /cronos/.cronos/config/genesis.json
Let’s finish the configuration.
# Verify sha256sum checksum of the downloaded genesis.json.
# You should see OK! if the sha256sum checksum matches.if [[ $(sha256sum ~/.cronos/config/genesis.json | awk '{print $1}') = "58f17545056267f57a2d95f4c9c00ac1d689a580e220c5d4de96570fbbc832e1" ]]; then echo "OK"; else echo "MISMATCHED"; fi;# In cronos/.cronos/config/app.toml, update minimum gas priceif [[ $(sha256sum /cronos/.cronos/config/genesis.json | awk '{print $1}') = "58f17545056267f57a2d95f4c9c00ac1d689a580e220c5d4de96570fbbc832e1" ]]; then echo "OK"; else echo "MISMATCHED"; fi;sed -i.bak -E 's#^(minimum-gas-prices[[:space:]]+=[[:space:]]+).*$#\\\\1"5000000000000basecro"#' /cronos/.cronos/config/app.toml# For network configuration, in cronos/.cronos/config/config.toml,
# to modify the configurations of persistent_peers,
# we create_empty_blocks_interval and timeout_commitsed -i.bak -E 's#^(seeds[[:space:]]+=[[:space:]]+).*$#\\\\1"0d5cf1394a1cfde28dc8f023567222abc0f47534@cronos-seed-0.crypto.org:26656,3032073adc06d710dd512240281637c1bd0c8a7b@cronos-seed-1.crypto.org:26656,04f43116b4c6c70054d9c2b7485383df5b1ed1da@cronos-seed-2.crypto.org:26656"#' /cronos/.cronos/config/config.tomlsed -i.bak -E 's#^(create_empty_blocks_interval[[:space:]]+=[[:space:]]+).*$#\\\\1"5s"#' /cronos/.cronos/config/config.tomlsed -i.bak -E 's#^(timeout_commit[[:space:]]+=[[:space:]]+).*$#\\\\1"5s"#' /cronos/.cronos/config/config.toml
Create keys. After the following command, you are going to be asked for a password and should not forget to save the password in a safe place. Then you are going to be given a mnenomic phrase which should also be saved in a safe place.
cronosd keys add Default
Start the cronosd client
Here we are going to create a cronosd service so that the cronosd client starts whenever the virtual machine is restarted.
curl -s <https://raw.githubusercontent.com/crypto-org-chain/cronos-docs/master/systemd/create-service.sh> -o create-service.sh && curl -s <https://raw.githubusercontent.com/crypto-org-chain/cronos-docs/master/systemd/cronosd.service.template> -o cronosd.service.templatechmod +x ./create-service.sh && ./create-service.sh
Let’s edit the file /etc/systemd/system/cronosd.service
sudo vim /etc/systemd/system/cronosd.service
Change the ExecStart line to the text below instead of the original one, then save.
ExecStart=/usr/bin/cronosd start --home /cronos/.cronos
Then:
sudo systemctl daemon-reload
sudo systemctl start cronosd
Your cronosd full node has started and should be syncing ! It will take several days for the node to fully sync.
Various commands that you can use at that point:
# Check status of cronosd servicesystemctl status cronosd# Check node's sync progress (in number of blocks)
# You can compare the number of blocks to the one shown
# in the Cronos block explorer
# at the URL <https://cronos.crypto.org/explorer/>cronosd status 2>&1 | jq '.SyncInfo.latest_block_height'# Stop cronosd servicesudo systemctl stop cronosd
Query your node remotely
Once the full node is synced, you can send any JSON-RPC query to it remotely using the standard Ethereum request formats.
For example, using curl from your local machine in a Terminal window:
# Retrieve gas price
curl --location --header 'Content-Type: application/json' --request POST 'localhost:8545' --data-raw '{"jsonrpc":"2.0","method":"eth_gasPrice","params": [],"id":1}'
# Retrieve block by number
curl --location --header 'Content-Type: application/json' --request POST '<http://13.37.187.44:8545>' --data-raw '{"jsonrpc":"2.0","method":"eth_getBlockByNumber","params": ["0xc60c", true],"id":25}'
In practice, it may be more convenient to use a Javascript library (such as ethers.js or web3.js) or a Python library (such web3.py) to send requests to the full node.
For example with ethers.js in Typescript:
import { ethers } from 'ethers';
const ethersProvider = new ethers.providers.JsonRpcProvider("http://replace_by_ip:8545");
console.log("Gas price in Gwei", parseInt(
        ethers.BigNumber.from(await ethersProvider.getGasPrice())
          .div(ethers.BigNumber.from('1000000000'))
          .toString()))
Or with web3.py:
from web3 import Web3
w3 = Web3(Web3.HTTPProvider("http://replace_by_ip:8545"))
print("Gas price in Gwei", Web3.fromWei(w3.eth.gas_price, 'GWei'))