
Intermediate
How to verify contracts using Hardhat
This tutorial provides a simple approach to deploy and verify a smart contract on Cronos mainnet. It uses a simple ERC20 contract from the OpenZeppelin library and the Hardhat smart contract development and testing framework. The blog post walks through the steps to configure the Hardhat-Etherscan plugin, the Hardhat-Cronoscan plugin, and the Cronoscan block explorer to automate the verification of the smart contract after deployment. It also shows how to create the necessary configuration files, install dependencies, and write test scripts for the smart contract. The tutorial concludes with instructions on how to deploy the smart contract to Cronos and verify it using Hardhat.
Smart contract verification is sometimes overlooked when teams are rushing to ship, but it is an essential tenet of Web3 application development.
In this blog post, we review a simple approach to deploy and verify a smart contract on Cronos mainnet, using:
-
A simple ERC20 contract from the OpenZeppelin library
-
The Hardhat smart contract development and testing framework
-
The Hardhat-Etherscan plugin, used to automate the verification of the smart contract, after deployment, on Cronoscan (the Cronos version of Etherscan)
-
The Hardhat-Cronoscan plugin, which is used to configure the Hardhat-Etherscan plugin (listed above) for Cronos
-
Cronoscan, the block explorer on Cronos mainnet
Let’s set-up our working directory
If you want to go quickly through this step, you can simply clone our Cronos hardhat boilerplate repository and then type the npm install command in the root directory.
Alternatively, here is how you can re-create this boilerplate directory. In your project folder with node already installed, create your Hardhat project by typing npx hardhat and select “❯ Create an advanced sample project that uses TypeScript”. Reply yes to all.
Install the following dependencies:
npm install ethers dotenv @openzeppelin/contracts
npm install --save-dev @nomiclabs/hardhat-etherscan@^3.1.0
npm install --save-dev @cronos-labs/hardhat-cronoscan
npm install --save-dev solidity-coverage
npm install --save-dev hardhat-gas-reporter
Remove the files that you are not going to use and replace them by the actual contract, deployment and test files (see repository for the actual example files):
-
Remove
contracts/Greeter.sol=> createcontracts/MyERC20.sol -
Remove
scripts/deploy.ts=> createscripts/DeployMyERC20.script.ts -
Remove
tests/index.ts=> createscripts/MyERC20.test.ts
Then, update your hardhat.config.ts file, using the hardhat.config.ts file of the repository as template:
const config: HardhatUserConfig = {
  networks: {
    hardhat: {},
    cronosTestnet: {
      url: "https://evm-t3.cronos.org/",
      chainId: 338,
      accounts: [myPrivateKey],
      gasPrice: 5000000000000,
    },
    cronos: {
      url: "https://evm.cronos.org/",
      chainId: 25,
      accounts: [myPrivateKey],
      gasPrice: 5000000000000,
    },
  },
  etherscan: {
    apiKey: {
      cronosTestnet: <string>process.env["CRONOSCAN_TESTNET_API_KEY"],
      cronos: <string>process.env["CRONOSCAN_API_KEY"],
    },
  },
...
}
Environment variables
Create the .env file, using the .env.example file of the repository as template. The environment variables are:
-
MY_PRIVATE_KEY: this is the private key of a wallet address on Cronos (or Cronos Testnet), funded with CRO or TCRO, which will deploy the smart contract and be its owner. If you are using Cronos Testnet, you can visit Cronos Chain | DeFi and Metaverse for the next billion users to get some TCRO.
-
CRONOSCAN_API_KEY and CRONOSCAN_TESTNET_API_KEY: you can get API keys from Cronos Chain Blockchain Explorer and Cronos Chain Blockchain Explorer respectively. This is used by Hardhat to connect to Cronoscan (the Cronos version of Etherscan) in order to verify your smart contract.
-
COINMARKETCAP_API: you can get an API key from Cryptocurrency Prices, Charts And Market Capitalizations | CoinMarketCap . This is used by hardhat-gas-reporter to convert the deployment cost of the smart contract in USD or EUR.
Time to test your code
It is really important to achieve 100% unit test coverage with smart contracts. You can measure your test coverage thanks to the solidity-coverage tool, which we have installed in the above section.
For example you can type in the project folder:
npx hardhat coverage
Using our illustrative repository, you will see the following report showing that your test coverage is far from complete, as only 57% of lines are covered:

The next step would be to complete the test script in order to cover more cases.
Let’s deploy the smart contract to Cronos
The deployment to Cronos mainnet is fairly simple using the scripts/DeployMyERC20.script.ts file provided in our example repository.
For Cronos Mainnet:
npx hardhat run scripts/DeployMyERC20.script.ts --network cronos


Or, for Cronos Testnet:
npx hardhat run scripts/DeployMyERC20.script.ts --network cronosTestnet
Do not forget to verify the smart contract!
The verification of the smart contract consists in uploading the smart contract code to Cronoscan so that any user can check the source code of the contract that they are interacting with, simply by entering the smart contract address in Cronoscan.
Fortunately, Hardhat makes it easy to automate this process.
If you have installed everything properly as explained above, you can check that the Hardhat contract verification plug-in is configured for Cronos by typing:
npx hardhat verify --list-networks
The response should include, at the bottom:
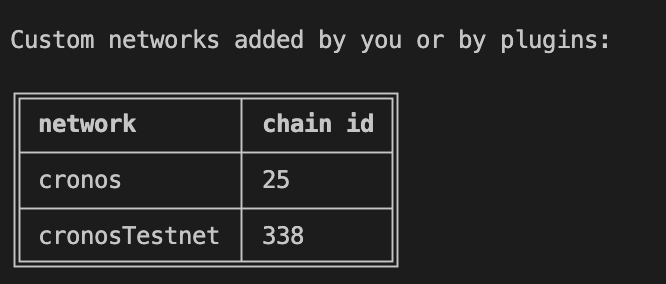

The syntax to verify the contract on Cronos Mainnet is:
npx hardhat verify --network cronos DEPLOYED_CONTRACT_ADDRESS "Constructor argument 1" "Constructor argument 2"
So, for example:
npx hardhat verify --network cronos "0x481F53b0Bb0e6fBF3eDcFd4e2790aF7A4B89A1f9" "My token name" "My token symbol"
The response should look like:


verify response
Or, on Cronos Testnet:
npx hardhat verify --network cronosTestnet DEPLOYED_CONTRACT_ADDRESS "Constructor argument 1" "Constructor argument 2"
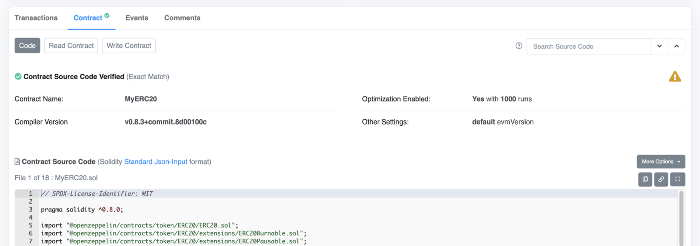
And if you head to the Cronos Chain Blockchain Explorer URL returned by the verify command, you should be able to see something like this:

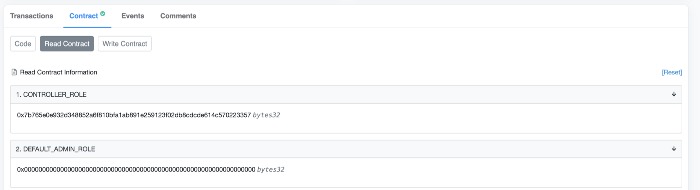
As a bonus, users can now use Cronoscan to read your smart contracts or send transactions directly:

Happy coding!