

Intermediate
Network Configuration for A Core Cell
Welcome to our tutorial on network configuration for a Core Cell on the Klaytn blockchain network. In Klaytn, Core Cells are responsible for maintaining the integrity of the blockchain by validating transactions and producing blocks. In order for a Core Cell to function properly, it must be properly configured to connect to and communicate with the rest of the network. In this tutorial, we will explore the process of configuring a Core Cell on the Klaytn network, including the necessary network settings, the process of registering the Core Cell on the network, and best practices for ensuring network stability and security. Whether you are a developer, researcher, or simply a blockchain enthusiast, this tutorial will provide valuable insights and hands-on experience in configuring a Core Cell on the Klaytn network.
A Core Cell can be made up of:
-
multiple subnets (recommended)
-
a single subnet
A Core Cell with Multiple Subnets
It is recommended to have a two-layer subnet which is used in general web services such as DB + AppServer and Proxy Web Servers. This design of the subnet has more advantages in security.
Since monitoring servers are also required for managing all servers as another layer, the following section describes how to set up a Core Cell with a three-layer subnet.
The three-layer subnet consists of the following:
-
CN Subnet
-
PN Subnet
-
Management (Mgmt) Subnet
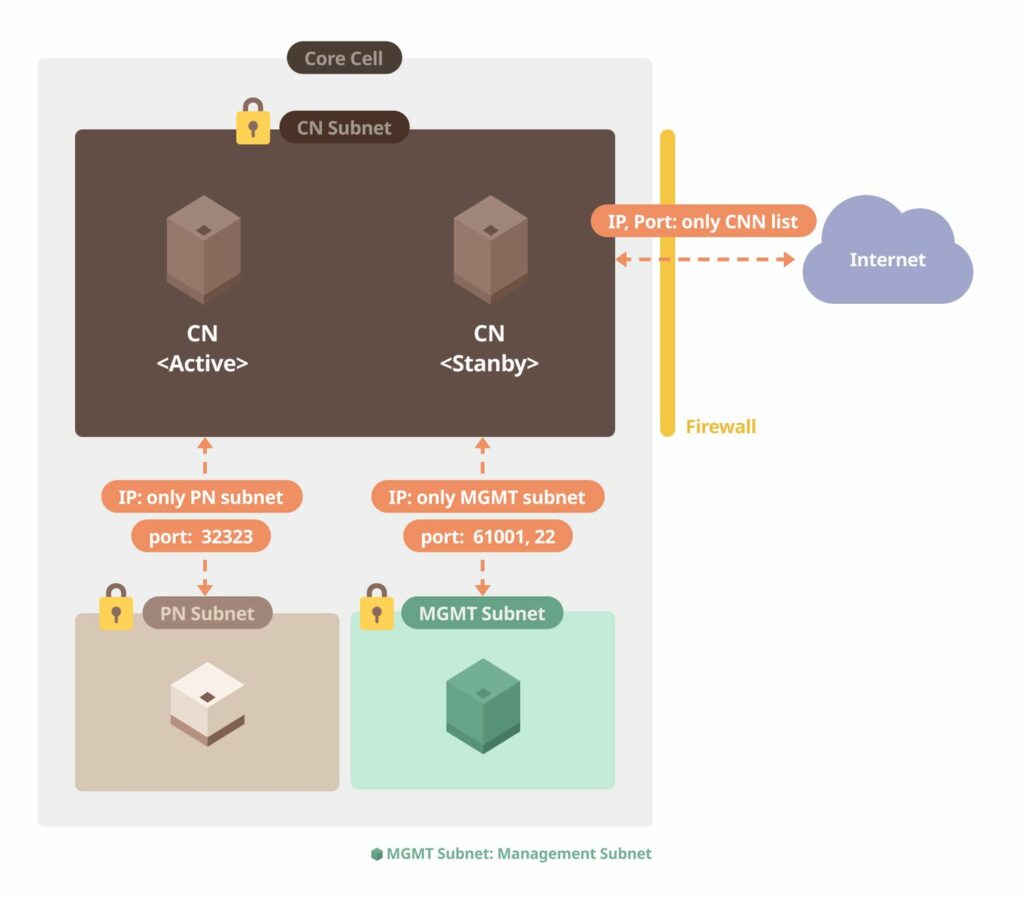
CN Subnet
A CN Subnet consists of CN servers in Core Cells. The working CN in a Core Cell is only one, but a spare one should be prepared for high availability. IP/Port of all CNs within the Core Cell Network (CCN) must be opened to each other because they try to connect to the others from the outside of the Core Cell. (This connection information can be received from Baobab operators.) The internal communication with other subnets in the Core Cell requires opening the default port (32323: default Klaytn P2P port number) in order to connect to the PNs of the PN Subnet. Furthermore, it is necessary to open other ports such as the CN monitoring port (61001) for the monitoring server and the SSH port (22) for the management purpose. If the multichannel feature is used, another port (32324: default multichannel port) should be opened as well.
CN Subnet
|
Origin Subnet |
Target Subnet |
Ingress |
Egress |
|---|---|---|---|
|
CN Subnet |
PN Subnet |
P2P: 32323 (32324 for multichannel) |
All |
|
CN Subnet |
Mgmt Subnet |
SSH: 22, Monitoring: 61001 |
All |
|
CN Subnet |
Public (Internet) |
each CN’s IP and P2P port |
All |
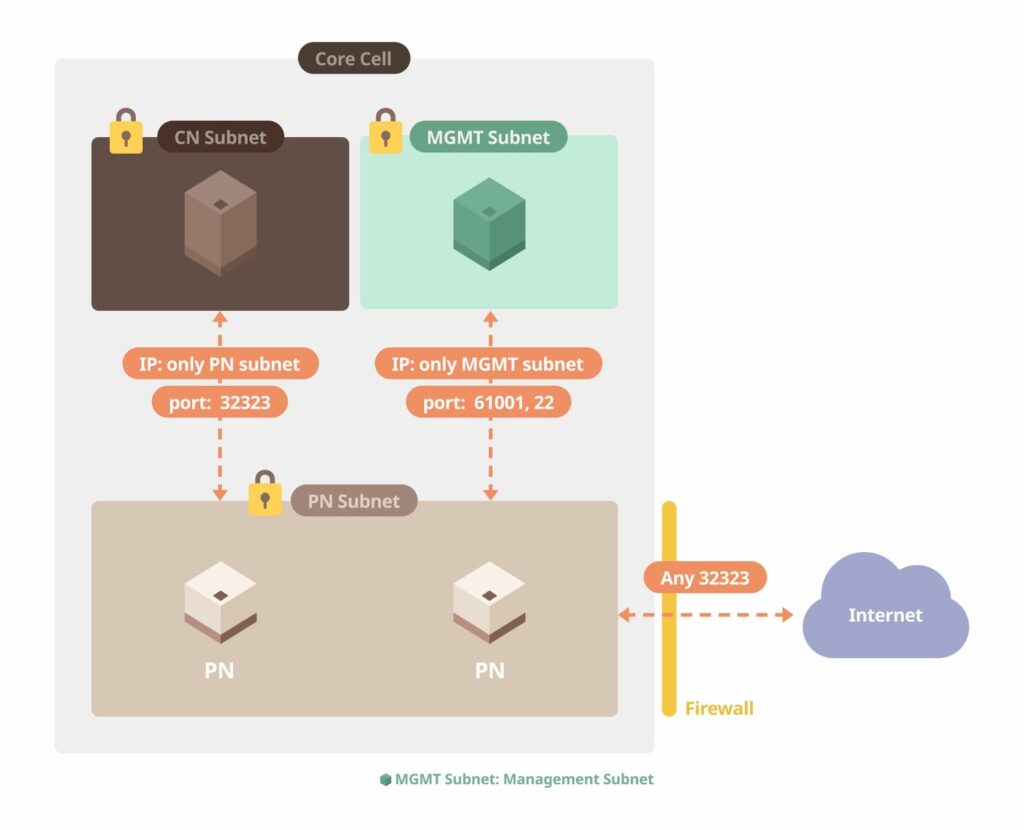
PN Subnet
A PN Subnet consists of the PN servers to provide services in order to connect to the external ENs.
A PN subnet is connected to the following nodes:
-
CNs in Core Cells
-
Some PNs of other Core Cells
-
Core Cell Management Servers (Mgmt, Monitoring)
-
EN nodes
PN Subnet
|
Origin Subnet |
Target Subnet |
Ingress |
Egress |
|---|---|---|---|
|
PN Subnet |
CN Subnet |
P2P: 32323 (32324 for multichannel) |
All |
|
PN Subnet |
Mgmt Subnet |
SSH: 22, Monitoring: 61001 |
All |
|
PN Subnet |
Public (Internet) |
P2P: 32323 |
All |
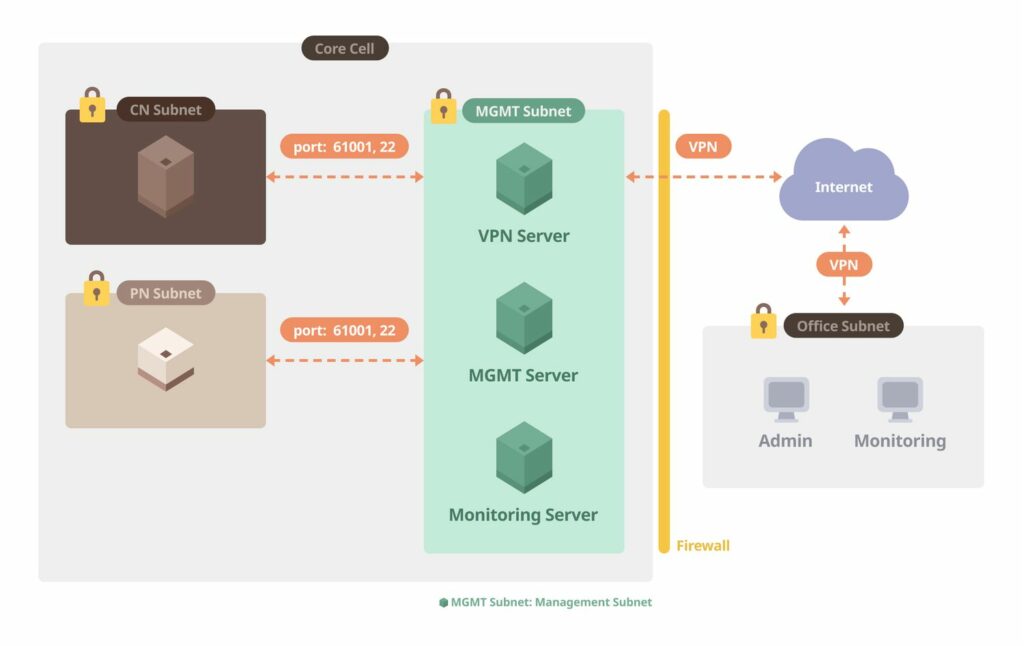
Mgmt Subnet
An Mgmt Subnet is a gateway subnet for the operator to enter into the Core Cell nodes through ssh. A VPN server may be necessary to make the connection together with a monitoring server and a management server installed with a tool to manage the Core Cell nodes.
Management Subnet
|
Origin Subnet |
Target Subnet |
Ingress |
Egress |
|---|---|---|---|
|
Mgmt Subnet |
CN Subnet |
All |
All |
|
Mgmt Subnet |
PN Subnet |
All |
All |
|
Mgmt Subnet |
Public (Internet) |
VPN (tcp): 443, VPN (udp): 1194 |
All |
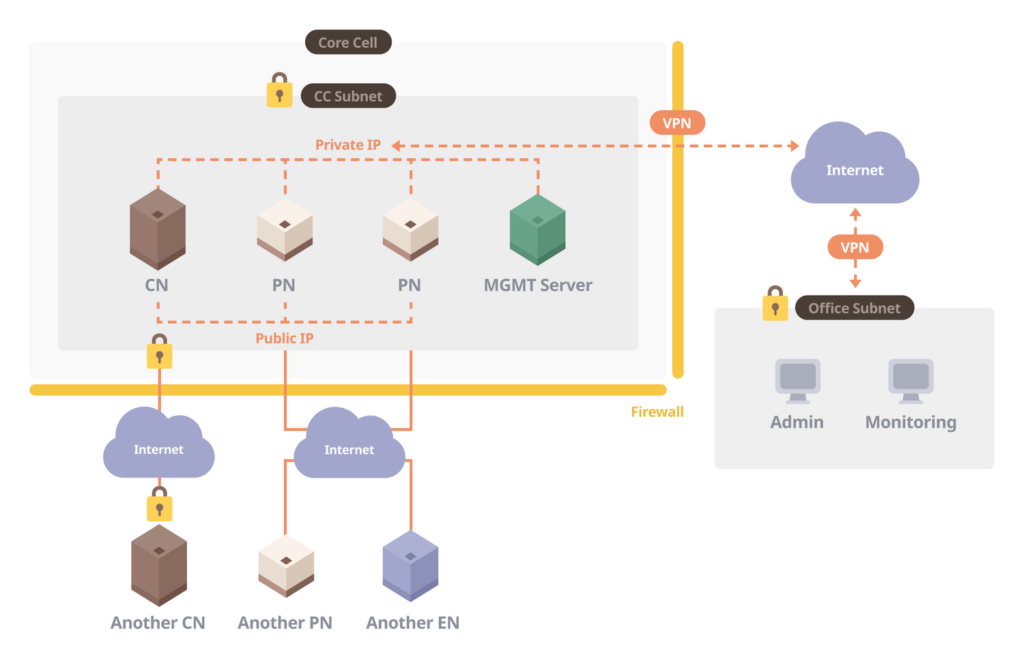
A Core Cell with a Single Subnet
A single subnet of a Core Cell is built for the development/test purpose or under difficult circumstances to create multiple subnets.
All nodes are set up under a single CC subnet. A firewall setup is also necessary for the CN to connect to other CNs within the CNN using the P2P port (32323, 32324 for the multichannel option). The P2P port of the PN is opened to connect with ENs in Endpoint Node Network (ENN) and PNs in the Core Cell Network (CNN). Additionally, an optional VPN and monitoring servers are required to be managed remotely.

Before You Install
Before installing the Klaytn package, it is required to create the associated node information to enroll your node URIs. The Kgen package is provided for CC operators, please follow the steps in the order shown below.
-
Download
kgenPackage -
Node Key & Node URI Creation
-
Node URI Enrollment
Download kgen Package
First of all, you can download the latest version of kgen package depending on your operating system on the Download page.
You can find the kgen binary file under the bin directory.
Node Key & Node URI Creation
The node key and the node URI are created only once at the beginning. The node URI must be shared with other Core Cells of the Core Cell Network. A CN connects to other CNs and a PN connects to a CN and some PNs using the created node URI. A node URI is created based on the node key by using the downloaded kgen. The below command line creates nodekey as well as node_info.json.
kgen takes the associated IP and Port number as follows.
$ kgen --ip "123.456.789.012" --port 32323 --file

$ ls

nodekey node_info.json
The nodekey is a 64-byte hexadecimal string which is a private key used in the node internally. This private key must be present in the Klaytn data directory and be careful not to lose it.
$ cat nodekey
f08f2118c455a6c9c9b5e035d3571e570a719ea61771e268546e796a264acc2b
$ mv nodekey ~/kcnd_home
The created file node_info.json includes the following contents.
|
Key Name |
Description |
Example |
|---|---|---|
|
NodeAddress |
an address of the associated node |
0xc8a23d67f2471066fa1b07270651fea7e5c0cf78 |
|
NodeKey |
the node key (a.k.a private key) |
aaa7248dfdf19418ae9121a0f39db39c5c27a3e404ea7c1b8e020ca8dbe7e71a |
|
NodeURI |
node URI |
kni://4f2f47f3bf35a2c576d3345e6e9c49b147d510c05832d2458709f63c3c90c76ead205975d944ed65e77dd4c6f63ebe1ef21d60da95952bc1e200e7487f4d9e1b@123.456.789.012:32323?discport=0 |
node_info.json contains the node information in a JSON format as follows.
$ cat node_info.json
{

    "NodeAddress": "0xc8a23d67f2471066fa1b07270651fea7e5c0cf78",

    "NodeKey": "aaa7248dfdf19418ae9121a0f39db39c5c27a3e404ea7c1b8e020ca8dbe7e71a",

    "NodeURI": "kni://4f2f47f3bf35a2c576d3345e6e9c49b147d510c05832d2458709f63c3c90c76ead205975d944ed65e77dd4c6f63ebe1ef21d60da95952bc1e200e7487f4d9e1b@123.456.789.012:32323?discport=0"

}
Node URI Enrollment
The created node URI should be enrolled to participate in the Core Cell Network (CCN). The process of enrollment is as follows.
-
Create a node URI using
kgen(node_info.json) which contains the associated IP and Port number. -
Send the information to the official Klaytn email address (
bootstrap@klaytn.comfor Cypress orbaobab@klaytn.comfor Baobab).
The enrolled information should be sent to the official Klaytn email address. The format is as follows.
In the case of CN,
Company: Kakao
CN URI : kni://
4f2f47f3bf35a2c576d3345e6e9c49b147d510c05832d2458709f63c3c90c76ead205975d944ed65e77dd4c6f63ebe1ef21d60da95952bc1e200e7487f4d9e1b@123.456.789.012:32323?discport=0
In the case of PN,
Company: Kakao
PN URI : kni://
4f2f47f3bf35a2c576d3345e6e9c49b147d510c05832d2458709f63c3c90c76ead205975d944ed65e77dd4c6f63ebe1ef2
With this, you complete this workshop successfully!!
Units of KLAY
Klaytn uses the following unit system for KLAY.
-
pebis the smallest currency unit. -
stonis an alias forGpeband was introduced for convenience. -
A
KLAYis 10^18 peb.
|
Unit |
peb value |
peb |
|---|
|
Unit |
peb value |
peb |
|---|---|---|
|
peb |
1 peb |
1 |
|
kpeb |
10^3 peb |
1,000 |
|
Mpeb |
10^6 peb |
1,000,000 |
|
Gpeb |
10^9 peb |
1,000,000,000 |
|
ston |
10^9 peb |
1,000,000,000 |
|
uKLAY |
10^12 peb |
1,000,000,000,000 |
|
mKLAY |
10^15 peb |
1,000,000,000,000,000 |
|
KLAY |
10^18 peb |
1,000,000,000,000,000,000 |
|
kKLAY |
10^21 peb |
1,000,000,000,000,000,000,000 |
|
MKLAY |
10^24 peb |
1,000,000,000,000,000,000,000,000 |
|
GKLAY |
10^27 peb |
1,000,000,000,000,000,000,000,000,000 |
|
TKLAY |
10^30 peb |
1,000,000,000,000,000,000,000,000,000,000 |
APIs Related to KLAY Units
klay.toPeb and klay.fromPeb are convenient APIs for converting between KLAY units.
$ ./klay attach data/dd/klay.ipc
...
> klay.fromPeb(25, "peb")
"25"
> klay.fromPeb(25, "Gpeb")
"0.000000025"
> klay.fromPeb(25, "ston")
"0.000000025"
> klay.fromPeb(25, "KLAY")
"0.000000000000000025"
> klay.toPeb(25, "peb")
"25"
> klay.toPeb(25, "ston")
"25000000000"
> klay.toPeb(25, "KLAY")
"25000000000000000000"
You can get the list of all units supported by klay.toPeb and klay.fromPeb by sending an invalid unit string such as the one below.
> klay.toPeb(1, "something-does-not-exist")
Error: This unit doesn't exist, please use one of the following units
"noKLAY": "0"
"peb": "1"
"kpeb": "1000"
"Mpeb": "1000000"
"Gpeb": "1000000000"
"ston": "1000000000"
"uKLAY": "1000000000000"
"mKLAY": "1000000000000000"
"KLAY": "1000000000000000000"
"kKLAY": "1000000000000000000000"
"MKLAY": "1000000000000000000000000"
"GKLAY": "1000000000000000000000000000"
"TKLAY": "1000000000000000000000000000000"

    at web3.js:2170:19
    at web3.js:2255:49
    at <anonymous>:1:1