

Intermediate
Setting up a 4-node Service Chain
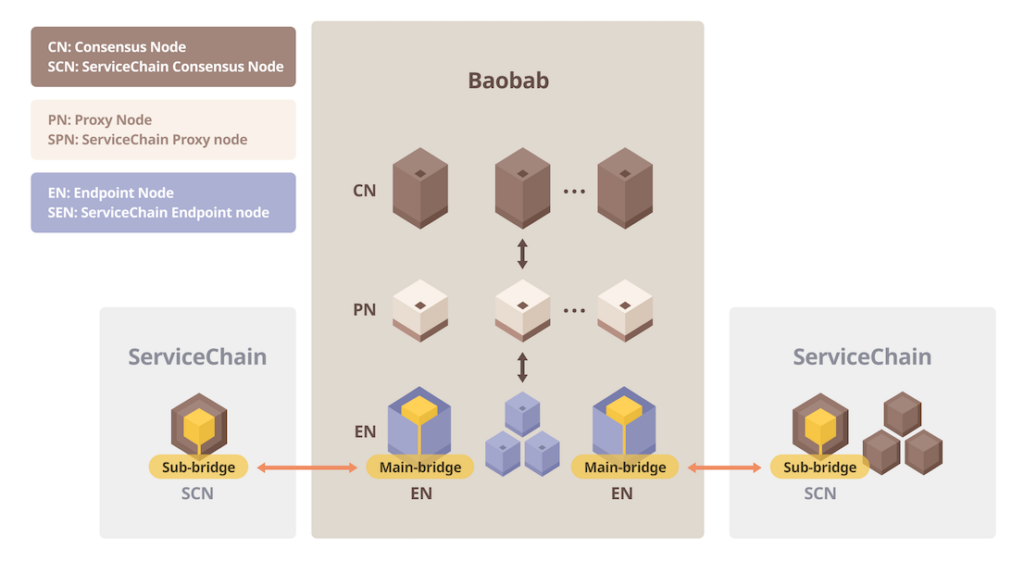
Welcome to our tutorial on setting up a 4-node service chain on the Klaytn blockchain network. In Klaytn, service chains are specialized sub-networks within the Klaytn ecosystem that can be used to optimize the performance and scalability of certain types of applications. Setting up a service chain involves configuring multiple nodes to work together as a network, allowing them to process and validate transactions more efficiently. In this tutorial, we will explore the process of setting up a 4-node service chain on the Klaytn network, including the necessary hardware and software requirements, the configuration steps, and the best practices for maintaining and securing the service chain. Whether you are a developer, researcher, or simply a blockchain enthusiast, this tutorial will provide valuable insights and hands-on experience in setting up a service chain on the Klaytn network.
Step 0: Install SCN on all nodes
The installation is the uncompression of the downloaded package. Extract the SCN archive on each server.
$ tar xvf kscn-vX.X.X-XXXXX-amd64.tar.gz
x kscn-XXXXX-amd64/
x kscn-XXXXX-amd64/conf/
x kscn-XXXXX-amd64/conf/kscnd.conf
x kscn-XXXXX-amd64/bin/
x kscn-XXXXX-amd64/bin/kscnd
x kscn-XXXXX-amd64/bin/kscn
For convenience, we will add the binary path to $PATH. Use the actual path on your node.
$ export PATH=$PATH:~/path/to/kscn-XXXXX-amd64/bin
SCN also provides various RPM distributions like RHEL, CentOS, and Fedora.
$ curl -o /etc/yum.repos.d/klaytn.repo https://packages.klaytn.net/config/rhel/7/prod.repo
  % Total % Received % Xferd Average Speed Time Time Time Current Dload Upload Total Spent Left Speed
     100 118 100 118 0 0 1113 0 --:--:-- --:--:-- --:--:-- 1102

$ yum list | grep klaytn
packages-klaytn-prod 31 kB/s | 2.9 kB 00:00
homi.x86_64           v1.8.0-0.el7      packages-klaytn-prod
kbnd.x86_64           v1.8.0-0.el7      packages-klaytn-prod
kcnd.x86_64           v1.8.0-0.el7      packages-klaytn-prod
kcnd-baobab.x86_64    v1.8.0-0.el7      packages-klaytn-prod
kend.x86_64           v1.8.0-0.el7      packages-klaytn-prod
kend-baobab.x86_64    v1.8.0-0.el7      packages-klaytn-prod
kgen.x86_64           v1.8.0-0.el7      packages-klaytn-prod
kpnd.x86_64           v1.8.0-0.el7      packages-klaytn-prod
kpnd-baobab.x86_64    v1.8.0-0.el7      packages-klaytn-prod
kscnd.x86_64          v1.8.0-0.el7      packages-klaytn-prod
ksend.x86_64          v1.8.0-0.el7      packages-klaytn-prod
kspnd.x86_64          v1.8.0-0.el7      packages-klaytn-prod

$ yum install kscnd
Step 1: Create genesis.json and nodekeys
We will use homi utility to generate the needed files. homi is a utility that automatically generates scripts, configuration files, and private keys necessary to configure the Klaytn blockchain. You can execute homi from any Linux/Mac PC.
First, extract the homi archive you downloaded.
$ tar xvf homi-vX.X.X-XXXXX-amd64.tar.gz
x homi-XXXXX-amd64/
x homi-XXXXX-amd64/bin/
x homi-XXXXX-amd64/bin/homi
Go to the bin folder and execute homi with the following options to generate the files. homi setup local --cn-num 4 --test-num 1 --servicechain --chainID 1002 --p2p-port 22323 -o homi-output Since Baobab’s chainID is 1001, for convenience, the chainID of the ServiceChain constructed in this example is set to 1002. When operating a blockchain by launching an actual service, it is recommended to use it after registering a new chainID value at https://chainlist.defillama.com/ so that chainID does not overlap with other ServiceChains. The ServiceChain port is set to 22323, which is the default port.
$ ./homi setup local --cn-num 4 --test-num 1 --servicechain --chainID 1002 --p2p-port 22323 -o homi-output
Created :  homi-output/keys/passwd1
Created :  homi-output/keys/passwd2
Created :  homi-output/keys/passwd3
Created :  homi-output/keys/passwd4
Created :  homi-output/scripts/genesis.json
Created :  homi-output/keys/nodekey1
Created :  homi-output/keys/validator1
Created :  homi-output/keys/nodekey2
Created :  homi-output/keys/validator2
Created :  homi-output/keys/nodekey3
Created :  homi-output/keys/validator3
Created :  homi-output/keys/nodekey4
Created :  homi-output/keys/validator4
Created :  homi-output/scripts/static-nodes.json
Created :  homi-output/keys_test/testkey1
Created :  homi-output/keys_test/keystore1/0xdC7218621513f71d609653d22C39d79d558d9CDC
Created :  homi-output/Klaytn.json
Created :  homi-output/Klaytn_txpool.json
Among the outputs, we will use nodekey*, genesis.json and static-nodes.json in the subsequent steps.
Step 2: Customize static-nodes.json
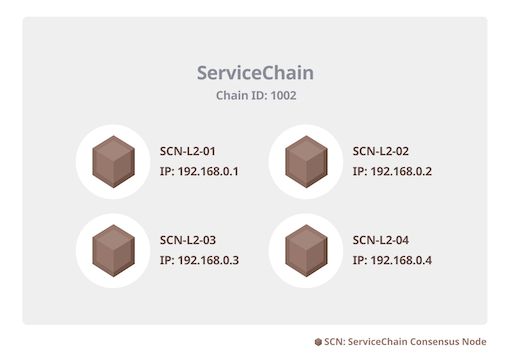
Open homi-output/scripts/static-nodes.json in a text editor then update the IP addresses and ports with the actual values of your nodes. In this example, it is assumed that the IP of each SCN node in the ServiceChain is as shown in the figure below. Remember the port you assigned here, as it will be used later in step 4.
[
     "kni://38693ad4b17ff77...23153@192.168.0.1:22323?discport=0\u0026ntype=cn",
     "kni://f36d969b16f7337...1329b@192.168.0.2:22323?discport=0\u0026ntype=cn",
     "kni://16e55d8921ab034...b2bec@192.168.0.3:22323?discport=0\u0026ntype=cn",
     "kni://0973e792a421c1d...bbd71@192.168.0.4:22323?discport=0\u0026ntype=cn"
]
After you update static-nodes.json, upload the output folders(homi-output) to all SCNs, i.e. SCN-L2-01, SCN-L2-02, SCN-L2-03, SCN-L2-04 nodes in this example.
$ scp -r path/to/homi-output/ user@192.168.0.1:~/
$ scp -r path/to/homi-output/ user@192.168.0.2:~/
$ scp -r path/to/homi-output/ user@192.168.0.3:~/
$ scp -r path/to/homi-output/ user@192.168.0.4:~/
Step 3: Node initialization
Now, we will initialize each node using the genesis file. On each node, execute the following command. It will create the data folder storing the chain data and logs on your home directory. You can change the data folder using the --datadir directive. In this example, we set the data folder to \~/data.
$ kscn --datadir ~/data init ~/homi-output/scripts/genesis.json

$ ls ~/data
keystore	klay		kscn
Step 4: Install nodekey and static-nodes.json
On every SCNs, copy static-nodes.json to the data folder.
$ cp ~/homi-output/scripts/static-nodes.json ~/data/
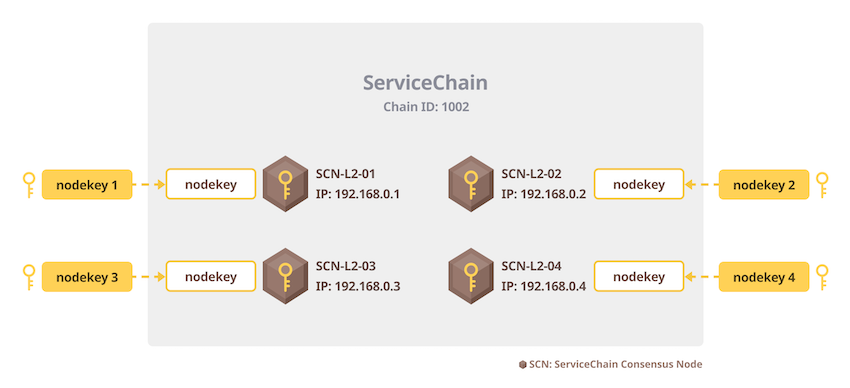
In step 1, we generated 4 nodekeys. Assign each node key to the SCN and copy the matching nodekey to each SCN’s data folder. For example, use nodekey1 for SCN-L2-01(192.168.0.1) node and use nodekey2, nodekey3 and nodekey4 for SCN-L2-02(192.168.0.2), SCN-L2-03(192.168.0.3) and SCN-L2-04(192.168.0.4) respectively.
$ cp ~/homi-output/keys/nodekey{1..4} ~/data/klay/nodekey
Step 5: Configure nodes
On every SCNs, go to the kscn installation folder and edit conf/kscnd.conf as follows. PORT is the port used to set up homi, and SC_SUB_BRIDGE is required for connecting bridges in the next section. For now, just set it to 0. In DATA_DIR, enter the data folder used in step 3.
...
PORT=22323
...
SC_SUB_BRIDGE=0
...
DATA_DIR=~/data
...
Step 6: Start nodes
Execute the following command on all SCN nodes.
$ kscnd start
Starting kscnd: OK
You can check the block generation status by watching klay.blockNumber. If this number is not 0, the node is working fine.
$ kscn attach --datadir ~/data
> klay.blockNumber
10
If you want to stop a node, you can use the command kscnd stop