
Advance
Setup, Deploy And Confirm Your Tezos Nodes
Running a Public Tezos Node with AWS Cloud
This tutorial will take you through a deployment process step by step for a public testnet node, providing scripts and tools that will make the process much easier. It assumes you have little to no previous AWS experience, but that you are more comfortable with git.
This tutorial is intended for more advanced users, who are interested in hosting a cluster of nodes capable of handling hundreds of public requests.
Before you get started, you’ll need an AWS account, to fork the necessary repositories, and to choose the network and docker image to deploy, which we’ll discuss now.
Amazon Web Services
Before we get started, you will need to set up your AWS account.
What is CloudFormation
Allocating resources and configuring options in AWS can become tedious and difficult to manage. If something goes wrong or you want to change something, you might have to tear down everything and start from scratch.
CloudFormation allows you to specify all the resources and settings you’ll need to accomplish a task in one configuration file. All stacks created with CloudFormation will be the same every time and aren’t subject to forgetting a setting. It also means that if there’s any problem creating the stack, the whole thing can be rolled back and redeployed.
Estimated costs:
AWS has a number of methods for charging for its services. In this tutorial, we use an “always on” method, but this can be modified in the provided CloudFormation scripts if you wish.
You should typically run 2 nodes so that if one fails, the load balancer can point to the other. We suggest you run i3.large ec2s. Pricing is set differently from region to region. Find the pricing per hour for the region you want to deploy in, and multiply the cost by a constant uptime of approximately 730 hours per month and by the number of nodes you plan to run. The load balancer will cost approximately an additional $20 per month. In addition, if you run your own updater, you will be running a third i3.large EC2.
With updater = $(3 * [price of i3.large EC2 in your region] * 730) + 20 Without updater = $(2 * [price of i3.large EC2 in your region] * 730) + 20
Fork and Customize Source Repositories
You can read about the different Tezos networks here and choose one that meets your needs. In this tutorial, we will be deploying a testnet node, but you can also deploy mainnet or zeronet nodes.
Tezos Docker Images
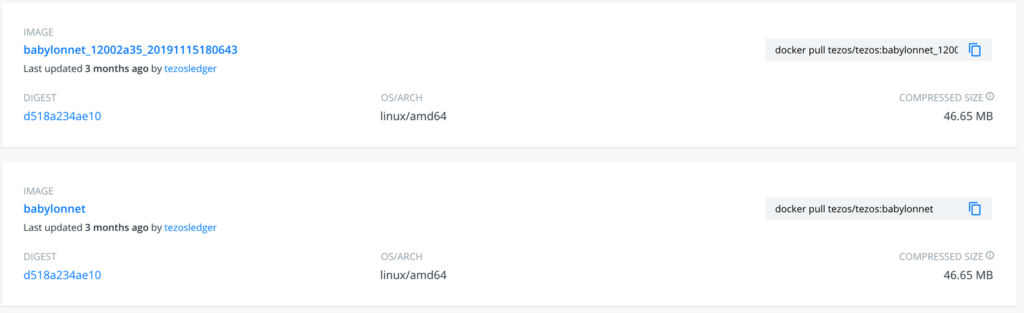
Tezos releases Docker images for each of the networks, both maintaining an always-up-to-date version, and individual release versions. You can find the one you’d like on the docker hub.
-
Mainnet will be prefixed with “master”
-
Testnet will be named for whatever the most recent testnet protocol exists. At the time of writing, it is prefixed with “babylonnet”
-
Zeronet will be prefixed with “zeronet.” This is a node you’ll want to pin to a specific release version image since it will often have breaking changes
Auto-updating versions are named just the “prefix” described above, whereas specific versions will be followed by an underscore and a hash.
Resource Repositories
We’ll be using three repositories with boilerplate pre-written so that you don’t have to.
-
tezos-updater (optional, but recommended)
Before beginning, you will want to fork these repos and customize them.
Clone your node-cloudformation fork to your local machine so that you can access the CloudFormation scripts. You can examine the yaml files, and anywhere that there is a reference to the tqtezos github account or repositories, you will want to update those references to your own forks.
Pick your Docker Image and Update Accordingly
The node-docker and tezos-updater repositories have three branches to choose from: mainnet, testnet, and zeronet. These branches use the auto-updating docker image (see “Tezos Docker Images” above), and if you’d like to pin the release version you’re using when you deploy, you’ll need to modify the Dockerfile in the appropriate branch in both repositories. Pinned image versions will need to be monitored and updated manually, but will be easier to control.
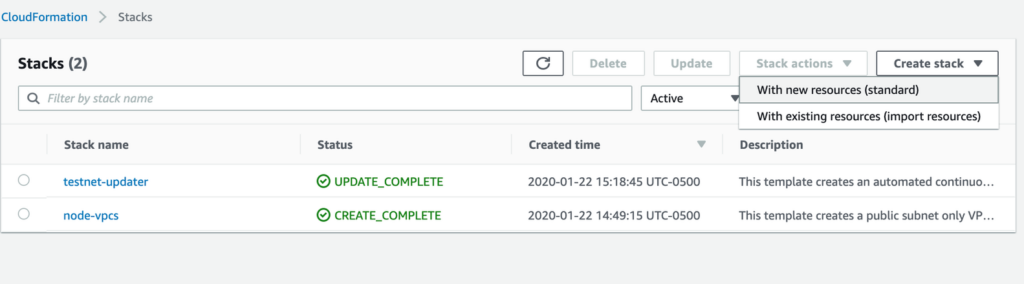
Next, navigate to Services > CloudFormation in the AWS console. Select “Create Stack” “With new resources” (this should start feeling familiar!)
If you deployed the tezos-updater in the last section, this will look very similar, but we’ll go through step by step, and I’ll point out the parameters to pay attention to.
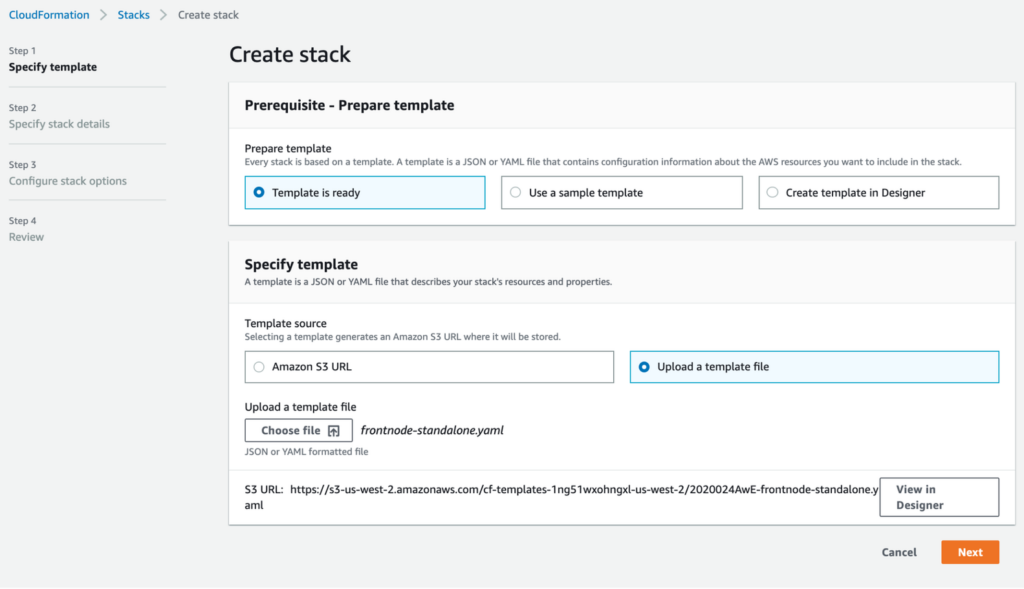
Step 1: Specify Template
Use the frontnode-standalone.yaml file.
Step 2: Specify Stack details
-
Stack name: Give your stack a name that will identify it

-
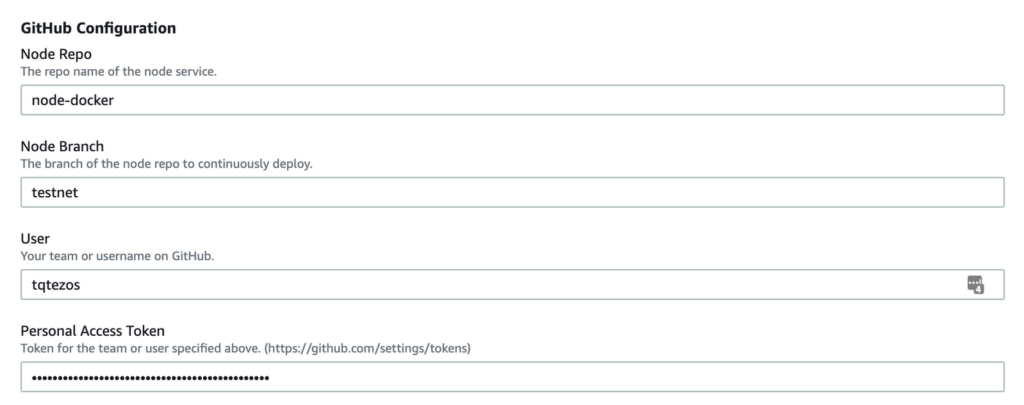
GitHub configuration Parameters will require several updates.
-
Unless you’ve changed the repository name for the node-docker fork, that field will remain unchanged.
-
The branch will default to “testnet,” so update it if you’re deploying mainnet or zeronet nodes.
-
The user is going to be changed to the GitHub user that forked the repository.
-
The personal access token is what we generated and copied from GitHub in the previous section.
-
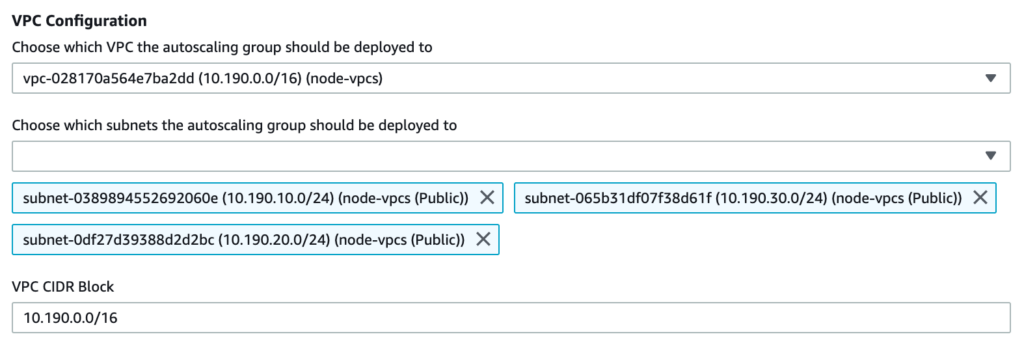
VPC Configuration Parameters will require several updates.
-
In the first dropdown, find the VPCs we just created. In the tutorial, we named them “node-vpcs”
-
When we choose what subnets to deploy to, we will choose the subnets associated with “node-vpcs.” Choose all three.
-
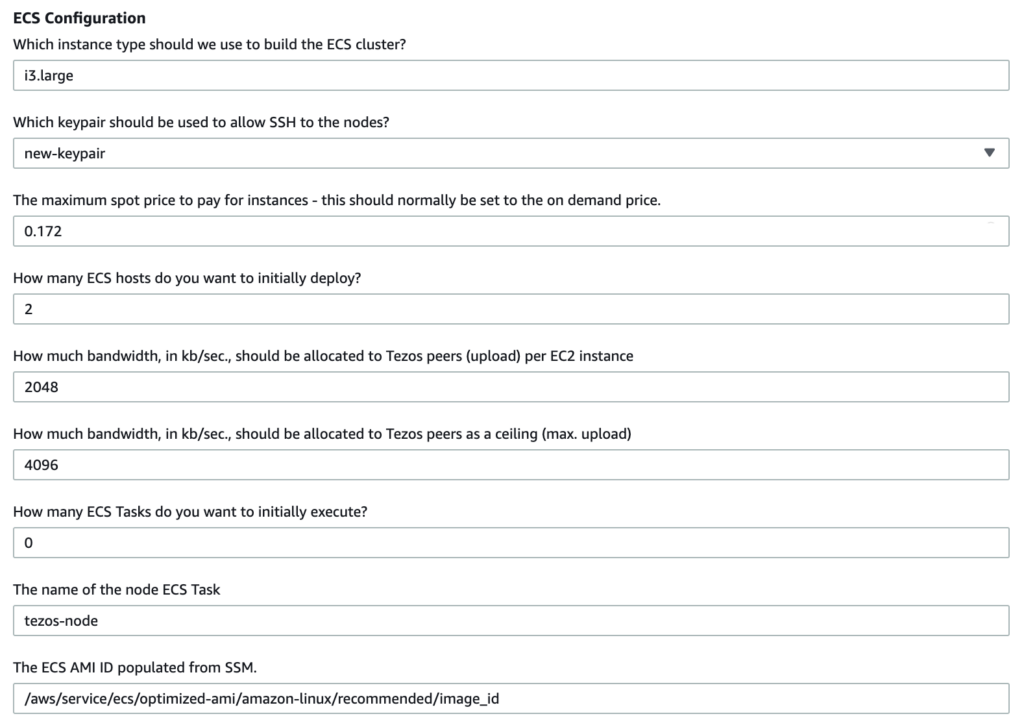
ECS Configuration
-
Add the keypair we created earlier to the keypair option
-
Update the number of ECS hosts from 5 to 2 (this is the number of nodes you’ll deploy)
-
For right now, leave the rest of the options unchanged. We will be changing the number of ECS tasks a little later.
-
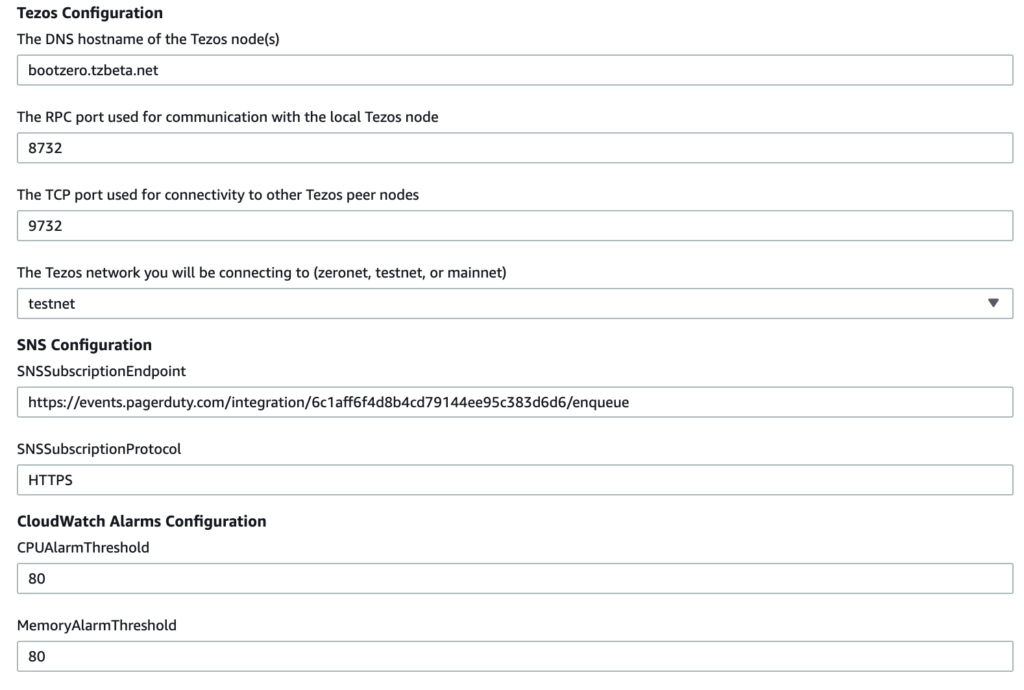
Tezos Configuration, SNS, and Cloudwatch Configurations
-
Be sure the tezos network you’re connecting to matches the tezos-updater you will be using in your region
-
The other fields can be left as is for now.
Step 3: Configure stack options
You don’t need to do anything here. Click next.
Step 4: Review
Check the acknowledgment checkbox and click “Create stack”
The CloudFormation script will allocate resources and set everything up for you. You can monitor its progress in the Services > CloudFormation > Stacks list and click on your node CloudFormation stack.
Update ECS Tasks
Once the stack has been created successfully, we can update the stack to create an ECS task. It may seem odd to immediately update the stack we just created, but there’s a reason for this. If we launch a task before the CodePipeline/CodeBuild builds your first artifact, the task creation will fail, causing the entire stack to fail and roll back. When you deploy with 0, then wait a few minutes until CodePipeline builds the first artifact, you can then update the number of tasks to be > 0 and they will successfully create/launch the tasks.
Go to Services > CloudFormation > Stacks, select the nodes stack, and click “Update”
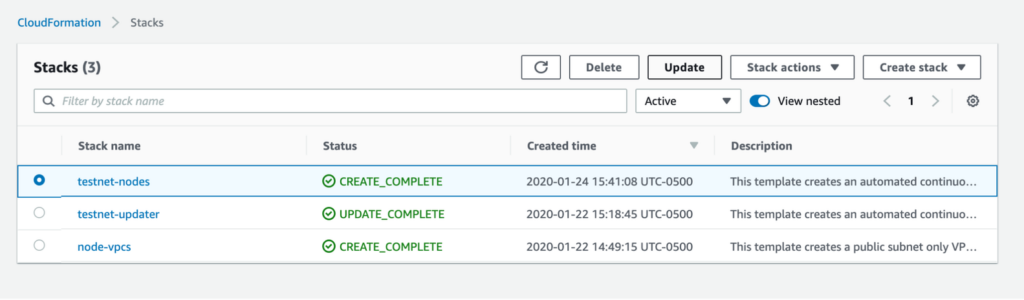
Select “Use current template” and click “Next”
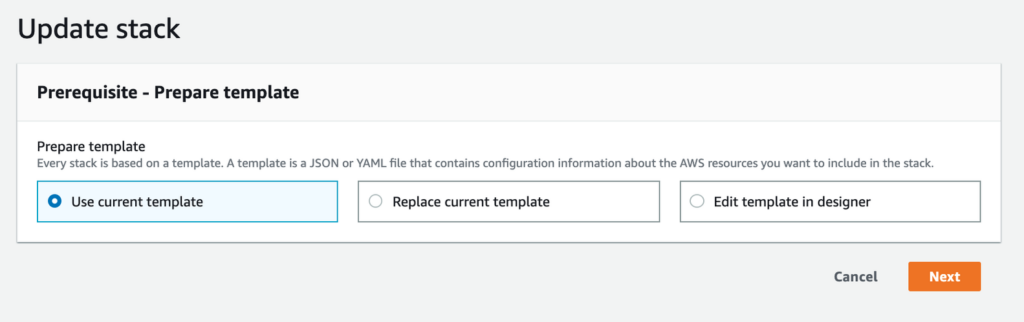
Update the number of ECS tasks from 0 to 1, and click “Next” Save the new stack.

Now, we should have nodes running, accessing data stored in our s3 buckets. Let’s confirm that everything is working as expected in the next step.
Confirm the Nodes
Making Sure Our Nodes are Working
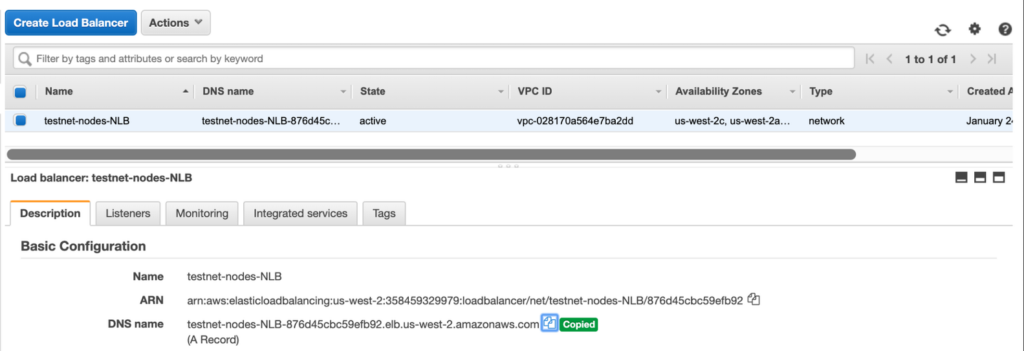
We want to make sure the nodes are up and syncing correctly. In order to do that, we need to get the address of the NLB (Node Load Balancer) that our EC2 containers are connected through.
In the AWS console, navigate to Services > EC2 > Load Balancers. Click on the node load balancer to bring up details. Find the DNS name and copy it.
In a terminal window, you can curl http://<nlb-address>:8732/monitor/bootstrapped to see if your nodes are up and the timestamp on their latest block (i.e. whether they are in sync).
$ curl http://testnet-nodes-NLB-876d45cbc59efb92.elb.us-west-2.amazonaws.com:8732/monitor/bootstrapped

{"block":"BL3ZwKGAp8o986wQ5LkvThTcEtEyj84LeVfoNGGVqJnteyMjoyH","timestamp":"2020-01-24T21:55:50Z"}
Our node is responding and up to date!
Now let’s query the data. We can use the RPCs to get the latest block with curl -s http://<nlb-address>:8732/chains/main/blocks/head
$ curl -s http://testnet-nodes-NLB-876d45cbc59efb92.elb.us-west-2.amazonaws.com:8732/chains/main/blocks/head

{"protocol":"PsBabyM1eUXZseaJdmXFApDSBqj8YBfwELoxZHHW77EMcAbbwAS","chain_id":"NetXUdfLh6Gm88t","hash":"BLedAPryPxDcCSYAuYm8PS9ohFVhujBT1fAGpARdwmUXH5UKUwQ","header":{"level":237137,"proto":1,"predecessor":"BMf1MaBXLqzfyLrF2uwBMnRDqtq4HeYs5MpcaG2DRyPu297BkPB","timestamp":"2020-01-24T22:00:32Z","validation_pass":4,"operations_hash":"LLoa8wtVnRa8npi4ejFUMDfmnBy6uwas9S9KHKcgvZar25JzLRoh2","fitness":["01","0000000000039e50"],"context":

….
We can also interact with our node through the tezos-client. We just need to provide the NLB address and port. tezos-client -A <nlb-address> -P 8732
$ tezos-client -A testnet-nodes-NLB-876d45cbc59efb92.elb.us-west-2.amazonaws.com -P 8732 bootstrapped

Warning:


                 This is NOT the Tezos Mainnet.


     The node you are connecting to claims to be running on the

               Tezos Alphanet DEVELOPMENT NETWORK.

          Do NOT use your fundraiser keys on this network.

          Alphanet is a testing network, with free tokens.

Current head: BL4fD1vf8TNk (timestamp: 2020-01-24T22:12:24-00:00, validation: 2020-01-24T22:12:55-00:00)

Bootstrapped.
Yay! Our node is working!