

Advance
Smart Contract Debugging and Build Reference
Welcome to the Smart Contract Debugging and Build Reference tutorial on MultiversX. In this tutorial, you will learn about the tools and techniques for debugging and building smart contracts in MultiversX. You will be introduced to the MultiversX platform and will be shown how to use its advanced features and tools to build, test, and deploy your smart contracts. Whether you are a beginner or an experienced developer, this tutorial will provide you with the knowledge and skills you need to create high-quality and secure smart contracts. Get ready to dive into the exciting world of smart contract development on MultiversX!
Smart Contract Debugging
Introduction
Debugging smart contracts is possible with the integrated debugger in Visual Studio Code. You will be able to debug your contract just like you would debug a regular program.
Prerequisites
For this tutorial, you will need:
Visual Studio Code
the rust-analyser extension.
the CodeLLDB extension.
A Rust test
If you want to follow along, you can clone the mx-sdk-rs repository and use the crowdfunding-esdt example.
Step-by-step debugging
In VSCode, you can put breakpoints anywhere in your code, by simply clicking to the left of the line number. A red dot should appear to mark the breakpoint as registered by the environment:
Once you’ve done that, you can debug your test function by pressing the Debug button above the test function name:’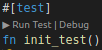
If it doesn’t appear, you might have to wait a bit for rust-analyser to load, or you might’ve forgotten the #[test] annotation.
Once you’ve started the test, it should stop at the breakpoint and highlight the current line for you: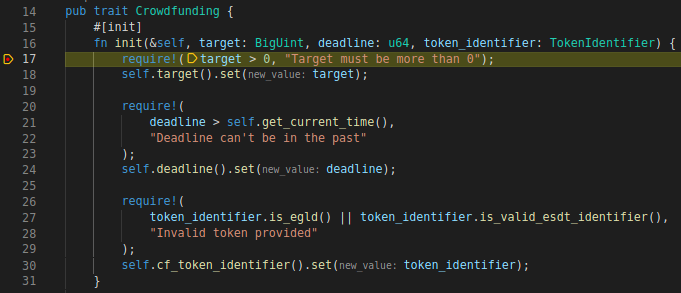
Then, you can use VSCode’s step-by-step debugging (usually F10 to step over, F11 to step into, or shift + F11 to step out).
Inspecting variables
For base Rust types, like u64 and such, you will be able to simply hover over them and see the value.
You might, however, try to hover over the target variable for instance, and will be immediately disappointed since all you’ll see is something like this:
handle:0
_phantom:{...}
This is not very helpful. Unfortunately, for managed types you don’t have the actual data in the type itself, you only have a handle (i.e. an index) in a stack somewhere.
For that reason, we have the sc_print! macro:
sc_print!("{}", target);
Adding this line to the beginning of the #[init] function will print 2000 in the console.
Printing formatted messages
If you want to print other data types, maybe even with a message, you can use the sc_print! macro all the same.
For example, if you were to add this to the start of the #[init] function:
sc_print!(
    "I accept {}, a number of {}, and only until {}",
    token_identifier,
    target,
    deadline
);
This macro would print the following:
"I accept CROWD-123456, a number of 2000, and only until 604800"
Note: For ASCII or decimal representation, use {}, and for hex, use {:x}.
Smart Contract Build Reference
How to Basic build
To build a contract, it is enough to navigate in your contract crate and run
mxpy contract build
Alternatively, you can go to your installed MultiversX Workspace Explorer VS Code extension and right-click your Smart Contract followed by Build Contract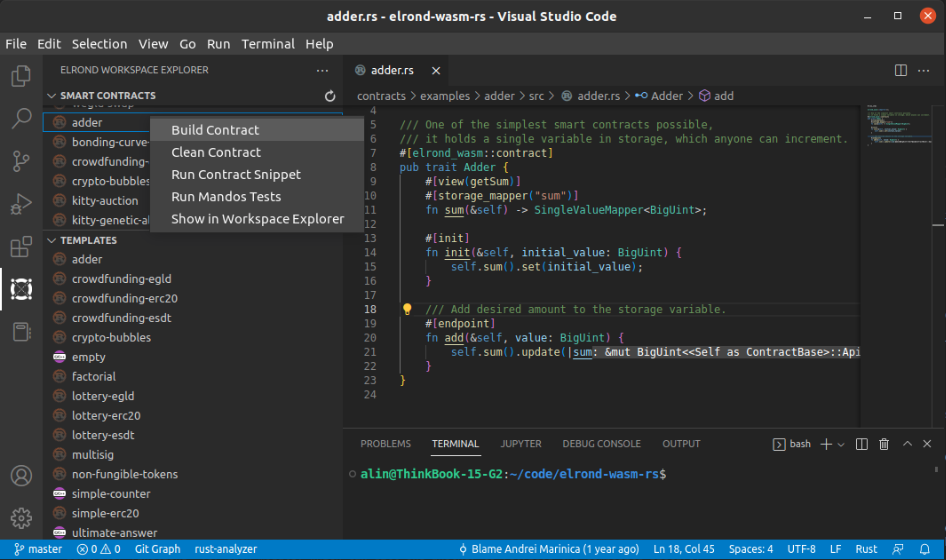
How to: Multi-contract build
Rationale
Starting with version 0.37, it is possible to configure a so-called “multi-contract build”.
The idea is to produce several smart contract binaries from the same smart contract project. These “output” contracts may or may not share most of their endpoints and logic, but they always originate from the same code base. Think of them as flavors of the same contract.
The main rationale of this system (for now at least) is the “external view” contracts. It is very common for contracts to have certain endpoints that are very useful for grabbing data off-chain but are very rarely used on-chain, if ever. Their code is basically bloating the main contract, and the idea is to extract them into a separate contract. This second contract (called an “external view contract”) works because contracts can read from the storage of other contracts directly.
The framework does the storage access rerouting automatically behind the scenes. The contract code cannot even tell the difference between a regular view from the same contract and one that has been relegated to an external view. Even more so, the same view endpoint can function both as an external view and as a regular view in different configurations/output contracts.
It is possible that this component becomes a building block of a more advanced versioning system, but we have not experimented with that yet.
Configuration example
To get a multi-contract build, it is enough to add a multicontract.toml file to the smart contract root. The build is triggered the same way as for basic builds.
The multicontract.toml file contains data on what the output contracts are, and what endpoints go in which.
We will use the multisig contract as an example. In this contracts, we have several endpoints that are never used on-chain: getPendingActionFullInfo, userRole, getAllBoardMembers, getAllProposers, getActionData, getActionSigners, getActionSignerCount, getActionValidSignerCount. We want to place these contracts in an external view contract.
In order to make configuration easier, we label them in code, as can be seen in the excerpt below:
#[multiversx_sc::module]
pub trait MultisigStateModule {
    // ...

    /// Serialized action data of an action with index.
    #[label("multisig-external-view")]
    #[view(getActionData)]
    fn get_action_data(&self, action_id: usize) -> Action<Self::Api> {
        // ...
    }

    /// Gets addresses of all users who signed an action.
    #[label("multisig-external-view")]
    #[view(getActionSigners)]
    fn get_action_signers(&self, action_id: usize) -> ManagedVec<ManagedAddress> {
        // ...
    }

    // ...
}
Labels don’t do anything more than provide a handy way to refer to groups of endpoints in the multicontract.toml.
Now for the multicontract.toml config itself, with explanations in comments:
[settings]
# one of the output contracts is considered "multisig-main"
# it can have any id
main = "multisig-main"

# contracts are identified by a contract id
# this id is only relevant in this file and in test setup
[contracts.multisig-main]
# the contract name is the important one,
# the output will be <contract-name>.wasm/<contract-name>.abi.json
name = "multisig"
# we can choose to add all unlabelled endpoints to a contract
add-unlabelled = true

# this is the external view contract, here we call it "view"
[contracts.view]
# the output will be multisig-view.wasm/multisig-view.abi.json
name = "multisig-view"
# this is how we signal that this contract will be built as an external view
external-view = true
# we only add the endpoints labelled "multisig-external-view", as in the code snippet above
# any number of labels can be added
add-labels = ["multisig-external-view"]

# this is how you get a version of the contract with all endpoints
# (main and external view, as defined above),
[contracts.full]
name = "multisig-full"
add-unlabelled = true
add-labels = ["multisig-external-view"]
The external view contract
An external view contract has a behavior different from that of a regular contract. The framework adds some logic to such a contract, which is invisible to the developer. There are two main points:
- Storage access is different. All storage reads are done from the target contract given in the constructor.
- The constructor is different. Be mindful of this when deploying the external view contract.
- The original constructor is ignored, a specific constructor is always provided instead.
- This constructor always takes one single argument, which is the address of the target contract to read from. From this on, the target address can no longer be changed.
- The external view constructor ABI is always as follows:
{
  "constructor": {
    "docs": [
      "The external view init prepares a contract that looks in another contract's storage.",
      "It takes a single argument, the other contract's address",
      "You won't find this constructors' definition in the contract, it gets injected automatically by the framework. See `multiversx_sc::external_view_contract`."
    ],
    "inputs": [
      {
        "name": "target_contract_address",
        "type": "Address"
      }
    ],
    "outputs": []
  }
}
Testing with multi-contracts
It is possible (and recommended) to use the contracts in scenario tests as they would be used on-chain.
The Go scenario runner will work with the produced contract binaries without further ado. Calling an endpoint that is not available in a certain output contract will fail, even if said endpoint exists in the original contract code.
To achieve the same effect on the Rust scenario runner, configure it as in the following snippet. This is an actual excerpt from multisig_scenario_rs_test.rs, one of the multisig test files.
fn world() -> ScenarioWorld {
    // Initialize the blockchain mock, the same as for a regular test.
    let mut blockchain = ScenarioWorld::new();
    blockchain.set_current_dir_from_workspace("contracts/examples/multisig");

    // Contracts that have no multi-contract config are provided the same as before.
    blockchain.register_contract("file:test-contracts/adder.wasm", adder::ContractBuilder);

    // For multi-contract outputs we need to provide:
    // - the ABI, via the generated AbiProvider type
    // - a scenario expression to bind to, same as for simple contracts
    // - a contract builder, same as for simple contracts
    // - the contract name, as specified in multicontract.toml
    blockchain.register_partial_contract::<multisig::AbiProvider, _>(
        "file:output/multisig.wasm",
        multisig::ContractBuilder,
        "multisig",
    );

    // The same goes for the external view contract.
    // There is no need to specify here that it is an external view,
    // the framework gets all the data from multicontract.toml.
    blockchain.register_partial_contract::<multisig::AbiProvider, _>(
        "file:output/multisig-view.wasm",
        multisig::ContractBuilder,
        "multisig-view",
    );

    blockchain
}
The multicontract.toml specification
-
settings-
main– The contract id of the main wasm crate. The only thing special about this contract’s crate is that it is simply calledwasmand that itsCargo.tomlis the basis for theCargo.tomlconfigs in all other output contract wasm crates.
-
-
contractsmap, indexed by contract id. Each contract has:-
name(optional) – The output contract name. If missing, the contract id will be used. -
external-view– Specifies that a contract should be built as an external view contract. False if unspecified. -
add-unlabelled– Specifies that all unlabelled endpoints should be added to this contract. False if unspecified. -
add-labels– A list of labels. All endpoints labeled with at least one of these labels will be added to the contract. -
add-endpoints– A list of endpoint names to be added directly to this contract. It bypasses the label system.
-
-
labels-for-contracts– It is also possible to map in reverse, labels to contracts. It contains a mapping from labels to lists of contract ids. It can be a little harder to read than the contract to label map, but it can be used. It
CLI specification
Calling build
A build can be triggered by calling either mxpy contract build <project> or cargo run build in the meta crate. In fact, mxpy calls the meta crate itself.
By default, this command will produce three files for each output contract: the ABI (<contract>.abi.json), the contract (<contract>.wasm), and a json file with all the used VM EI imported functions (<contract>.imports.json). For the multisig example above, the produced files are as follows:
output
├── multisig-full.abi.json
├── multisig-full.imports.json
├── multisig-full.wasm
├── multisig-view.abi.json
├── multisig-view.imports.json
├── multisig-view.wasm
├── multisig.abi.json
├── multisig.imports.json
└── multisig.wasm
Several arguments can be added to the build command, both in mxpy and directly:
-
--wasm-symbols: Does not optimize away symbols at compile time, retains function names, good for investigating the WAT. -
--no-wasm-opt: Does not applywasm-optafter the build, this retains function names, good for investigating the WAT. -
--wat: Also generates a WAT file for each of the contract outputs. It does so by callingwasm2wat. -
--no-imports: Does not generate an EI imports JSON file for each contract, as is the default. -
--wasm-namefollowed by name: Replaces the main contract’s name with this one. Does nothing for secondary contracts. -
--wasm-suffixfollowed by a suffix: Adds a dash and this suffix to all produced contracts. E.g.cargo run build --wasm-suffix dbgon multisig will produce contractsmultisig-dbg.wasm,multisig-view-dbg.wasmandmultisig-full-dbg.wasm. -
--target-dirspecifies which target folder the rust compiler should use. In case more contracts are compiled, it is faster for them to share the target directory, since common crates will not need to be recompiled for each contract. mxpy always sets this explicitly.
Calling build-dbg
There is another command, provided for convenience: cargo run build-dbg. Calling this is equivalent to cargo run build --wasm-symbols --no-wasm-opt --wasm-suffix "dbg" --wat --no-imports. It is ideal for developers who want to investigate the WebAssembly output produced by the compiler.
The output for build-dbg in the multisig example would be:
output
├── multisig.abi.json
├── multisig-dbg.wasm
├── multisig-dbg.wat
├── multisig-full.abi.json
├── multisig-full-dbg.wasm
├── multisig-full-dbg.wat
├── multisig-view.abi.json
├── multisig-view-dbg.wasm
└── multisig-view-dbg.wat
It accepts all the arguments from build, so --target-dir works here too.
Calling clean
Calling mxpy contract clean <project> or cargo run clean in the meta crate will delete the output folder and clean outputs of the Rust crates.
Calling snippets
Calling cargo run snippets in the meta crate will create a project called interact-rs in the contract main directory, containing auto-generated boilerplate code for building an interactor for the current contract.
An interactor is a small tool, meant for developers to interact with the contract on-chain. Being written in Rust, it is ideal for quick interactions and tinkering, directly from the contract project. There will be more documentation in the works on this topic.
Contract build process deep dive
This section provides an overview for those who want to understand the system on a deeper level. If you are simply looking to build some contracts, feel free to skip this.
Building a contract is a complex process, but luckily it gets handled invisibly by the framework. We will follow the components step by step and give some justification for this architecture.
a. The smart contract itself
The smart contract is defined as a trait without implementation. This is good because it means the contract can be executed on various platforms. Some of the implementations gets generated automatically by the [multiversx_sc::contract] macro.
Not everything, though, can be performed here. Notably, macros cannot access data from other modules or crates, all processing is local to the current contract or module. Therefore, we need another mechanism for working with the complete contract data.
b. The (generated) ABI generator
ABIs are a collection of metatada about the contract. To build an ABI, we also need the data from the modules. The module macros cannot be called from the contract macros (macros are run at compilation, we are not even sure that modules will need to be recompiled!). Modules, however, can be called. That is why we are actually generating ABI generator functions for each module, which can call one another to retrieve the composite picture.
Note: The ABI generator comes as an implementation of the trait ContractAbiProvider.
c. Meta crate: generating the ABI
The next question is how will this function be called. Whenever we compile the WASM contracts, we also produce the ABIs in JSON format. Rust has something called build scripts, which get called after compiling a project, but for reasons that will become apparent later, they are not powerful enough for our use-case.
Therefore, we have decided to include an extra crate in each smart contract project. It is always found in the meta folder in a contract, and it handles the entire build. To minimize boilerplate, it always only contains one line, that simply defers execution to the framework:
fn main() {
    multiversx_sc_meta::cli_main::<my_contract_crate::AbiProvider>();
}
To produce the ABI, in fact, it is enough to call:
cd meta
cargo run
The meta crate has access to the ABI generator because it always has a dependency on the contract crate. This is the my_contract_crate::AbiProvider in the example above.
This is also the step where the meta crate parses and processes the multicontract.toml file. If there are multiple outputs, one ABI will be produced for each.
d. Meta crate: generatingwasmcrate code
Each contract must contain at least one wasm crate. This is separate from the contract crate because it has a different purpose: it only needs to be the basis for compiling wasm. Please take it as an intermediary step between the contract logic and the Rust to WASM compiler. This is also where the WASM compilation options are specified (e.g. the optimization level). These options can be seen in the Cargo.toml file of the wasm crate.
The separation is helpful because, in this way, the smart contract crate can act as a pure Rust crate with no knowledge of WebAssembly. This makes testing and coverage easy, as well as enables integration with other unrelated technologies.
The wasm crates do not add any meaningful code to the smart contract. Everything they need to do is to provide an adapter to the WASM function syntax. More specifically, they expose an external function for each desired endpoint, which forwards execution to the corresponding smart contract method.
If we are not careful, we risk adding unwanted endpoints to the contract. A classic example is when we have a crate with multiple modules, of which only one is imported into the smart contract. In some older versions, you might have gotten unwanted endpoints from the other modules of that crate. To avoid this, we are using the ABI to generate a curated list of endpoints in each wasm crate. This way, our contracts always have the exact same endpoints as the ones specified in the ABIs.
This requires code generation. The meta crate will handle this code generation too. An example of such generated code lies below:
// Code generated by the multiversx-sc multi-contract system. DO NOT EDIT.

////////////////////////////////////////////////////
////////////////// AUTO-GENERATED //////////////////
////////////////////////////////////////////////////

// Init:                                 1
// Endpoints:                            2
// Async Callback (empty):               1
// Total number of exported functions:   4

#![no_std]
#![feature(alloc_error_handler, lang_items)]

multiversx_sc_wasm_adapter::allocator!();
multiversx_sc_wasm_adapter::panic_handler!();

multiversx_sc_wasm_adapter::endpoints! {
    adder
    (
        getSum
        add
    )
}

multiversx_sc_wasm_adapter::empty_callback! {}
The multiversx_sc_wasm_adapter macros help keep even this generated code to a minimum.
For multi-contract builds, one wasm crate needs to be generated for each of the output contracts:
-
The main wasm crate must always reside in the
wasmfolder. The source file is auto-generated, but theCargo.tomlmust be provided by the developer. -
The other wasm contracts (called “secondary”) receive a crate folder starting with
wasm-, e.g.wasm-multisig-view. These crates are fully generated based on data frommulticontract.toml. The respectiveCargo.tomlfiles are based on theCargo.tomlof the main wasm crate. All configs are taken from there, except for the crate name. -
Warning: Any folders starting with
wasm-that are unaccounted for will be removed without prompt. This is to keep the folder structure clean in case of renames.
e. Meta crate: the actual WASM build
The previous two steps happen by just calling cargo run in the meta crate, but to perform a build, one must call cargo run build.
With the ABI information and the code generated, the meta crate can now build all the WASM contracts, one for each output contract.
The rust compiler places the result in the designated target folder, but for convenience, the meta crate moves the executables to the project output folder and renames them according to the configured names.
You might have performed this step automatically from mxpy, but mxpy simply calls the meta crate to do this job. This is because at this point only the meta crate has access to the ABIs and can do it easily.
f. Meta crate: build post-processing
After building the contracts, there are three more operations left to perform, based on the compiled WebAssembly outputs:
- All contracts are optimized, using
wasm-opt. This operation can be disabled (via--no-wasm-opt). - A WAT file id generated for each contract. Not enabled by default, can be enabled (via
--wat). The framework simply calls thewasm2wattool to do this. - An
.imports.jsonfile is generated for each contract. Can be disabled (via--no-imports). The framework uses thewasm-objdumptool to retrieve the imports. It parses the output and saves it as JSON.
g. Cleaning a project
Calling cargo run clean in the meta crate will run cargo clean in all wasm crates and delete the output folder.
mxpy contract clean also just forwards to this.
Note that even the clean operation relies on the ABI, in order to reach all the wasm crates.
Build process summary
To recap, the build process steps are as follows:
- Generate code using the contract/module macros, including the ABI generator;
- Call the ABI generator, to produce an ABI in memory;
- Parse the
multicontract.tomlfile (if present); - Deciding based on that which endpoints go to which output contracts;
- Save the ABI as JSON in the output folder (one for each output contract);
- Generate the wasm crates for all output contracts (all sources generated, Cargo.toml contents copied from the main wasm crate);
- Build all wasm crates;
- Copy binaries from the
targetfolder(s) tooutput. - Perform post-processing for each contract:
wasm-opt,wasm2wat, imports;
Luckily, the framework can do all of this automatically, with a single click.