

Advance
Staking smart contract
Staking has become a popular way for blockchain users to earn rewards for participating in the network’s security and maintaining its decentralization. In this tutorial, we will learn how to build a staking smart contract on the MultiversX platform. By the end of this tutorial, you will have a solid understanding of the basics of staking and be able to build your own custom staking contract to deploy on the MultiversX blockchain.
This tutorial will guide you through the process of setting up a smart contract that allows users to stake their tokens and earn rewards based on the amount they have staked. You will also learn how to deploy and interact with the smart contract on the MultiversX network. Whether you are new to smart contract development or a seasoned veteran, this tutorial is a great way to expand your knowledge of staking and smart contract development on the MultiversX platform.
Introduction
This tutorial aims to teach you how to write a simple staking contract and to illustrate and correct the common pitfalls new smart contract developers might fall into.
Prerequisites
mxpy
First and foremost, you need to have mxpy installed: Installing mxpy • MultiversX Docs
If you already have mxpy installed, make sure to update it to the latest version, using the same instructions as for the installation.
We’re going to use mxpy for interacting with our contracts, so if you need more details about some of the steps we will perform, you can check here for more detailed explanations regarding what each command does: Smart contract interactions • MultiversX Docs
Rust
Once you have mxpy installed, you also have to install Rust through it, and the VM tools for testing:
mxpy deps install rust
mxpy deps install vmtools --overwrite
If you installed Rust already without mxpy, you might run into some issues when building your smart contracts. It’s recommended to uninstall Rust and install it through mxpy instead.
Example of error:
error[E0554]: #!
VSCode and rust-analyser extension
VSCode: https://code.visualstudio.com/
Assuming you’re on Ubuntu, download the .deb version. Go to that folder:
-
open the folder in terminal
-
run the following command:
sudo dpkg -i downloaded_file_name
rust-analyser: https://marketplace.visualstudio.com/items?itemName=rust-lang.rust-analyzer
MultiversX VSCode extension: https://marketplace.visualstudio.com/items?itemName=MultiversX.vscode-elrond-ide
Both can be easily installed from the “Extensions” menu in VSCode.
Creating the contract
Run the following command in the folder in which you want your smart contract to be created:
mxpy contract new staking-contract --template empty
Open VSCode, select File -> Open Folder, and open the newly created staking-contract folder.
You should then have the following structure:
For now, comment on all the code in the ./tests/empty_rust_test.rs file (ctrl + “A”, then ctrl + “/”). Otherwise, it will keep popping up errors as we modify the contract’s code.
Setting up the workspace
Now, to have all the extensions work properly, we have to set up our workspace. This is done by pressing ctrl + shift + P and selecting the “MultiversX: Setup Workspace” option from the menu. Choose the “Yes” option on the pop-up menu.
Now let’s open the MultiversX VSCode extension and try building our contract, to see if everything is properly set up. Go to the extension’s tab, right-click on “staking-contract” and select the “Build Contract” option:
Alternatively, you can run mxpy --verbose contract build yourself from the VSCode terminal. The command should be run inside the staking-contract folder.
After the building has been completed, our folder should look like this: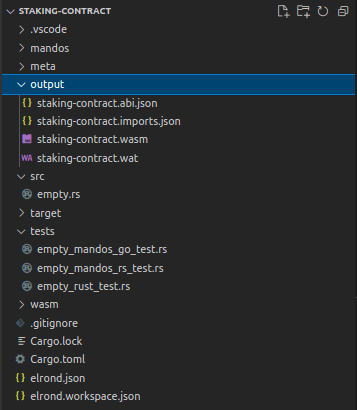
A new folder, called output was created, which contains the compiled contract code. More on this is used later. For now, let’s continue.
Your first lines of Rust
Currently, we just have an empty contract. Not very useful, is it? So let’s add some simple code for it. Since this is a staking contract, we’d expect to have a stake function, right?
First, remove all the code in the ./src/empty.rs file and replace it with this:
#![no_std]

multiversx_sc::imports!();

#[multiversx_sc::contract]
pub trait StakingContract {
    #[init]
    fn init(&self) {}

    #[payable("EGLD")]
    #[endpoint]
    fn stake(&self) {}
}
Since we want this function to be callable by users, we have to annotate it with #[endpoint]. Also, since we want to be able to receive a payment, we mark it also as #[payable("EGLD)]. For now, we’ll use EGLD as our staking token.
Now, it’s time to add an implementation for the function. We need to see how much a user paid, and save their staking information in storage. We end up with this code:
#![no_std]

multiversx_sc::imports!();

#[multiversx_sc::contract]
pub trait StakingContract {
    #[init]
    fn init(&self) {}

    #[payable("EGLD")]
    #[endpoint]
    fn stake(&self) {
        let payment_amount = self.call_value().egld_value();
        require!(payment_amount > 0, "Must pay more than 0");

        let caller = self.blockchain().get_caller();
        self.staking_position(caller.clone()).set(&payment_amount);
        self.staked_addresses().insert(caller.clone());
    }

    #[view(getStakedAddresses)]
    #[storage_mapper("stakedAddresses")]
    fn staked_addresses(&self) -> UnorderedSetMapper<ManagedAddress>;

    #[view(getStakingPosition)]
    #[storage_mapper("stakingPosition")]
    fn staking_position(&self, addr: ManagedAddress) -> SingleValueMapper<BigUint>;
}
require! is a macro that is a shortcut for if !condition { signal_error(msg) }. Signalling an error will terminate the execution and revert any changes made to the internal state, including token transfers from and to the SC. In this case, there is no reason to continue if the user did not pay anything.
We’ve also added #[view] annotation for the storage mappers, so we can later perform queries on those storage entries.
Firstly, the last clone is not needed. If you clone variables all the time, then you need to take some time to read the Rust ownership chapter of the Rust book: ![]() Understanding Ownership – The Rust Programming Language and also about the implications of cloning types from the Rust framework:
Understanding Ownership – The Rust Programming Language and also about the implications of cloning types from the Rust framework: BigUint Operations • MultiversX Docs
Secondly, the staking_position does not need an owned value of the addr argument. We can take a reference instead.
And lastly, there’s a logic error. What happens if a user stakes twice? That’s right, their position will be overwritten with the newest value. So instead, we need to add the newest stake amount over their current amount, using the update method.
After fixing the above problems, we end up with the following code:
#![no_std]

multiversx_sc::imports!();

#[multiversx_sc::contract]
pub trait StakingContract {
    #[init]
    fn init(&self) {}

    #[payable("EGLD")]
    #[endpoint]
    fn stake(&self) {
        let payment_amount = self.call_value().egld_value();
        require!(payment_amount > 0, "Must pay more than 0");

        let caller = self.blockchain().get_caller();
        self.staking_position(&caller)
            .update(|current_amount| *current_amount += payment_amount);
        self.staked_addresses().insert(caller);
    }

    #[view(getStakedAddresses)]
    #[storage_mapper("stakedAddresses")]
    fn staked_addresses(&self) -> UnorderedSetMapper<ManagedAddress>;

    #[view(getStakingPosition)]
    #[storage_mapper("stakingPosition")]
    fn staking_position(&self, addr: &ManagedAddress) -> SingleValueMapper<BigUint>;
}
Deploying the contract
Now that we’ve created a wallet, it’s time to deploy our contract. Open your snippets.sh file, and add the following:
USER_PEM="~/Downloads/tutorialKey.pem"
PROXY="https://devnet-gateway.multiversx.com"
CHAIN_ID="D"

deploy() {
    mxpy --verbose contract deploy --project=${PROJECT} \
    --recall-nonce --pem=${USER_PEM} \
    --gas-limit=10000000 \
    --send --outfile="deploy-devnet.interaction.json" \
    --proxy=${PROXY} --chain=${CHAIN_ID} || return
}
The only thing you need to edit is the USER_PEM variable with the previously created PEM file’s path.
To run this snippet, we’re going to use the MultiversX IDE extension again. Open the extension in VSCode from the left-hand menu, right-click on the contract name, and select the Run Contract Snippet option. This should open a menu at the top: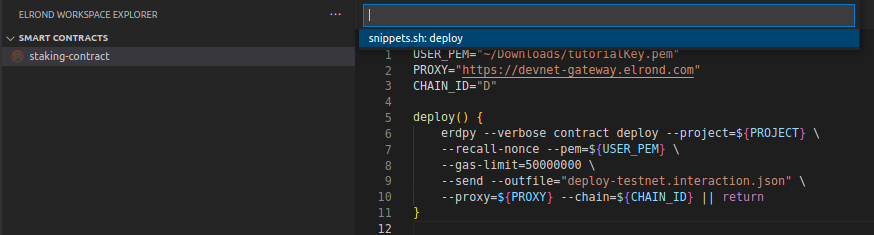
For now, we only have one option, as we only have a single function in our file, but any bash function we write in the snippets.sh file will appear there. Now, select the deploy option, and let’s deploy the contract.
The first stake
Let’s add a snippet for the staking function:
USER_PEM="~/Downloads/tutorialKey.pem"
PROXY="https://devnet-gateway.multiversx.com"
CHAIN_ID="D"

SC_ADDRESS=erd1qqqqqqqqqqqqq...
STAKE_AMOUNT=1

deploy() {
    mxpy --verbose contract deploy --project=${PROJECT} \
    --recall-nonce --pem=${USER_PEM} \
    --gas-limit=10000000 \
    --send --outfile="deploy-devnet.interaction.json" \
    --proxy=${PROXY} --chain=${CHAIN_ID} || return
}

stake() {
    mxpy --verbose contract call ${SC_ADDRESS} \
    --proxy=${PROXY} --chain=${CHAIN_ID} \
    --send --recall-nonce --pem=${USER_PEM} \
    --gas-limit=10000000 \
    --value=${STAKE_AMOUNT} \
    --function="stake"
}
To pay EGLD, the --value argument is used, and, as you can guess, the --function argument is used to select which endpoint we want to call.
We’ve now successfully staked 1 EGLD… or have we? If we look at the transaction, that’s not quite the case:
I sent 1 EGLD to the SC, but instead 0.000000000000000001 EGLD got sent?
This is because EGLD has 18 decimals. So to send 1 EGLD, you actually have to send a value equal to 1000000000000000000 (i.e. 1 * 10^18). The blockchain only works with unsigned numbers. Floating point numbers are not allowed. The only reason the explorer displays the balances with a floating point is because it’s much more user-friendly to tell someone they have 1 EGLD instead of 1000000000000000000 EGLD, but internally, only the integer value is used.
But how do I send 0.5 EGLD to the SC?
Since we know EGLD has 18 decimals, we have to simply multiply 0.5 by 10^18, which yields 500000000000000000.
Actually staking 1 EGLD
To do this, we simply have to update our STAKE_AMOUNT variable in the snippet. This should be: STAKE_AMOUNT=1000000000000000000.
Now let’s try staking again:
Querying the view functions
To perform smart contract queries, we also use mxpy. Let’s add the following to our snippet file:
USER_ADDRESS=erd1...

getStakeForAddress() {
    mxpy --verbose contract query ${SC_ADDRESS} \
    --proxy=${PROXY} \
    --function="getStakingPosition" \
    --arguments ${USER_ADDRESS}
}
Replace USER_ADDRESS value with your address. Now let’s see our staking amount, according to the SC’s internal state:
getStakeForAddress
[
    {
        "base64": "DeC2s6dkAAE=",
        "hex": "0de0b6b3a7640001",
        "number": 1000000000000000001
    }
]
We get the expected amount, 1 EGLD, plus the initial 10^-18 EGLD we sent.
Now let’s also query the stakers list:
getAllStakers() {
    mxpy --verbose contract query ${SC_ADDRESS} \
    --proxy=${PROXY} \
    --function="getStakedAddresses"
}
Running this function should yield a result like this:
getAllStakers
[
    {
        "base64": "nKGLvsPooKhq/R30cdiu1SRbQysprPITCnvi04n0cR0=",
        "hex": "9ca18bbec3e8a0a86afd1df471d8aed5245b432b29acf2130a7be2d389f4711d",
        "number": 70846231242182541417246304875524977991498122361356467219989042906898688667933
    }
]
..but what’s this value? If we try to convert 9ca18bbec3e8a0a86afd1df471d8aed5245b432b29acf2130a7be2d389f4711d to ASCII, we get gibberish. So what happened to our pretty erd1 address?
Converting erd1 addresses to hex
The smart contracts never work with the erd1 address format, but rather with the hex format. This is NOT an ASCII to hex conversion. This is a bech32 to ASCII conversion.
But then, why did the previous query work?
getStakeForAddress() {
    mxpy --verbose contract query ${SC_ADDRESS} \
    --proxy=${PROXY} \
    --function="getStakingPosition" \
    --arguments ${USER_ADDRESS}
}
This is because mxpy automatically detected and converted the erd1 address to hex. To perform those conversions yourself, you can also use mxpy:
bech32 to hex
mxpy wallet bech32 --decode erd1...
In the previous example, we used the address: erd1njsch0krazs2s6harh68rk9w65j9kset9xk0yyc2003d8z05wywsmmnn76
Now let’s try and decode this with mxpy:
mxpy wallet bech32 --decode erd1njsch0krazs2s6harh68rk9w65j9kset9xk0yyc2003d8z05wywsmmnn76
9ca18bbec3e8a0a86afd1df471d8aed5245b432b29acf2130a7be2d389f4711d
Which is precisely the value we received from the smart contract. Now let’s try it the other way around.
hex to bech32
mxpy wallet bech32 --encode hex_address
Running the command with the previous example, we should get the same initial address:
mxpy wallet bech32 --encode 9ca18bbec3e8a0a86afd1df471d8aed5245b432b29acf2130a7be2d389f4711d
erd1njsch0krazs2s6harh68rk9w65j9kset9xk0yyc2003d8z05wywsmmnn76
Adding unstake functionality
For now, users can only stake, but they cannot actually get their EGLD back… at all. Let’s add the unstake endpoint in our SC:
#[endpoint]
fn unstake(&self) {
    let caller = self.blockchain().get_caller();
    let stake_mapper = self.staking_position(&caller);

    let caller_stake = stake_mapper.get();
    if caller_stake == 0 {
        return;
    }

    self.staked_addresses().swap_remove(&caller);
    stake_mapper.clear();

    self.send().direct_egld(&caller, &caller_stake);
}
You might notice the variable stake_mapper. Just to remind you, the mapper’s definition looks like this:
#[storage_mapper("stakingPosition")]
fn staking_position(&self, addr: &ManagedAddress) -> SingleValueMapper<BigUint>;
In pure Rust terms, this is a method of our contract trait, with one argument, that returns a SingleValueMapper<BigUint>. All mappers are nothing more than struct types that provide an interface to the storage API.
So then, why save the mapper in a variable?
Better usage of storage mapper types
Each time you access self.staking_position(&addr), the storage key has to be constructed again, by concatenating the static string stakingPosition with the given addr argument. The mapper saves its key internally, so if we reuse the same mapper, the key is only constructed once.
This saves us the following operations:
let mut key = ManagedBuffer::new_from_bytes(b"stakingPosition");
key.append(addr.as_managed_buffer());
Instead, we just reuse the key we built previously. This can be a great performance enhancement, especially for mappers with multiple arguments. For mappers with no arguments, the improvement is minimal, but might still be worth thinking about.
Partial unstake
Some users might only want to unstake a part of their tokens, so we could simply add an unstake_amount argument:
#[endpoint]
fn unstake(&self, unstake_amount: BigUint) {
    let caller = self.blockchain().get_caller();
    let remaining_stake = self.staking_position(&caller).update(|staked_amount| {
        require!(
            unstake_amount > 0 && unstake_amount <= *staked_amount,
            "Invalid unstake amount"
        );
        *staked_amount -= &unstake_amount;

        staked_amount.clone()
    });
    if remaining_stake == 0 {
        self.staked_addresses().swap_remove(&caller);
    }

    self.send().direct_egld(&caller, &unstake_amount);
}
As you might notice, the code changed quite a bit. We also need to account for invalid user input, so we add a require! statement. Additionally, since we no longer need to simply “clear” the storage, we use the update method, which allows us to change the currently stored value through a mutable reference.
update is the same as doing get, followed by computation, and then set, but it’s just a lot more compact. Additionally, it also allows us to return anything we want from the given closure, so we use that to detect if this was a full unstake.
pub fn update<R, F: FnOnce(&mut T) -> R>(&self, f: F) -> R {
    let mut value = self.get();
    let result = f(&mut value);
    self.set(value);
    result
}
Optional arguments
For a bit of performance enhancement, we could have the unstake_amount as an optional argument, with the default being full unstake.
#[endpoint]
fn unstake(&self, opt_unstake_amount: OptionalValue<BigUint>) {
    let caller = self.blockchain().get_caller();
    let stake_mapper = self.staking_position(&caller);
    let unstake_amount = match opt_unstake_amount {
        OptionalValue::Some(amt) => amt,
        OptionalValue::None => stake_mapper.get(),
    };

    let remaining_stake = stake_mapper.update(|staked_amount| {
        require!(
            unstake_amount > 0 && unstake_amount <= *staked_amount,
            "Invalid unstake amount"
        );
        *staked_amount -= &unstake_amount;

        staked_amount.clone()
    });
    if remaining_stake == 0 {
        self.staked_addresses().swap_remove(&caller);
    }

    self.send().direct_egld(&caller, &unstake_amount);
}
This makes it so if someone wants to perform a full unstake, they can simply not give the argument at all.
Unstaking our devnet tokens
Now that we’ve added the unstake function, let’s test it out on devnet. Build your SC again through the MultiversX IDE extension or mxpy directly, and add the unstake function to our snippets.rs file:
UNSTAKE_AMOUNT=500000000000000000

unstake() {
    mxpy --verbose contract call ${SC_ADDRESS} \
    --proxy=${PROXY} --chain=${CHAIN_ID} \
    --send --recall-nonce --pem=${USER_PEM} \
    --gas-limit=10000000 \
    --function="unstake" \
    --arguments ${UNSTAKE_AMOUNT}
}
Now run this function, and you’ll get this result: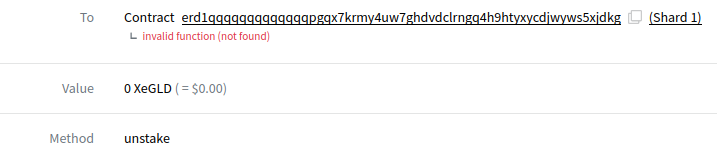
…but why? We just added the function! Well, we might’ve added it to our code, but the contract on the devnet still has our old code. So, how do we upload our new code?
Upgrading smart contracts
Since we’ve added some new functionality, we also want to update the currently deployed implementation. Add the upgrade snippet to your snippets.sh and run it:
upgrade() {
    mxpy --verbose contract upgrade ${SC_ADDRESS} \
    --project=${PROJECT} \
    --recall-nonce --pem=${USER_PEM} \
    --gas-limit=20000000 \
    --send --outfile="upgrade-devnet.interaction.json" \
    --proxy=${PROXY} --chain=${CHAIN_ID} || return
}
Try unstaking again
Try running the unstake snippet again. This time, it should work just fine. Afterwards, let’s query our staked amount through getStakeForAddress, to see if it updated our amount properly:
getStakeForAddress
[
    {
        "base64": "BvBbWdOyAAE=",
        "hex": "06f05b59d3b20001",
        "number": 500000000000000001
    }
]
We had 1 EGLD, and we’ve unstaked 0.5 EGLD. Now we have 0.5 EGLD staked. (with the extra 1 fraction of EGLD we’ve staked initially).
Unstake with no arguments
Let’s also test the optional argument functionality. Remove the --arguments line from the snippet, and run it again.
unstake() {
    mxpy --verbose contract call ${SC_ADDRESS} \
    --proxy=${PROXY} --chain=${CHAIN_ID} \
    --send --recall-nonce --pem=${USER_PEM} \
    --gas-limit=10000000 \
    --function="unstake"
}
Let’s also query getStakeForAddress and getAllStakers afterwards to see if the state was cleaned up properly:
getStakeForAddress
[
    ""
]
getAllStakers
[]
As you can see, we get an empty result (which means the value 0), and an empty array respectively.