


Intermediate
How to integrate Cronos play Gaming SDK with cronos chain : 2D Game Example
This tutorial aims to demonstrate the integration of Cronos Play Gaming SDK with the Cronos chain, enabling Unity games to function within the Cronos ecosystem. The tutorial provides step-by-step instructions on how to perform a basic integration of Cronos Play and Cronos chain, including connecting to Cronos networks, installing the SDK, obtaining a sample NFT, and importing a sample package from Unity Asset Store. To proceed with the tutorial, users should have Unity (version 2020.3.25f1 or later), ChainSafe SDK, and the Metamask browser extension installed. The tutorial also includes the required network settings, contract addresses, and ERC protocol methods for reference. By following the guidelines, users can create a new project, perform prefabs interaction, run and build the game on the WebGL platform, and download the full source code of the sample game.
Overview
This section showcase the Cronos play Gaming SDK integration with the Cronos chain, aiming to bring Unity games into the Cronos ecosystem. In particular, we will show how to do a basic integration of the Cronos play with the Cronos chain including:
-
Connecting to Cronos networks;
-
Installaiton of the SDK;
-
Obtaining a sample NFT and;
-
Import Sample package from Unity Asset Store
Pre-requisites
Unity (Version 2020.3.25f1 or later)
Mainnet
Network Name: Cronos Mainnet Beta
-
New RPC URL: https://evm-dev.cronos.org/
-
Chain ID: 25
-
Currency Symbol: CRO
-
Block Explorer URL: Cronos Chain Blockchain Explorer
Testnet
Network Name: Cronos Testnet
-
New RPC URL: https://evm-dev-t3.cronos.org/
-
Chain ID: 338
-
Currency Symbol: TCRO
-
Block Explorer URL: Cronos Chain Blockchain Explorer
-
Sufficient fund on deployer address
-
For Crypto.com: The best place to buy Bitcoin, Ethereum, and 250+ altcoins DeFi Wallet integration, please refer to our documentation.
Integration guide for Cronos
Create a new project
-
Download the tutorial bolt kit from Unity and import the assets into the blank new project. Below are the steps of importing Tutorial Projects – Bolt Kit from Unity. See Reference #1.
Download the latest ChainSafe SDK and import into the project.
-
For a detailed explanation, please refer to ChainSafe official documentation
Prefabs interaction
-
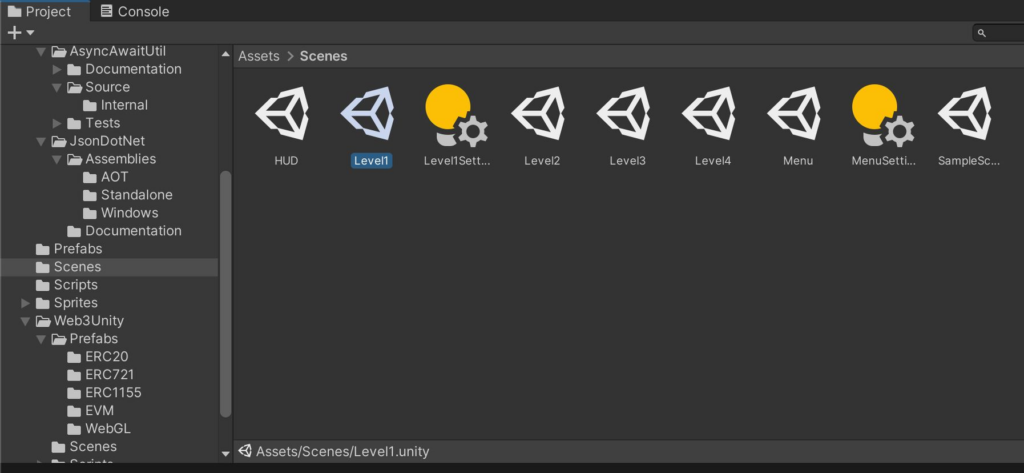
Step 3a. [Unity] Double click the
Level1scene underAssets/Scenesdirectory
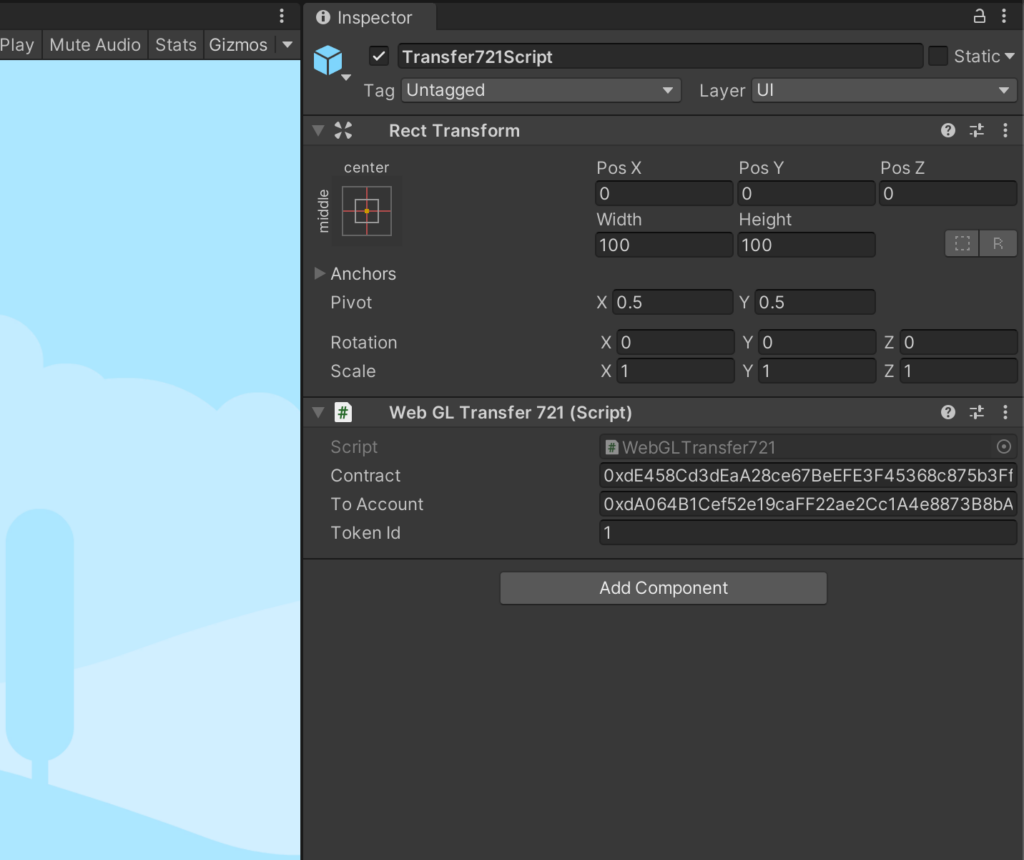
Transfer721 Example
-
Drag the
Transfer721prefab underAssets/Web3Unity/Prefabs/WebGLdir into the scene.

- Update the
Contractaddress underTransfer721Scriptobject inspector - Update the
To Accountaddress to your desired wallet address

- For acquiring the NFT, you can create your own (see
Reference #2), or mint an ERC721 NFT at our Cronos NFT faucet (see Reference #3).
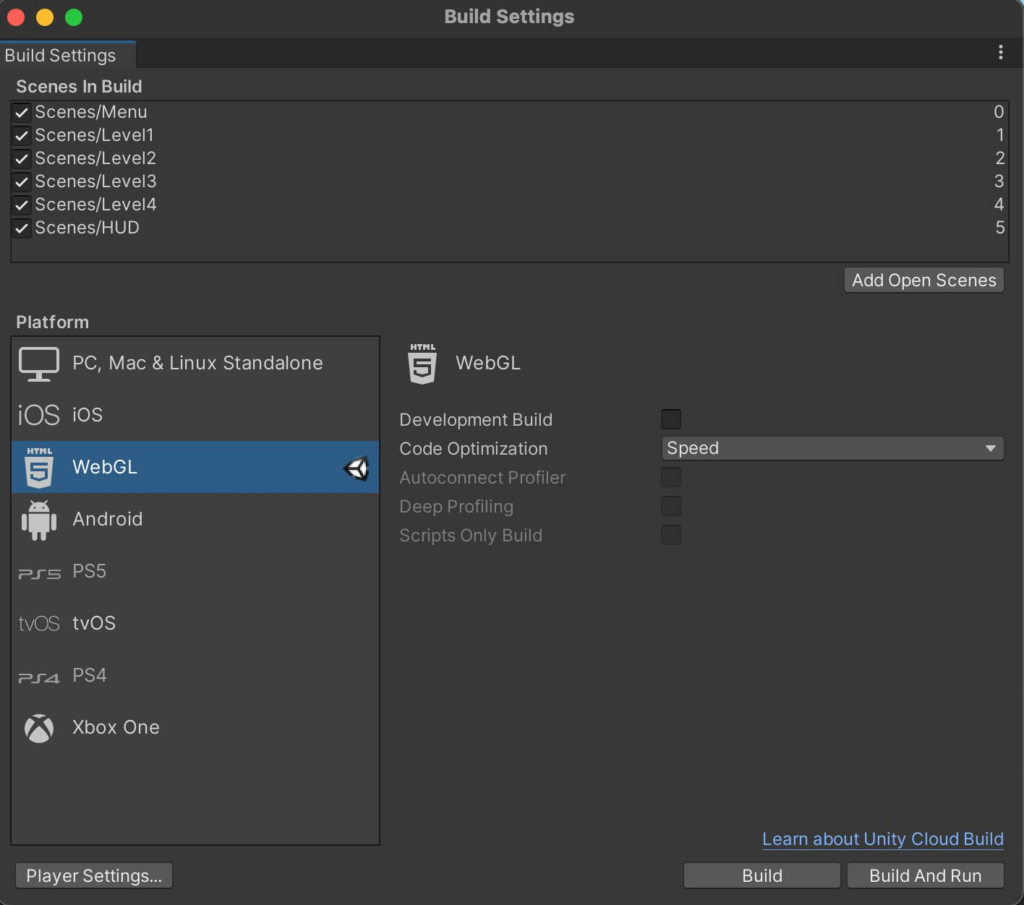
Build and Run
Switch to WebGL platform
Click the Player Setting button
Select Web3GL-2020 under Resolution and Presentation tab
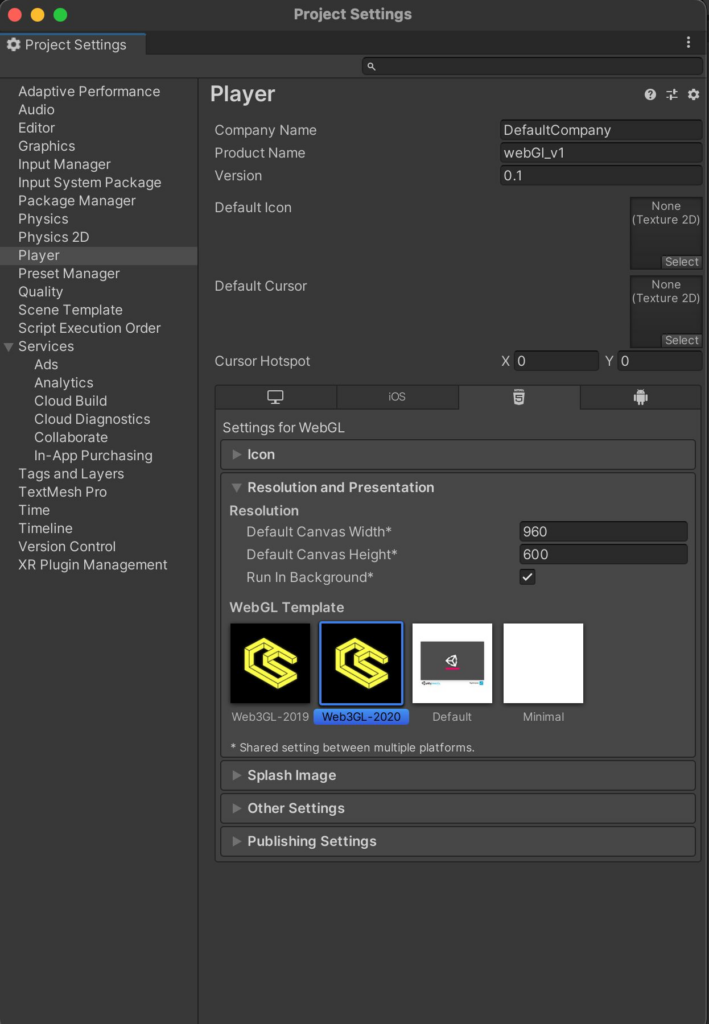
Set Compression Format to Disabled under Publishing Settings tab
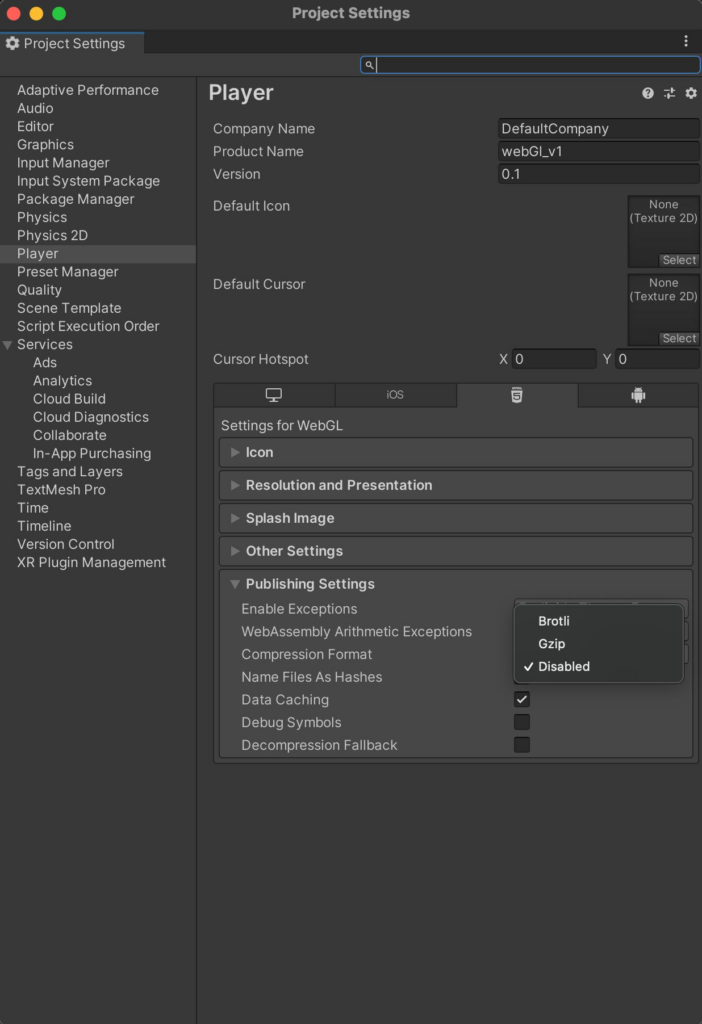
After that, click Build and Run button and you are ready to play.
What’s next
The above guideline documentation only highlights the basic integration between ChainSafe and Cronos chain. You can download the full source code of the above sample game here. For other ERC protocol methods, please refer to the ChainSafe Documentation.
Reference
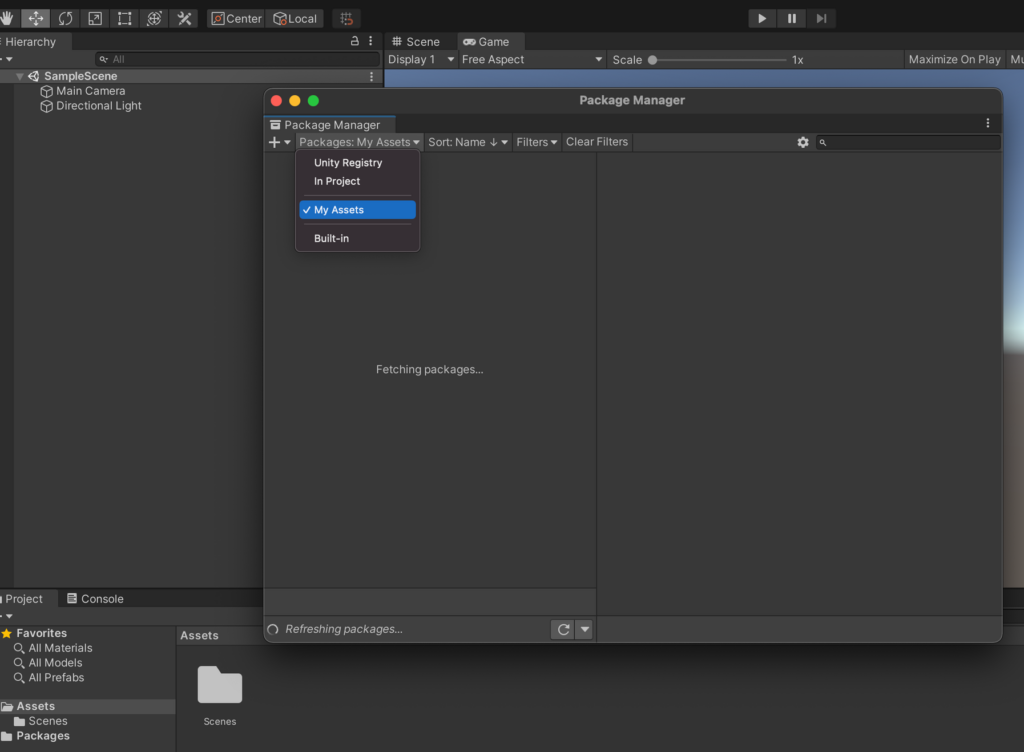
Import Sample package from Unity Asset Store
1a. Click to add the asset and sign in to your Unity account
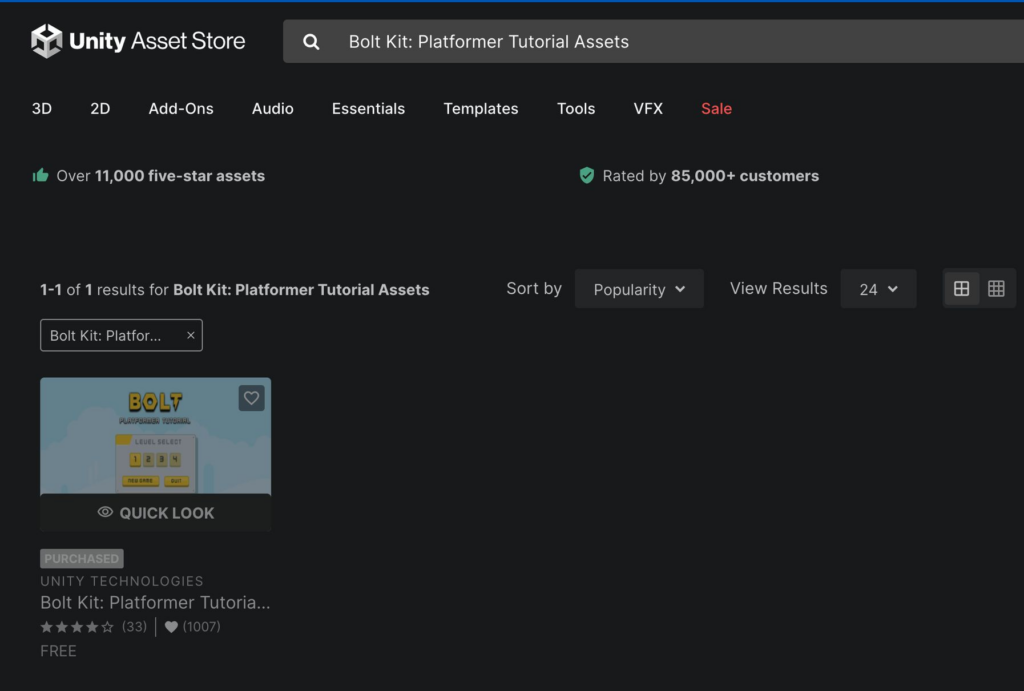
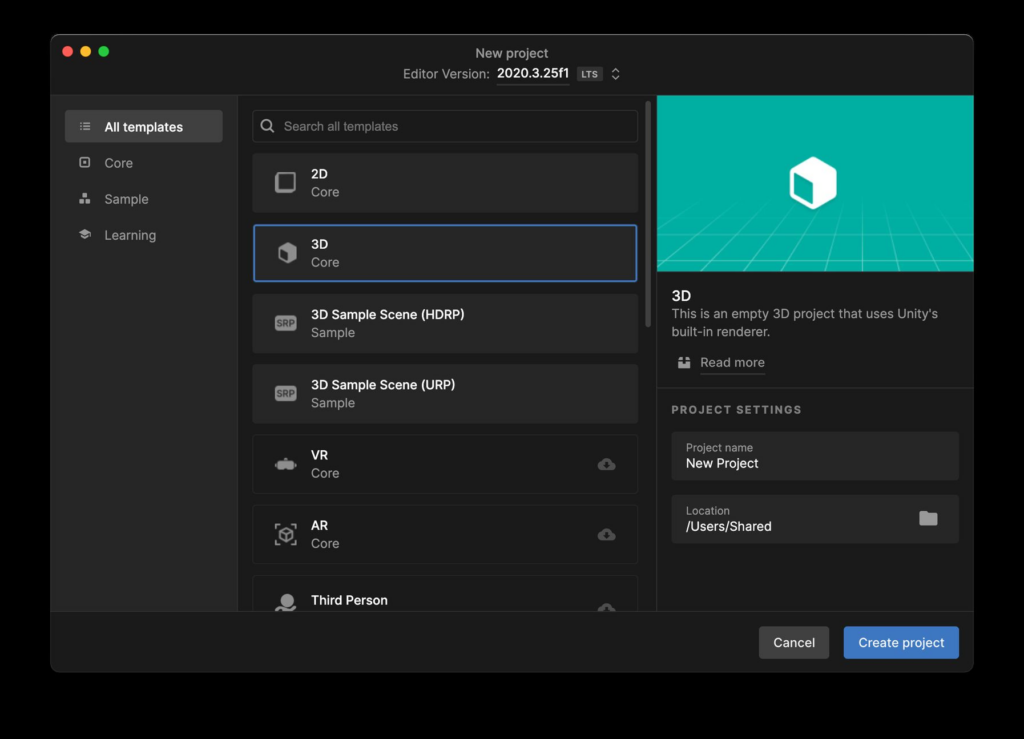
1b. Create a new project in Unity
1c. Open the Package Manager window in Unity and under “My Assets” download the Bolt Kit.

1d. Select Bolt Kit: Platformer Tutorial Assets and click Import
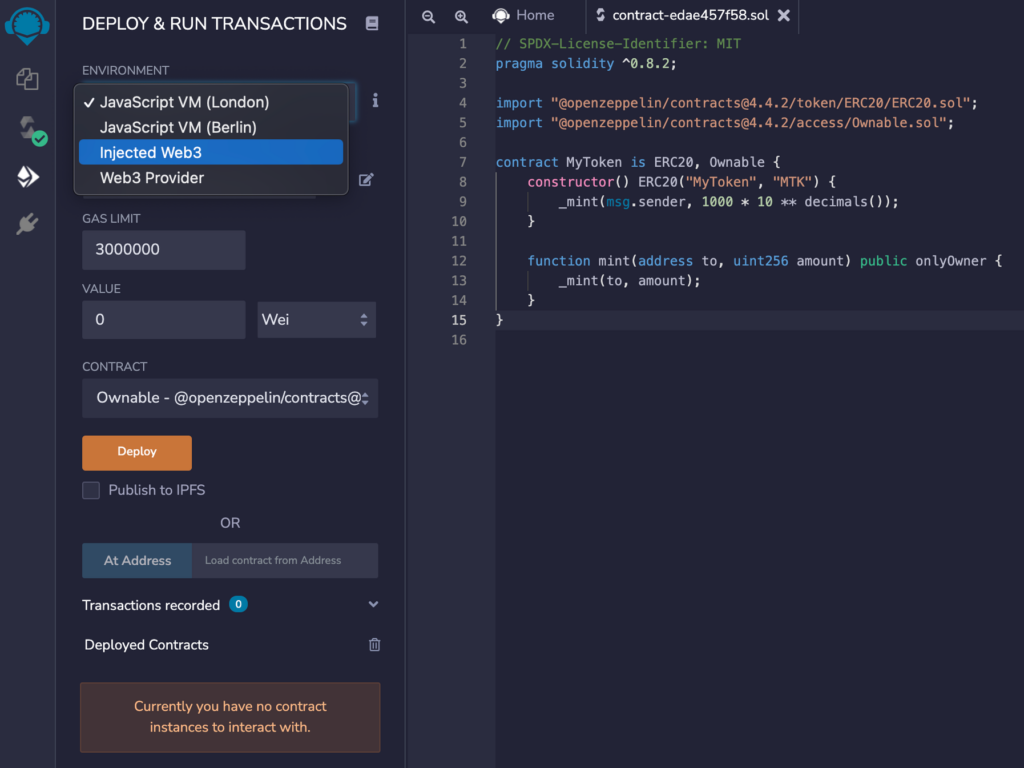
Smart contract
2a. Create an ERC standard smart contract
ERC20 example
// SPDX-License-Identifier: MIT
pragma solidity ^0.8.2;
import "@openzeppelin/contracts@4.4.2/token/ERC20/ERC20.sol";
import "@openzeppelin/contracts@4.4.2/access/Ownable.sol";
contract MyToken is ERC20, Ownable {
constructor() ERC20("MyToken", "MTK") {
_mint(msg.sender, 1000 * 10 ** decimals());
}
function mint(address to, uint256 amount) public onlyOwner {
_mint(to, amount);
}
-
ERC721 example
// SPDX-License-Identifier: MIT
pragma solidity ^0.8.2;

import "@openzeppelin/contracts@4.4.2/token/ERC721/ERC721.sol";
import "@openzeppelin/contracts@4.4.2/access/Ownable.sol";
import "@openzeppelin/contracts@4.4.2/utils/Counters.sol";

contract MyNFT is ERC721, Ownable {
    using Counters for Counters.Counter;

    Counters.Counter private _tokenIdCounter;

    constructor() ERC721("MyNFT", "MNFT") {}

    function _baseURI() internal pure override returns (string memory) {
        return "https://opensea-creatures-api.herokuapp.com/api/creature/";
    }

    function safeMint(address to) external onlyOwner {
        uint256 tokenId = _tokenIdCounter.current();
        _tokenIdCounter.increment();
        _safeMint(to, tokenId);
    }
}
-
ERC1155 example
// SPDX-License-Identifier: MIT
pragma solidity ^0.8.2;

import "@openzeppelin/contracts@4.4.2/token/ERC1155/ERC1155.sol";
import "@openzeppelin/contracts@4.4.2/access/Ownable.sol";

contract My1155Token is ERC1155, Ownable {
    constructor()
        ERC1155("https://opensea-creatures-api.herokuapp.com/api/creature/")
    {}

    function setURI(string memory newuri) public onlyOwner {
        _setURI(newuri);
    }

    function mint(address account, uint256 id, uint256 amount, bytes memory data)
        public
        onlyOwner
    {
        _mint(account, id, amount, data);
    }

    function mintBatch(address to, uint256[] memory ids, uint256[] memory amounts, bytes memory data)
        public
        onlyOwner
    {
        _mintBatch(to, ids, amounts, data);
    }
}
2b. Deploy Smart Contract via Remix IDE
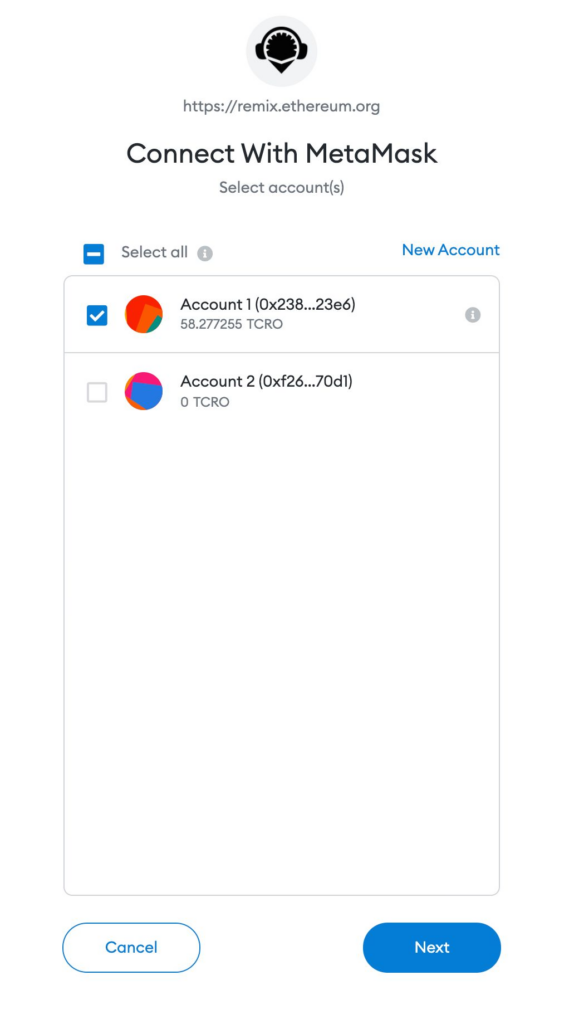
-  Switch the chain network to Cronos Testnet via Metamask extension or other similar provider
-  Select the `Injected Web3` under ENVIRONMENT tab
1- Approve the connection
1- Select your contract name under CONTRACT tab
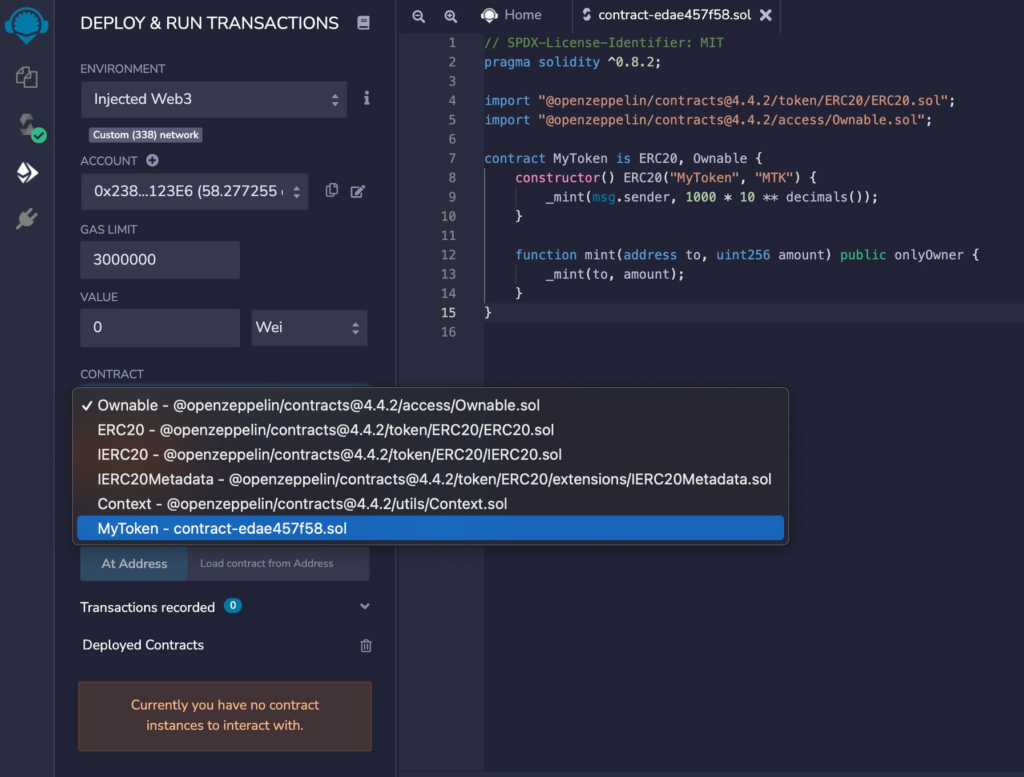
1- Approve the transaction after clicking `Deploy` button
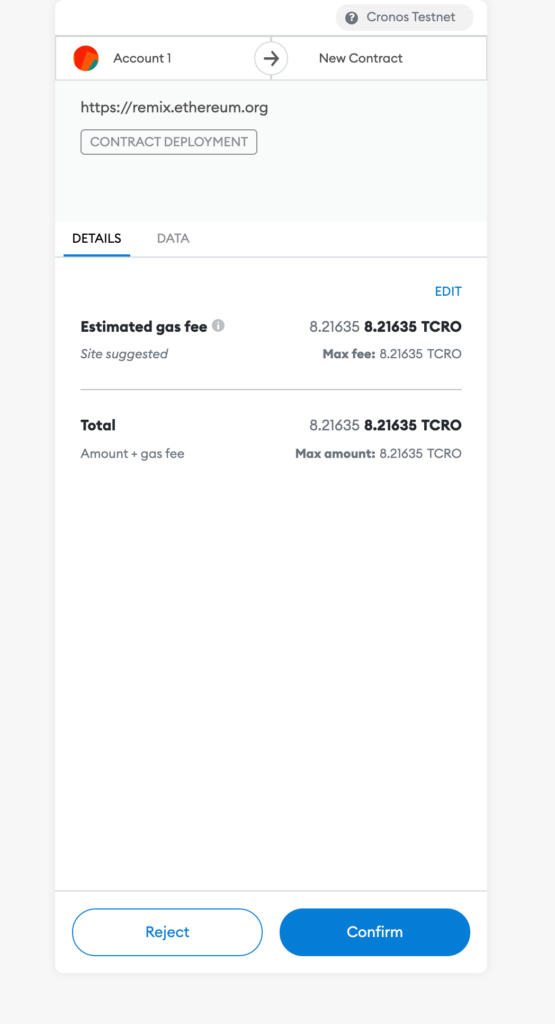
1- Copy the contract address
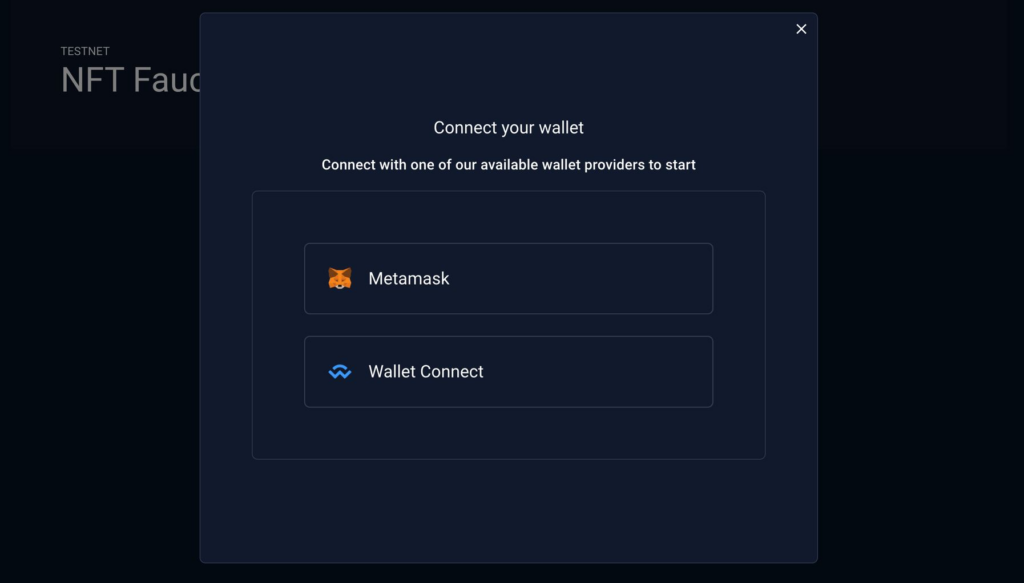
NFT Faucet
-
Connect your wallet via metamask or walletconnect
- Click
Create NFTunderYOUR COLLECTIONtab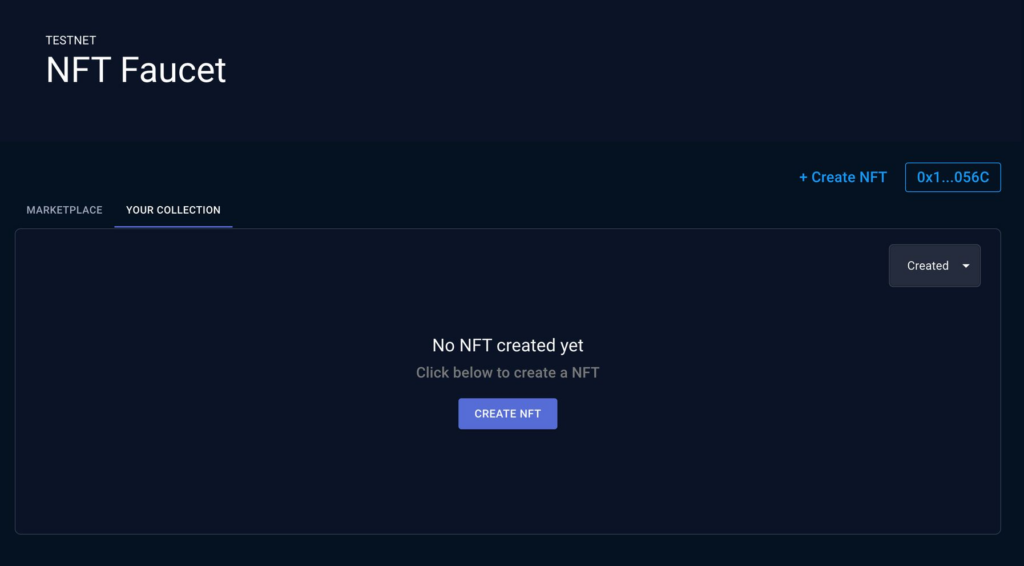
- Create and sign the transaction after uploading the image

- Copy the contract address and image URL from the NFT modal
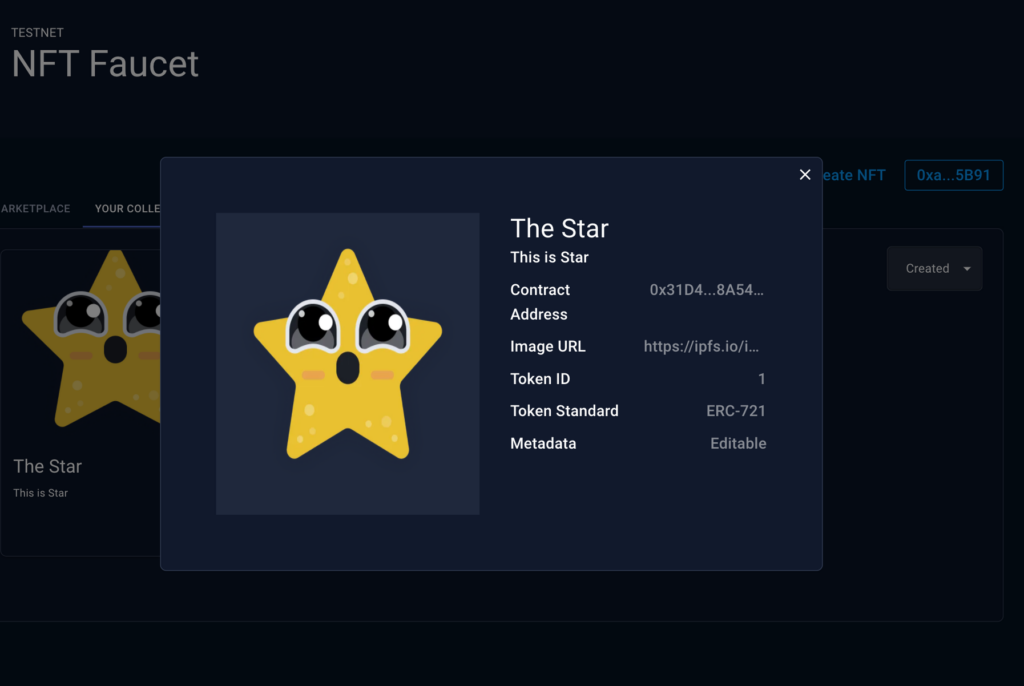
- Paste into the corresponding input box inside Unity inspector
- (Optional) List NFT for sale in marketplace faucet
-
Fill in the price at list item modal and confirm
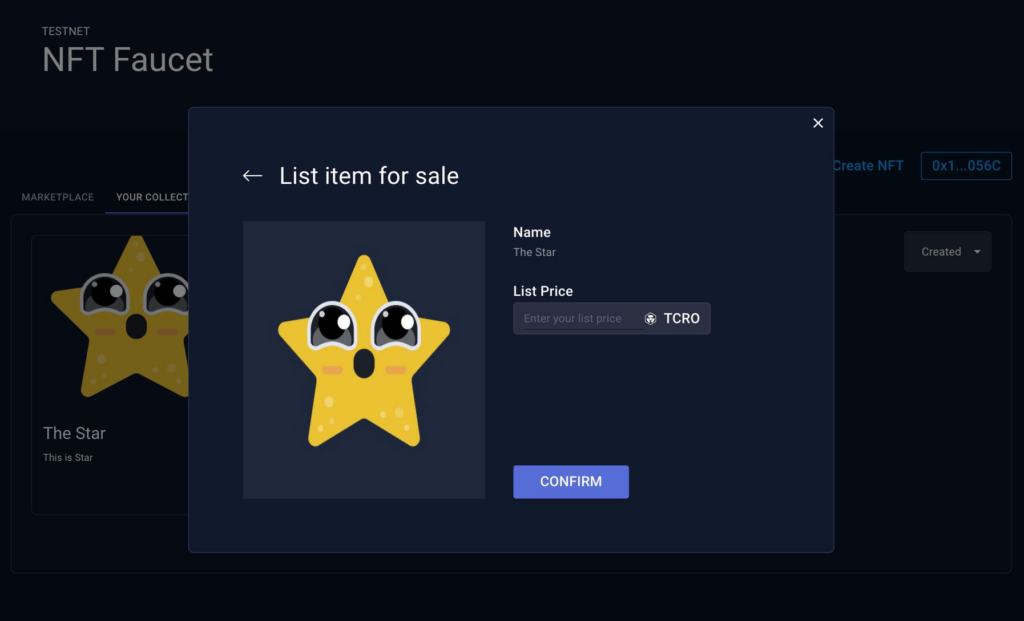
- Sign approval and create item transaction


- View the listed item in Marketplace tab