Intermediate
Nodes Management
The world of blockchain technology and decentralized applications (dApps) is constantly evolving, and it’s important to stay ahead of the curve. In this tutorial, we’ll explore how to manage a validator node in MultiversX, a leading platform for building decentralized applications. Whether you’re a seasoned developer or just starting out, this tutorial will guide you through the process of setting up and maintaining a validator node on the MultiversX network. We’ll cover topics such as installation, configuration, and ongoing maintenance to ensure your node runs smoothly and efficiently. By the end of this tutorial, you’ll have a solid understanding of how to manage a validator node in MultiversX, making you well-equipped to build and deploy dApps on this powerful platform.
Manage a validator node
Follow these steps to manage your validator node.
Let’s begin!
First, you need to create a MultiversX wallet. You can create this wallet on either the mainnet, devnet or testnet.
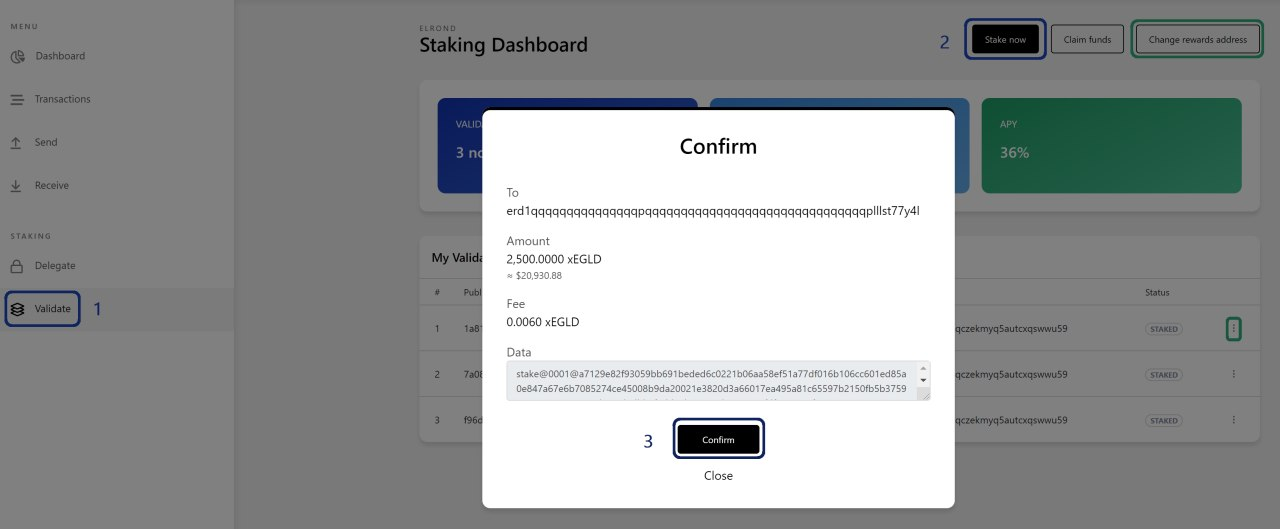
Once you have sufficient funds, you can use the wallet to send a stake transaction for your node, in order for it to become a Validator.
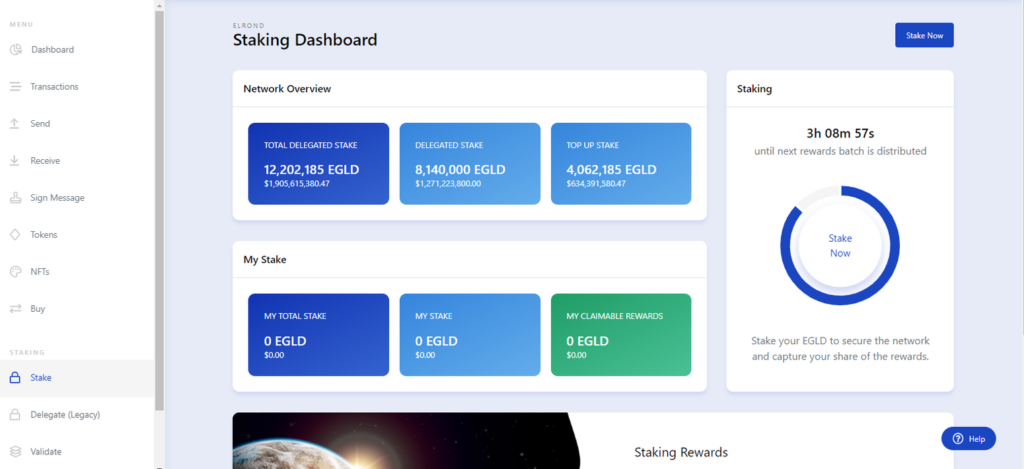
In the wallet, navigate to the “Stake” section and click on the “Stake now” button at the top right of the page.
Select the validatorKey.pem file you created for your node and proceed with the instructions displayed.
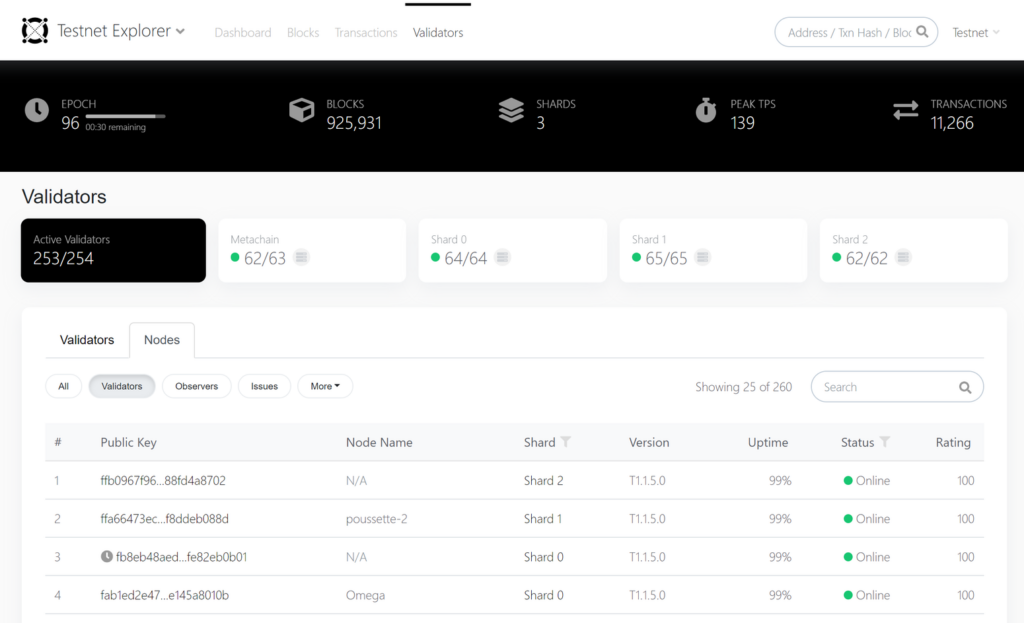
You can check the status of your Stake transaction and other information about the validator node in the explorer at mainnet explorer, devnet explorer or the testnet explorer. Make sure to check out the Validators section too.
NOTE : To distinguish between the mainnet and other networks (devnet and testnet), we have carefully created different addresses for the devnet tools, which are also presented in a predominantly black theme. Be cautious and know the difference, to avoid mistakes involving your mainnet validators and real EGLD tokens.
How to use the Docker Image
This will guide you through using the Docker image to run a MultiversX node.
Docker node images
As an alternative to the recommended installation flow, one could choose to run a MultiversX Node using the official Docker images: here
On the dockerhub there are Docker images for every chain (mainnet, devnet, and testnet).
Images name:
-
for mainnet: chain-mainnet
-
for devnet: chain-devnet
-
for testnet: chain-testnet
How to pull a Docker image from Dockerhub for a node?
IMAGE_NAME=chain-mainnet
IMAGE_TAG=[latest_release_tag]
docker pull multiversx/${IMAGE_NAME}:${IMAGE_TAG}
How to generate a BLS key ?
In order to generate a new BLS key one has to pull from dockerhub an image for the chain-keygenerator tool:
# pull image from dockerhub
docker pull multiversx/chain-keygenerator:latest

# create a folder for the bls key
BLS_KEY_FOLDER=~/bls-key
mkdir ${BLS_KEY_FOLDER}

# generate a new BLS key
docker run --rm --mount type=bind,source=${BLS_KEY_FOLDER},destination=/keys --workdir /keys multiversx/chain-keygenerator:latest
How to run a node with Docker ?
The following commands run a Node using the Docker image and map a container folder to a local one that holds the necessary configuration:
PATH_TO_BLS_KEY_FILE=/absolute/path/to/bls-key
IMAGE_NAME=chain-mainnet
IMAGE_TAG=[latest_release_tag]

docker run --mount type=bind,source=${PATH_TO_BLS_KEY_FILE}/,destination=/data multiversx/${IMAGE_NAME}:${IMAGE_TAG} \
 --validator-key-pem-file="/data/validatorKey.pem"
In the snippet above, make sure you adjust the path to a valid key file and also provide the appropriate command-line arguments to the Node. For more details refer to Node CLI.
allow_execheap flag to be enabled. In order to do this, run the command sudo setsebool allow_execheap=trueNode redundancy
MultiversX Validator Nodes can be configured to have one or more hot-standby nodes. This means additional nodes will run on different servers, in sync with the Main Validator node. Their role is to stand in for the Main Validator node in case it fails, to ensure high availability.
This is a redundancy mechanism that allows the Main Validator operator to start additional ‘n’ hot-standby nodes, each of them running the same ‘validatorKey.pem’ file. The difference between configurations consists of an option inside the prefs.toml file.
Hot standby nodes are configured using the ‘RedundancyLevel’ option in the ‘prefs.toml’ configuration file:
-
a 0 value will represent that the node is the Main Validator. The value 0 will be the default, therefore if the option is missing it will still make that node the Main Validator by default. With consideration to backward compatibility, the already-running Validators are not affected by the addition of this option. Moreover, we never overwrite the
prefs.tomlfiles during the node’s upgrade.
The values of RedundancyLevel are interpreted as follows:
-
a positive value will represent the “order of the hot-standby node” in the automatic fail-over sequence. Example: suppose we have 3 nodes running with the same BLS key. One has the redundancy level set to 0, another has 1, and another with 3. The node with level 0 will propose and sign blocks. The other 2 will sync data with the same shard as the Main Validator (and shuffle in and out of the same shards) but will not sign anything. If the Main Validator fails, the hot-standby node with level 1 will start producing/signing blocks after
level*5missed rounds. So, after 5 missed rounds by the Main Validator, the hot-standby node with level 1 will take the turn. If hot-standby node 1 is down as well, hot-standby node 2 will step in after3*5 = 15 roundsafter the Main Validator failed and 10 rounds after the failed hot-standby node 1 should have produced a block. -
a large value for this level option (say 1 million), or a negative value (say -1) will mean that the hot-standby nodes won’t get the chance to produce/sign blocks but will sync with the network and shuffle between shards just as the Main Validator will.
The random BLS key on hot-standby nodes has the following purposes:
-
the hot-standby node(s) will not cause BLS signature re-verification when idle.
-
it slightly prevents DDoS attacks as an attacker can not find all IPs behind a targeted BLS public key: when an attacker takes down the Main Validator, the hot-standby nodes will advertise the public key when they will need to sign blocks, but not sooner.
Node operation modes
Without configuration changes, nodes will start by using the default settings. However, there are several ways to configure the node, depending on the desired operation mode. Instead of manually (or programmatically via seds for example) editing the toml files, you can use the --operation-mode CLI flag described below to specify a custom operation mode that will result in config changes.
Starting with v1.4.x release, a new CLI flag has been introduced to the node. It is --operation-mode and its purpose is to override some configuration values that will allow the node to act differently, depending on the use-case.
List of available operation modes
Below you can find a list of operation modes that are supported:
Full archive
Usage:
./node --operation-mode full-archive
The full-archive operation mode will change the node’s configuration in order to make it able to sync from genesis and also be able to serve historical requests. Syncing a node from genesis might take some time since there aren’t that many full archive peers to sync from.
Db Lookup Extension
Usage:
./node --operation-mode db-lookup-extension
The db-lookup-extension operation mode will change the node’s configuration in order to support extended databases that are able to store more data that is to be used in further Rest API requests, such as logs, links between blocks and epoch, and so on.
For example, the proxy’s hyperblock endpoint relies on the fact that its observers have this setting enabled. Other examples are /network/esdt/supply/:tokenID or /transaction/:txhash?withResults=true.
Historical balances
Usage:
./node --operation-mode historical-balances
The historical-balances operation mode will change the node’s configuration in order to support historical balances queries. By setting this mode, the node won’t perform the usual trie pruning, resulting in more disk usage, but also in the ability to query the balance or the nonce of an address at blocks that were proposed a long time ago.
Lite observers
Usage:
./node --operation-mode lite-observer
The lite-observer operation mode will change the node’s configuration in order to make it efficient for real-time requests by disabling the trie snapshotting mechanism and making sure that older data is removed.
A use-case for such an observer would be serving live balance requests, or broadcasting transactions, eliminating the costly operations of the trie snapshotting.
Import DB
This will guide you through the process of starting a node in import-db mode, allowing the reprocessing of older transactions.
Introduction
The node is able to reprocess a previously produced database by providing the database and starting the node with the import-db-related flags explained in the section below.
Possible use cases for the import-db process:
-
index in ElasticSearch (or something similar) all the data from genesis to the present time;
-
validate the blockchain state;
-
make sure there aren’t backward compatibility issues with a new software version;
-
check the blockchain state at a specified time (this includes additional code changes, but for example, if you are interested in the result of an API endpoint at block 255255, you could use import db and force the node to stop at the block corresponding to that date).
How to start the process
Let’s suppose we have the following data structure:
~/mx-chain-go/cmd/node
the node binary is found in the above-mentioned path. Now, we have a previously constructed database (from an observer that synced with the chain from the genesis and never switched the shards). This database will be placed in a directory, let’s presume we will place it near the node’s binary, yielding a data structure as follows:
.
├── config
│    ├── api.toml
│    ├── config.toml
│    ...
├── import-db
│    └── db
│        └── 1
│            ├── Epoch_0
│            │     └── Shard_1
│            │         ├── BlockHeaders
│            │         │   ...
│            │         ├── BootstrapData
│            │         │   ...
│            │         ...
│            └── Static
│                  └── Shard_1
│                      ...
├── node
It is very important that the directory called db is a subdirectory (in our case of the import-db). Also, please check that the config directory matches the one of the node that produced the db data structure, including the prefs.toml file.
/mx-chain-go/cmd/node/db directory is empty so the import-db process will start from the genesis up until the last epoch provided.Next, the node can be started by using:
cd ~/mx-chain-go/cmd/node
./node -use-log-view -log-level *:INFO -import-db ./import-db
NOTE : Please note that the -import-db flag specifies the path to the directory containing the source db directory. The value provided in the example above assumes that the import db directory is called import-db and is located near the node executable file.
The node will start the reprocessing of the provided database. It will end with a message like:
import ended because data from epochs [x] or [y] does not exist
Import-DB with populating an Elasticsearch cluster
One of the use-cases for utilizing the import-db mechanism is to populate an Elasticsearch cluster with data that is re-processed with the help of this process.
![]() TIP : Import-DB for populating an Elasticsearch cluster should be used only for a full setup (a node in each Shard + a Metachain node)
TIP : Import-DB for populating an Elasticsearch cluster should be used only for a full setup (a node in each Shard + a Metachain node)
The preparation implies the update of the external.toml file for each node. More details can be found here.
If everything is configured correctly, nodes will push the re-processed data into the Elasticsearch cluster.
Node CLI
This will guide you through the CLI fields available for the node and other tools from the mx-chain-go repository.
Command Line Interface for the Node and the associated Tools
The Command Line Interface of the Node and its associated Tools is described at the following locations:
Examples
For example, the following command starts an Observer Node in Shard 0:
./node -rest-api-interface=localhost:8080 \
 -use-log-view -log-save -log-level=*:DEBUG -log-logger-name \
 -destination-shard-as-observer=0 -start-in-epoch\
 -validator-key-pem-file=observer0.pem
While the following starts a Node as a Metachain Observer:
./node -rest-api-interface=localhost:8080 \
 -use-log-view -log-save -log-level=*:DEBUG -log-logger-name \
 -destination-shard-as-observer=metachain -start-in-epoch\
 -validator-key-pem-file=observerMetachain.pem
Node Databases
Nodes use simple Key-Value type databases.
Nodes use Serial LevelDB databases to persist processed blocks, transactions, and so on.
The data can be removed or not, depending on the pruning flags that can be enabled or not in config.toml. The flags used to specify if a node should delete databases or not are ValidatorCleanOldEpochsData and ObserverCleanOldEpochsData. Older versions of the configuration only have one flag CleanOldEpochsData. If set to false, then old databases won’t be removed.
By default, validators only keep the last 4 epochs and delete older ones for freeing disk space.
The default databases directory is <node-working-directory>/db and it’s content should match the following structure:
/db
└── <chain id>
    ├── Epoch_X
    │  └── Shard_X
    │        ├── BlockHeaders
    │        │    ├── 000001.log
    │        │    ├── CURRENT
    │        │    ├── LOCK
    │        │    ├── LOG
    │        │    └── MANIFEST-000000
    │        ├── BootstrapData
    │        │    ├── 000001.log
    |     .............
    └── Static
        └── Shard_X
            ├── AccountsTrie
            │     └── MainDB
            │           ├── 000001.log
         .............
Nodes will fetch the state from an existing database if one is detected during the startup process. If it does not match the current network height, it will sync the rest of the data from the network, until fully synced.
Starting a node with existent databases
There are use cases when a node can receive the entire database from another node that is fully synced in order to speed up the process. In order to perform this, one has to copy the entire database directory to the new node. This is as simple as copying the db/ directory from one node to the other one.
The configuration files must be the same as the old node, except the BLS key which is independent of databases.
Two nodes in the same shard generate the same databases. These databases are interchangeable between them. However, starting a node as an observer and setting the --destination-shard-as-observer so it will join a pre-set shard, requires that its database is from the same shard. So starting an observer in shard 1 with a database of a shard 0 node will result in ignoring the database and network-only data fetch.
If the configuration and the database’s shard are the same, then the node should have the full state from the database and start to sync with the network only remaining items. If, for instance, a node starts with a database of 255 epochs, and the current epoch is 256, then it will only sync from a network the data from the missing epoch.

